
Our products are officially integrated with the Z-Wave JS integration for Home Assistant to give you the best experience. You can program your switches using central scene commands and the Events functionality in Home Assistant.
Scene control is a bonus feature on Zooz light switches that allows you to use them as smart remote controls. You can program each paddle for multi-tap triggers to turn on different connected devices in your home or even change the mode on your smart thermostat. This functionality is available only if your Z-Wave hub supports the central scene command class in the interface.
What Is Z-Wave Central Scene?
Z-Wave Central Scene is a command class used in Z-Wave devices that allows switches, dimmers, remotes, or other controllers to report different button press actions (like single tap, double tap, hold, release) to a central controller (like SmartThings, Hubitat, Home Assistant, etc.).
Unlike traditional Z-Wave scenes that require direct device-to-device associations, Central Scene commands are interpreted by the hub, allowing for flexible automations.
Scene Numbers and Paddle Mapping
In most Z-Wave switches that support Central Scene:
-
Each paddle or button is assigned a Scene Number.
-
Different press actions (like single tap, double tap, hold, etc.) are reported with different key attributes (not scene numbers).
For example, on our standard wall switches, the mapping below will apply. NOTE: Use of the ZAC99 in a multi-way installation is only supported on the ZEN71 On/Off Switch, ZEN72 Dimmer, ZEN32 Scene Controller, and ZEN35 Scene Dimmer. When using the ZEN71 On/Off Switch and ZEN72 Dimmer with the ZAC99, you have the option to enable scene control from the remote 3-way momentary switch via the advanced settings, and then you will also have Scene 003 available.
| Paddle/Button | Scene Number |
|---|---|
| Upper Paddle | 001 |
| Lower Paddle | 002 |
| ZAC99 (3-Way) | 003 |
So:
-
Tapping the upper paddle on a main switch = Scene 001
-
Tapping the lower paddle on a main switch = Scene 002
-
Pressing the ZAC99 momentary switch in a 3-way setup = Scene 003
When using the ZAC99 with the ZEN32 Scene Controller or the ZEN35 Scene Dimmer, you will have Scene 006 available, as the standard button mapping for those devices displays as shown below:
| Button | Scene Number | Description |
|---|---|---|
| Switch Button | 5 |
The large center button |
| Button 1 | 1 |
Small button, top left |
| Button 2 | 2 |
Small button, top right |
| Button 3 | 3 |
Small button, bottom left |
| Button 4 | 4 |
Small button, bottom right |
| ZAC99 (if used in 3-way) | 6 |
Reports separately when used |
This mapping allows the hub to distinguish where the command is coming from, even if it's physically wired to the same load.
Example: Zooz Switch + ZAC99 Momentary
Let’s say you have a ZEN71 or ZEN72 wired in a 3-way with the ZAC99 Momentary Switch. If you would like to use the ZAC99 for scene control purposes, you would first need to enable scene control from the remote 3-way switch via the advanced settings in the ZEN71/ZEN72.
Here’s how it works:
-
The main Zooz switch paddle:
-
Upper Paddle (Scene 001) – Can be programmed to send commands using central scene like:
-
Single tap: Turn on light
-
Double tap: Activate scene
-
Hold: Dim up
-
-
Lower Paddle (Scene 002) – Can send:
-
Single tap: Turn off light
-
Double tap: Deactivate scene
-
Hold: Dim down
-
-
-
The ZAC99 switch (Scene 003) wired as a remote 3-way control:
-
Sends Central Scene reports as Scene 003 with different key attributes for tap, hold, release, etc.
-
So in your automation platform, you can detect something like:
-
Scene 001, key attribute 3 (double tap) → Turn on Movie Mode
-
Scene 002, key attribute 2 (hold) → Dim lights down
-
Scene 003, key attribute 1 (single tap) → Toggle lights from the ZAC99 location
What Switches Support Central Scene?
The instructions below can be used for the following light switch models.
NOTE: Please remember that use of the ZAC99 Momentary Switch is only supported with the ZEN71, ZEN72, ZEN32, and ZEN35 models:
- ZEN30 Double Switch
- ZEN32 Scene Controller
- ZEN35 Scene Dimmer
- ZEN71 On | Off Switch
- ZEN72 Dimmer
- ZEN73 Toggle Switch
- ZEN74 Toggle Dimmer
- ZEN75 Heavy Duty Switch
- ZEN76 S2 On | Off Switch
- ZEN77 S2 Dimmer
Important Notes
Before you start programming your switch, please note:
- You always need a Z-Wave hub that supports this functionality to program scene control on your smart switches. Please check if your system has button control built into its interface for our devices first.
- You can only trigger devices which are controllable from your hub's interface. This type of communication between the devices requires that your hub is active and operational.
- The paddle on your switch will now be treated like a button on a remote control that's pressed or held - it will send only this information to the hub and should not be treated as an additional on/off device with its own status.
- After you add the switch to the hub, you need to go to the advanced settings to enable scene control on your device (it's disabled by default). If you don't change the setting first, your programming won't work. If you're not sure how to access the settings for your switch, simply search for your model number and the word "settings" in our Support Portal to get detailed instructions for your hub.
Central Scene Programming Instructions for Home Assistant
First, make sure that you have enabled scene control on your Zooz switch (it's disabled by default on the standard wall switches). Just go to the advanced settings for the device and toggle the scene control parameter to on so that the device starts sending central scene events to your hub.
JS Events Programming
Create a new automation in Home Assistant to program the trigger and action. Always use "Event" as the Trigger Type and “zwave_js_value_notification” as the Event Type (learn more about JS events here) followed by:
node_id: X [where X is the node ID of your Zooz switch, which can be found under Configuration > Devices > Zooz Switch]
label: Scene 001 [use 001 for top paddle and 002 for bottom paddle]
value: KeyPressed [KeyPressed = 1 x tap, KeyReleased = released, KeyHeldDown = held, KeyPressed2x = 2 x tap, KeyPressed3x = 3 x tap, KeyPressed4x = 4 x tap, KeyPressed5x = 5 x tap]
Next, proceed with the action you'd like to trigger with your Zooz switch or dimmer and save your new automation.
Automation from Device Programming
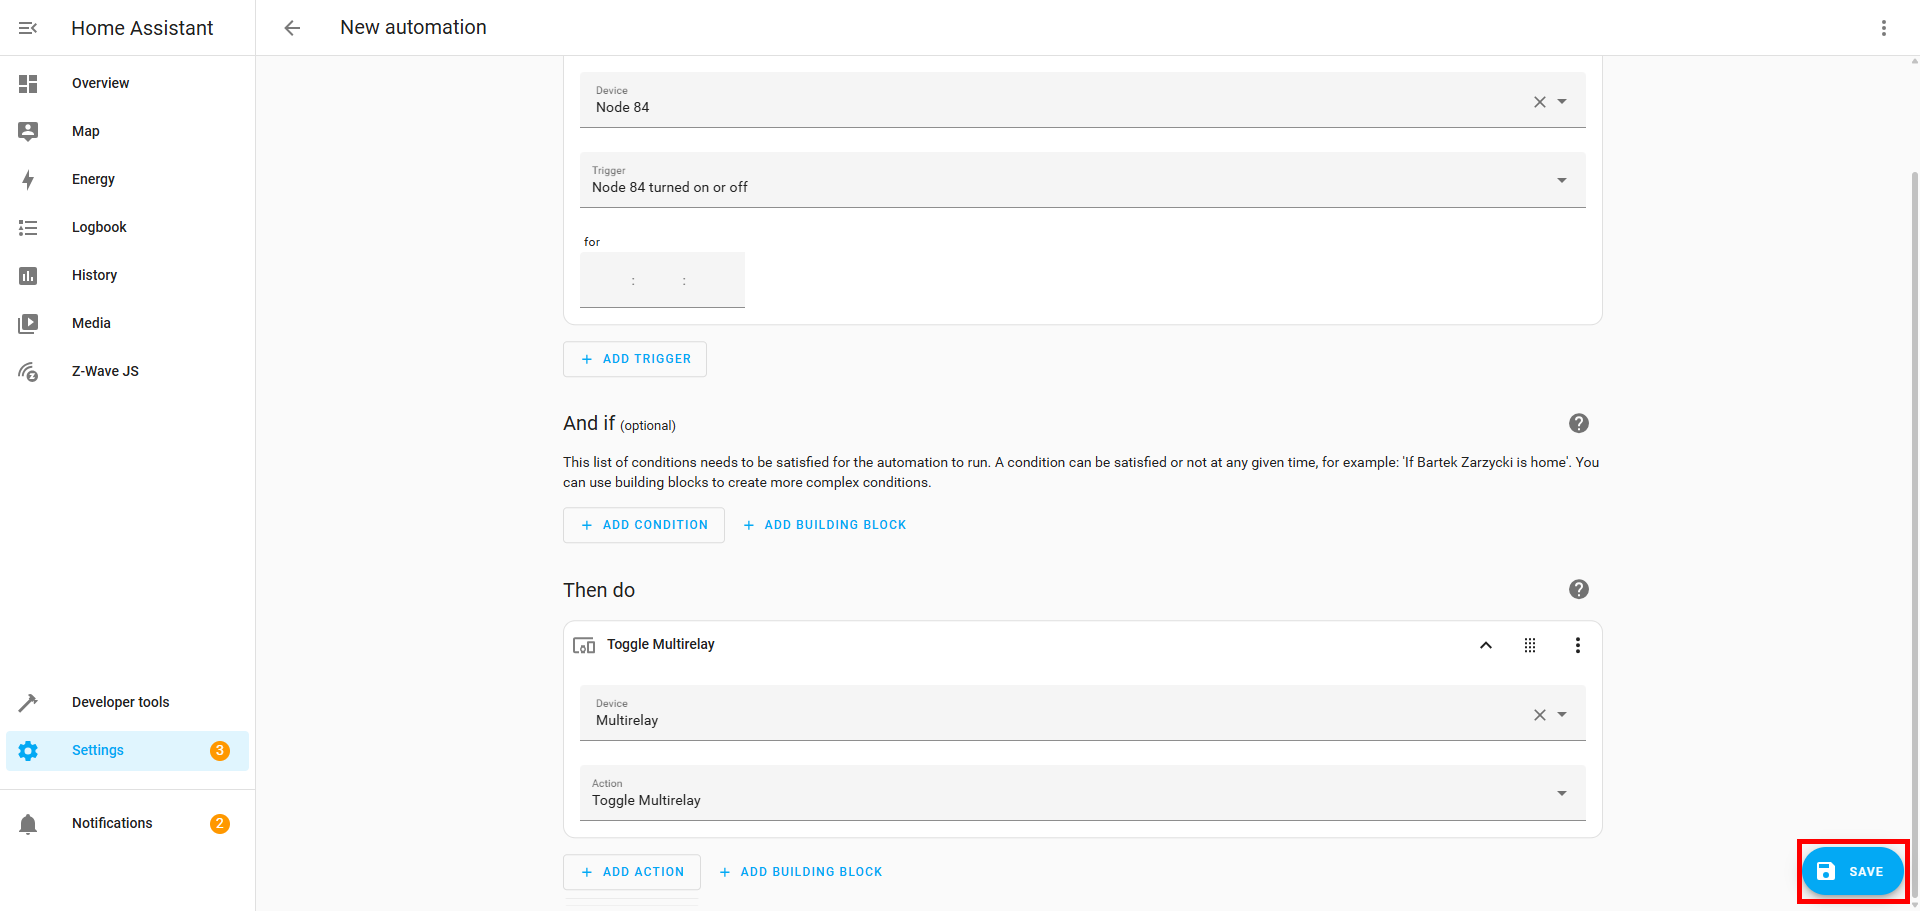
We're using the ZEN35 Scene Dimmer as an example, but the flow is the same for all central scene programming.
1. From the Device Info screen, select the + in Automations:

2. A box will pop up. Select use device as trigger:

3. Select your trigger option (see paddle mapping in the section above for your device).

4. Select any conditions, then select the action part of the scene by clicking + Add Action:

5. A pop up will display; select the action/then portion of the scene whether it's a device, light, etc.:

6. Choose the device for the action part of the scene:

7. Choose what you want the device to do. In this example, the button press on button 1 will toggle the state of the Multirelay:

8. Click Save.
Let us know if you run into any issues when programming your switches on Home Assistant, we'll be happy to help.

