
Choosing the right smart switch can feel overwhelming, especially once you start comparing dimmers, relays, smart bulb compatibility, multi-way wiring, load types, and all the different installation methods available. If you have ever opened a wall box and immediately found yourself searching terms like “single pole vs 3-way” or “what is line and load,” you are definitely not alone.
We'll be walking you through the entire Zooz switch lineup in a way that is easy to follow, whether you are brand new to smart home devices or planning a more advanced installation. Instead of throwing product specs at you and expecting you to figure it out on your own, we're going to break everything down step by step using a simple decision making process that covers:
-
The difference between on/off switches and dimmers
-
Single pole vs multi-way wiring
-
Classic, Virtual, and Momentary multi-way installations
-
Standard lighting loads vs high power loads
-
Smart bulb compatibility
-
Special applications like RGBW LED strips and 0 to 10V lighting
-
Which Zooz model works best for each setup
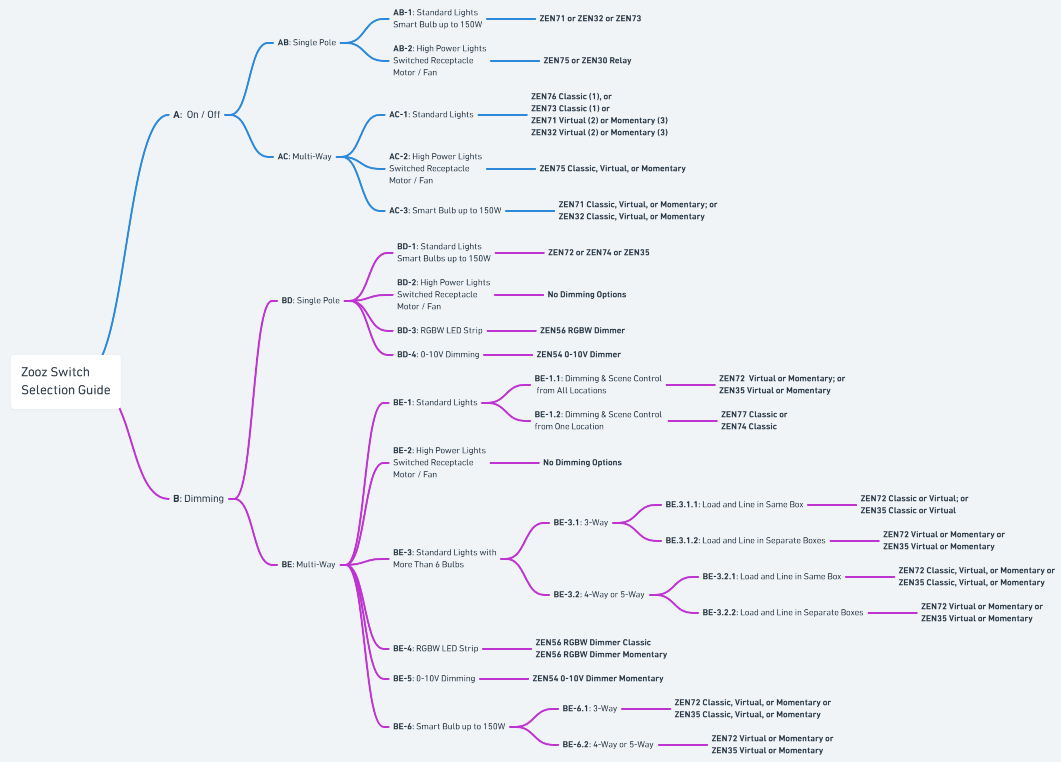
At the center of this guide is the Zooz Switch Selection Flow Chart. You can start at the left, answer a few simple questions about your setup, and follow the path directly to the recommended switch options for your project.
If you already know exactly what type of circuit you have, you can jump directly to that section of the article. If not, don't worry; we'll explain the terminology and installation types before getting into the recommendations so the process stays approachable and beginner friendly.
By the end of this guide, you should be able to confidently choose the right Zooz switch for your lighting, fan, receptacle, smart bulb, or multi-way setup without second guessing your decision.
Zooz Switch Selection Guide
The Zooz Switch Selection Guide is designed to help you narrow down the correct switch by following a simple series of decisions about your setup. Instead of comparing every model at once, you can start with the type of control you need and follow the branches that match your wiring and load type.
The chart is divided into two main branches:
-
Section A: On / Off
-
Section B: Dimming
From there, each path continues into more specific categories like single pole vs multi-way, standard lighting vs high power loads, smart bulbs, wiring layout, and installation type. Each decision point in the chart includes a label that corresponds directly to a section in this guide. For example:
-
AB refers to the On / Off > Single Pole branch
-
AC refers to the On / Off > Multi-way branch
-
BD refers to the Dimming > Single pole branch
-
BE refers to the Dimming > Multi-way
These labels make it easy to jump directly from the flow chart to the matching explanation and product recommendations in the article below. The sections in this guide follow the exact same left to right and top to bottom structure as the flow chart, so you can simply follow your path and continue reading the matching section as you go.
A vs B: On/Off vs. Dimming
The very first decision in the flow chart is whether you need simple on/off control or dimming control. This choice determines which family of Zooz switches you should be looking at from the start.
A. An on/off switch simply turns the connected device fully on or fully off. These switches are ideal for standard lighting control where dimming is not needed.
B. Dimmers, on the other hand, allow you to adjust brightness levels in addition to turning the lights on and off. Dimmers are best for creating adjustable lighting levels.
However, not every load can be dimmed safely. Certain devices like motors, fans, switched receptacles, smart bulbs, fluorescent fixtures with ballast, and some high power loads should always use relay style on/off switches instead of dimmers.
If you’re unsure which path to choose, a simple rule of thumb is:
-
If you only want full brightness or full off, choose On / Off
-
If you want adjustable brightness levels, choose Dimming
Once you’ve decided between On / Off and Dimming, you can continue following the matching branch in the flow chart.
A: On / Off
An on/off switch simply turns the connected device fully on or fully off. These switches are ideal for standard lighting control where dimming is not needed
AB: On/Off > Single Pole
A single pole setup means one switch controls the lights from one location. This is the most common and simplest type of switch wiring. For example, a bathroom light with a single switch by the door is usually a single pole circuit.
This is the simplest wiring configuration and is typically found in standard rooms where multi location control is not needed. The recommendations in this section focus on matching the switch type to the load, whether that is standard lighting, higher power devices, or specialized lighting systems.
AB1: On/ Off > Single Pole > Standard Lights or Smart Bulbs up to 150W
If you followed the flow chart to AB1, you’re looking for a single pole on/off switch for a standard lighting circuit or smart bulb setup. Standard lighting loads are the most common residential lighting applications and include:
-
LED bulbs under 150W
-
Incandescent bulbs under 600W or 960W, depending on switch model
-
Smart bulbs under 150W
This is the most common type of smart switch installation and includes things like ceiling lights, recessed lighting, hallway lights, and similar residential fixtures.
The ZEN71 On / Off Switch: standard paddle style on/off switch and will be the best fit for most users. It offers reliable Z-Wave control, scene functionality, and support for both standard lighting and smart bulb setups.
The ZEN32 Scene Controller: ideal if you want additional scene control from the wall. In addition to controlling the connected light, it includes programmable buttons that can trigger automations, routines, or other smart devices through your hub.
The ZEN73 Toggle Switch: functions similarly to the ZEN71 but uses a traditional toggle style instead of a paddle, making it a good option for homes where you want to preserve a classic switch appearance.
All three models support Smart Bulb Mode for compatible smart bulb installations up to 150W total. This allows the bulbs to stay powered at all times while still giving you wall switch control and scene functionality.
If your setup includes more than one switch controlling the same light, continue to the AC section for multi-way on/off configurations.
Note: You can still use any Zooz switch model in a single pole installation; however, these models are recommended for single pole standard lighting installations.
AB2: On/Off > Single Pole > High Power Lights, Switched Receptacles, Motor / Fan
If you followed the flow chart to AB2, you’re working with a high power or non-lighting load that should use a specialized heavy duty relay style on/off switch instead of a dimmer.
This includes applications like:
-
Switched receptacles
-
Exhaust fans and bathroom fans
-
Motors
-
Fluorescent lighting with ballast
-
Larger lighting loads that exceed standard switch limits (LED over 150W or incandescent over 960W)
ZEN75 Heavy Duty Switch: The ZEN75 is the primary recommendation for most high power applications. It’s designed specifically for heavier loads and provides reliable on/off control for devices that should not be dimmed. This is our top recommendation for all of the above installations as it is simple to install, matches the standard decora paddle switches, and is designed to handle the higher loads.
ZEN30 Double Switch (relay portion ONLY): The ZEN30 is a unique option that combines a relay switch with a separate dimmer paddle above it. This makes it a great fit when you want to control a fan or other high power load while also using the paddle for scene control or smart lighting automation.
Since these loads require full stable power, dimmers cannot be used in any of these setups. We are frequently asked about options for receptacles; please note that the NEC requires a 15A rated switch/relay to control a 15A receptacle. Only these two models have that required rating.
AC: On/Off > Multi-Way
If you followed the flow chart to the AC branch, you’re looking for a multi-way on/off setup where two or more switches control the same light or load.
This branch is divided into three categories:
-
AC1 covers standard lighting (LED under 150W, incandescent under 600 or 960W, model dependent)
-
AC2 covers high power loads like fans, motors, receptacles, and heavier lighting applications
-
AC3 covers smart bulb installations
The recommendations in this section vary depending on both the load type and the multi-way installation method you want to use, including Classic, Virtual, or Momentary setups.
AC1: On/Off > Multi-Way > Standard Lights
AC1 covers standard residential lighting in a multi-way setup. This includes common lighting applications like ceiling fixtures, recessed lights, pendants, and similar household lighting loads. These load should be LED bulbs under 150W, incandescent bulbs under 600 or 960W, model dependent)
ZEN76 On / Off Switch Classic or ZEN73 Toggle Switch Classic: A Classic installation is the most traditional and straightforward multi-way setup. In this configuration, you install one Zooz switch in the main box while keeping the existing dumb switch or switches in the remaining locations. The Zooz switch communicates with the other switches through the traveler wiring already present in the wall. For example, in a 3-way setup, you’d have one Zooz switch and one existing dumb switch, and in a 4-way setup, you’d have one Zooz switch and two existing dumb switches.
-
Pros: Simple installation without needing to rewire the second switch box; inexpensive, as you keep the standard on/off switch in the secondary location
-
Cons: Scene control only from the Zooz switch; the Zooz switch must be installed in the box with direct connection to power line.
-
Below we've included the multi-way wiring diagrams for the recommended switches:
ZEN71 On / Off Switch Virtual or ZEN32 Scene Controller Virtual: A Virtual installation uses Zooz smart switches in multiple wall boxes instead of keeping dumb switches in the secondary locations. Rather than communicating through traditional traveler wiring, the smart switches communicate using Z-Wave associations, central scene commands, or automation rules through your hub.
-
Pros: Scene control from all locations in the installation; matching switches; ability to have Zooz switches in any location, regardless of location of direct connection to power line
-
Cons: More expensive, as it requires multiple Zooz switches per installation
-
Virtual Wiring Diagrams: How To Use Multiple Zooz Switches In 3-Way and 4-Way Set-Ups
-
Virtual Programming Instructions: How to Program 2 Zooz Switches in a Virtual 3-Way with Regular Bulbs; or How to Program 3 Zooz Switches in a Virtual 4-Way with Regular Bulbs
-
ZEN71 On / Off Switch Momentary or ZEN32 Scene Controller Momentary: A Momentary installation uses one Zooz switch to control the load while the remaining locations use ZAC99 Momentary Switches instead of traditional dumb switches. The ZAC99 is a wired momentary accessory switch designed specifically for compatible Zooz multi-way setups. Pressing the switch sends a signal to the main Zooz device rather than directly controlling the load itself.
-
Pros: Simple installation; scene control from both locations
-
Cons: ZAC99 behavior is not intuitive; ZAC99 is SPST, so it id not a return to center switch like our standard wall switches (only the top portion of the paddle is used)
Overall, for users who want the simplest upgrade path, the ZEN76 and ZEN73 work well in Classic multi-way installations using existing dumb switches in the secondary locations. The main difference between the two is style: the ZEN76 uses a paddle design while the ZEN73 uses a traditional toggle style.
If you want additional smart functionality at multiple switch locations, Virtual and Momentary setups are the better fit. The ZEN71 is the standard choice for these installations, while the ZEN32 adds programmable scene buttons for extra automation and smart home control.
The best option comes down to how much control and customization you want throughout the multi-way circuit.
AC2: On/Off > Multi-Way > High Power Lights, Switched Receptacles, Motor / Fan
AC2 covers multi-way setups with high power or non lighting loads that require a relay style switch instead of a dimmer. This includes applications like exhaust fans, bathroom fans, switched receptacles, fluorescent fixtures with ballast, and other motor based loads.
ZEN75 Heavy Duty Switch Classic: This is the most traditional and straightforward multi-way setup. In this configuration, you install one Zooz switch in the main box while keeping the existing dumb switch or switches in the remaining locations. The Zooz switch communicates with the other switches through the traveler wiring already present in the wall. For example, in a 3-way setup, you’d have one ZEN75 switch and one existing dumb switch, and in a 4-way setup, you’d have one ZEN75 switch and two existing dumb switches.
-
Pros: Simple installation; least expensive option
-
Cons: Scene control only from the ZEN75
Below, we've provided links to the standard multi-way wiring options for the ZEN75:
ZEN75 Heavy Duty Switch Virtual: This installation uses at least one ZEN75 along with other Zooz switches (ZEN71, ZEN32, or ZEN75) in the remaining wall boxes instead of keeping dumb switches in the secondary locations. Rather than communicating through traditional traveler wiring, the smart switches communicate using Z-Wave association, central scene commands, or automation rules through your hub.
-
Pros: Scene control from all locations, matching switch style and operation
-
Cons: More expensive; communication can be hub dependent, based on which programming method is selected
Below, we've included the specific Virtual Wiring Diagrams and programming instructions; DO NOT wire a multiple Zooz switches together in a standard multi-way installation. Only the virtual diagram should be followed.
-
Virtual Wiring Diagrams: How To Use Multiple Zooz Switches In 3-Way and 4-Way Set-Ups
-
Virtual Programming Instructions: How to Program 2 Zooz Switches in a Virtual 3-Way with Regular Bulbs; or How to Program 3 Zooz Switches in a Virtual 4-Way with Regular Bulbs
ZEN75 Heavy Duty Switch Momentary: This installation uses one ZEN75 switch to control the load while the remaining locations use ZAC99 Momentary Switches instead of traditional dumb switches. The ZAC99 is a wired momentary accessory switch designed specifically for compatible Zooz multi-way setups. Pressing the switch sends a signal to the main Zooz device rather than directly controlling the load itself.
-
Pros: Simple installation; inexpensive
-
Cons: ZAC99 behavior is not intuitive; ZAC99 is SPST, so it is not a return to center switch like our standard wall switches (only the top portion of the paddle is used)
The ZEN75 is designed specifically for these heavier applications and supports Classic, Virtual, and Momentary multi-way installations depending on your preferred setup style.
Since these loads require stable full power, dimmers can never be used in this category. A relay switch like the ZEN75 provides the safest and most reliable solution.
AC3: On/Off > Multi-Way > Smart Bulbs up to 150W
AC3 is designed for multi-way smart bulb setups where the bulbs should remain powered at all times while still allowing wall switch control and scene functionality. Note: The ZEN73, ZEN74, ZEN76, and ZEN77 cannot be used in a 3-way with smart bulbs.
ZEN71 On / Off Switch Virtual or ZEN32 Scene Controller Virtual: This installation uses Zooz smart switches in multiple wall boxes instead of keeping dumb switches in the secondary locations. Rather than communicating through traditional traveler wiring, the smart switches communicate using Z-Wave associations, central scene commands, or automation rules through your hub.
-
Pros: Scene control from all locations in the installation; matching switches; ability to have Zooz switches in any location, regardless of location of direct connection to power line
-
Cons: More expensive, as it requires multiple Zooz switches per installation
-
Virtual Wiring Diagrams: How To Use Multiple Zooz Switches In 3-Way and 4-Way Set-Ups
-
Virtual Programming Instructions: How to Program 2 Zooz Switches in a Virtual 3-Way with Smart Bulbs; or How to Program 3 Zooz Switches in a Virtual 4-Way with Smart Bulbs
-
ZEN71 On / Off Switch Classic or ZEN32 Scene Controller Classic: This is the most traditional and straightforward multi-way setup. In this configuration, you install one Zooz switch in the main box while keeping the existing dumb switch or switches in the remaining locations. The Zooz switch communicates with the other switches through the traveler wiring already present in the wall. For example, in a 3-way setup, you’d have one Zooz switch and one existing dumb switch, and in a 4-way setup, you’d have one Zooz switch and two existing dumb switches.
-
Pros: Easy install, least expensive,
-
Cons: you will be limited in the way you can program your switches in this set-up as well, since the only way to link your switches to smart bulbs when there’s a mechanical switch in the mix is by creating simple If… Then… rules that will rely on status reports from both the switch and the bulbs to keep them all in sync
Below, we've included the wiring instructions for these models in a 3-way installation:
- 3-Way Diagrams for ZEN71, ZEN72, ZEN32, and ZEN35 Switches
- 4-Way Diagram for ZEN71, ZEN72, ZEN32, and ZEN35 Switches
- 5-Way Diagram for ZEN71, ZEN72, ZEN32, and ZEN35 Switches
ZEN71 On / Off Switch Momentary or ZEN32 Scene Controller Momentary: This installation uses one Zooz switch to control the load while the remaining locations use ZAC99 Momentary Switches instead of traditional dumb switches. The ZAC99 is a wired momentary accessory switch designed specifically for compatible Zooz multi-way setups. Pressing the switch sends a signal to the main Zooz device rather than directly controlling the load itself.
-
Pros: Simple installation; inexpensive
-
Cons: ZAC99 behavior is not intuitive; ZAC99 is SPST, so it is not a return to center switch like our standard wall switches (only the top portion of the paddle is used)
Both of these switch models support Smart Bulb Mode, which disables physical power control at the switch while all owing the switch itself to trigger smart bulb commands, automations, and scenes through your hub. While these setups can be configured using Classic, Virtual, or Momentary installations, we always highly recommend the virtual installation here for the easiest control of your smart bulbs. The ZEN71 is the standard choice for most smart bulb installations, while the ZEN32 is ideal if you want additional scene buttons for controlling other smart devices or automations from the wall.
For even more details and specifics on using Zooz switches with smart bulbs, check out our article here: How To Use Your Zooz Light Switches With Smart Bulbs
B: Dimming
Dimmers do more than just turn lights on and off. They let you adjust brightness levels to match the space, whether you want full brightness for tasks or softer lighting for comfort and ambiance.
Before choosing a dimmer, it is important to make sure your bulbs or fixtures are actually dimmable. Many LED bulbs look identical to non dimmable versions, but only dimmable models are designed to work properly with smart dimmers and adjustable brightness control.
BD: Dimming > Single Pole
If you followed the flow chart to the BD branch, you are looking at a single pole setup focused on choosing the right device based on load type when only one switch controls the circuit.
This branch is divided into four categories:
-
BD1 covers standard lighting and smart bulbs up to 150W
-
BD2 covers high power loads like fans, motors, and switched receptacles where dimming is not supported
-
BD3 covers RGBW LED strip lighting that requires dedicated color control
-
BD4 covers 0 to 10V dimming systems commonly used in commercial or high efficiency lighting
The recommendations in this section are based on ensuring the control method matches the electrical requirements of the load, since not all devices are compatible with dimming or smart control in the same way.
BD1: Dimming > Single Pole > Standard Lights or Smart Bulbs up to 150W
This category covers your everyday lighting like standard LED bulbs or smart bulbs up to 150W, or incandescent-style fixtures up to 600W. If you are replacing a basic wall switch and want smooth control over typical home lighting, this is the most common starting point.
The ZEN72 Dimmer is a great decora paddle option for straightforward on and off control with modern smart features.
The ZEN74 Toggle Dimmer has the same functionailty as the ZEN72 but uses a traditional toggle style instead of a paddle, making it a good option for homes where you want to preserve a classic toggle appearance.
The ZEN35 Scene Dimmer is a good fit if you are looking for scene control or more specialized button based automations along with direct dimming.
This category is the best fit for most residential lighting situations and works well when you want reliable everyday dimming without added complexity. It is typically the first choice when upgrading standard wall switches.
BD2: Dimming > Single Pole > High Power Lights, Switched Receptacles, Motor / Fan
Some loads are not meant for dimming. This includes ceiling fans, bathroom exhaust fans, garbage disposals, and switched outlets that power lamps or other plug in devices.
For these applications, dimming is not supported or recommended. The goal here is reliable switching on and off without risking damage to the load or creating performance issues. These types of circuits need a simple, dependable control solution rather than brightness adjustment, so return to the On / Off category for recommendations.
BD3: Dimming > Single Pole > RGBW LED Strip
RGBW LED strips need a dedicated controller that can handle both color channels and white balance control smoothly. These setups are popular for accent lighting, under cabinet lighting, and entertainment spaces where color control matters.
The ZEN56 RGBW Dimmer is designed specifically for this type of lighting, giving you control over both color and brightness in a single solution.
It is recommended here because RGBW strips require multi-channel control rather than simple phase dimming. They are also generally 12-24V powered, utilizing transformers to step down 120V power to 12-24V, which none of our standard dimmers can be connected to. The ZEN56 is built to operate from 12-24V power as well as independently manage the color channels, which is what makes smooth color mixing and consistent dimming possible in strip lighting setups.
BD4: Dimming > Single Pole > 0-10V
0 to 10V dimming is commonly found in commercial lighting and some high efficiency residential fixtures. Instead of directly cutting power like traditional dimmers, this system sends a low voltage control signal to adjust brightness.
The ZEN54 0 to 10V Dimmer is built for this style of lighting and works with compatible 0 to 10V drivers, making it a strong choice for both retrofit and new installations.
It is recommended here because 0 to 10V systems require a dedicated control signal rather than a line voltage dimming method. The ZEN54 is purposefully built to interface with those drivers, which is what allows smooth and stable dimming without compatibility issues you would see with standard triac dimmers.
BE: Dimming > Multi-Way
If you followed the flow chart to the BE branch, you are looking for a multi-way setup where two or more switches control the same light or load, with a focus on more complex or larger scale wiring layouts.
This branch is divided into four categories:
-
BE1 covers standard lighting in multi-way configurations
-
BE2 covers high power loads like fans, motors, and switched receptacles where dimming is not used
-
BE3 covers standard lighting with more than six bulbs and more complex wiring layouts
-
BE4 covers RGBW LED strip dimming in multi-way configurations
-
BE5 covers 0-10V Dimming in multi-way configurations
-
BE6 covers smart bulb installations in multi-way setups
The recommendations in this section depend on both the load type and the wiring complexity, including whether line and load are in the same box or separated across multiple locations, as well as whether you are using Classic, Virtual, or Momentary configurations.
BE1: Dimming > Multi-Way > Standard Lights
Standard lighting loads are the most common residential lighting applications and are typically compatible with Zooz dimmers and standard on/off switches. These include most LED bulbs under the supported wattage limit for the switch or dimmer, typically 100 to 150W depending on the model or incandescent bulbs under 600W.
BE1.1: Dimming > Multi-Way > Standard Lights > Dimming & Scene Control from All Locations
This setup is designed for users who want full dimming and scene control from every switch location in the circuit, not just the primary switch. It is a great fit for larger rooms, hallways, or staircases where consistent smart control from every location makes the lighting feel more seamless and intuitive.
ZEN72 Dimmer Virtual or ZEN35 Scene Dimmer Virtual: A Virtual installation uses these Zooz dimmers in multiple wall boxes instead of keeping dumb switches in the secondary locations. Rather than communicating through traditional traveler wiring, the smart switches communicate using Z-Wave associations, central scene commands, or automation rules through your hub.
-
Pros: Dimming and scene control from all locations in the installation; matching switches; ability to have Zooz switches in any location, regardless of location of direct connection to power line
-
Cons: More expensive, as it requires multiple Zooz switches per installation
-
Virtual Wiring Diagrams: How To Use Multiple Zooz Switches In 3-Way and 4-Way Set-Ups
-
Virtual Programming Instructions: How to Program 2 Zooz Switches in a Virtual 3-Way with Regular Bulbs; or How to Program 3 Zooz Switches in a Virtual 4-Way with Regular Bulbs
-
ZEN72 Dimmer Momentary or ZEN35 Scene Dimmer Momentary: A Momentary installation uses one Zooz dimmer to control the load while the remaining locations use ZAC99 Momentary Switches instead of traditional dumb switches. The ZAC99 is a wired momentary accessory switch designed specifically for compatible Zooz multi-way setups. Pressing the switch sends a signal to the main Zooz device rather than directly controlling the load itself.
-
Pros: Simple installation; scene control from both locations
-
Cons: ZAC99 behavior is not intuitive; only the top portion of the switch is pressed. If you click the switch once, it will turn on. If you press and hold it while it's on, it will decrease brightness. If you click it again, it'll turn off. Once off, when you press and hold it will increase brightness.
For most users looking for the best overall experience, we generally recommend the Virtual setup. While it costs more because it uses multiple smart switches, it provides the most consistent control experience across the entire installation, including dimming, scene control, and matching smart functionality from every wall box.
BE1.2: Dimming > Multi-Way > Standard Lights > Dimming & Scene Control from One Location
This setup is designed for users who only need full dimming and scene control from one switch location in the circuit. This is great for users who might utilize more Z-Wave control and automations rather than physical dimming. It's a quick and inexpensive way to add dimming and smart functionality to a circuit.
ZEN77 Dimmer Classic or ZEN74 Toggle Dimmer Classic: This option keeps full dimming control at a single main location while the other standard on/off switches act as companions. The Zooz switch communicates with the other switches through the traveler wiring already present in the wall. The ZEN77 paddle and ZEN74 toggle both provide identical dimming performance and programming behavior, so the choice mainly comes down to switch style preference. This approach is often used when you want one clearly defined control point but still need convenient multi-way access.
-
Pros: Simple installation; least expensive option
-
Cons: Dimming and scene control only from the Zooz switch
Below, we've provided links to the standard multi-way wiring options for the ZEN74 and ZEN77:
Please note, you have to install the Zooz switch in the box with direct connection to power line and neutral in the Classic installation.
BE2: Dimming > Multi-Way > High Power Lights, Switched Receptacles, Motor / Fan
Some circuits are not suitable for dimming at all, including ceiling fans, exhaust fans, garbage disposals, and switched outlets. In these cases, the goal is simple and reliable switching from multiple locations without any dimming behavior.
No dimming options are available here because these loads require full power switching rather than variable control. Multi-way wiring can still be supported depending on the setup, but the device role stays strictly on and off, so return to the On / Off branch to make your selection.
BE3: Dimming > Multi-Way > Standard Lights with More Than 6 Bulbs
If you are in the BE3 branch, you are working with standard lighting loads that have a higher total number of bulbs or fixtures. These setups often draw more attention to wiring layout and load distribution, which is why the exact installation type matters more than in simpler multi-way circuits.
This branch is divided into two main wiring scenarios: whether line and load are in the same box or in separate boxes, and then further into 3-way or 4-way / 5-way configurations, depending on how many control locations are involved.
BE3.1: Dimming> Multi-Way > Standard Lights With More Than 6 Bulbs > 3-Way
A 3-way setup means the light can be controlled from two different locations. This is one of the most common multi-way configurations and often serves as the foundation for more complex wiring layouts. In this section, we cover installations that have more than 6 bulbs, as this requires a different switch and installation method.
-
BE3.1.1: Dimming > Multi-Way > Standard Lights With More Than 6 Bulbs > 3-Way > Load & Line in Same Box
-
In this configuration, both line power and the load are located in the same electrical box, which typically makes installation more straightforward. This setup allows for more traditional multi-way wiring behavior and is often easier to configure when using standard control methods. The recommended models for this path are chosen because they handle standard dimming loads reliably while still supporting multi location control when wired in a conventional 3-way layout.
-
ZEN72 Dimmer Classic or ZEN35 Scene Dimmer Classic: This option keeps full dimming control at a single main location while the other standard on/off switches act as companions. The Zooz switch communicates with the other switches through the traveler wiring already present in the wall. You cannot use the ZEN77 Dimmer here, as it has a higher load rating and the inrush current from more than 6 LED bulbs in the installation can damage the dimmer over time.
-
Pros: Simple installation; least expensive option
-
Cons: Dimming & scene control only from the Zooz switch
-
Here are the wiring diagrams for the ZEN72 Dimmer and the ZEN35 Scene Dimmer: 3-Way Diagrams for ZEN71, ZEN72, ZEN32, and ZEN35 Switches
-
-
-
ZEN72 Dimmer Virtual or ZEN35 Scene Dimmer Virtual: A Virtual installation uses these Zooz dimmers in multiple wall boxes instead of keeping dumb switches in the secondary locations. Rather than communicating through traditional traveler wiring, the smart switches communicate using Z-Wave associations, central scene commands, or automation rules through your hub.
-
Pros: Dimming and scene control from all locations in the installation; matching switches; ability to have Zooz switches in any location, regardless of location of direct connection to power line
-
Cons: More expensive, as it requires multiple Zooz switches per installation
-
Virtual Wiring Diagrams: How To Use Multiple Zooz Switches In 3-Way and 4-Way Set-Ups
-
Virtual Programming Instructions: How to Program 2 Zooz Switches in a Virtual 3-Way with Regular Bulbs
-
-
-
-
-
BE3.1.2: Dimming > Multi-Way > Standard Lights with More Than 6 Bulbs > 3-Way > Load & Line in Separate Boxes
-
In this configuration, the line power and the load are located in different electrical boxes, which typically makes installation less straightforward when dealing with a load that contains more than 6 bulbs. A standard installation that maintains the use of dumb switches is not supported in this instance, as the ZEN77 Dimmer cannot be used in installations with more than 6 LED bulbs. Recommended set-ups:
-
ZEN72 Dimmer Virtual or ZEN35 Scene Dimmer Virtual: This type of installation uses these Zooz dimmers in multiple wall boxes instead of keeping dumb switches in the secondary locations. Rather than communicating through traditional traveler wiring, the smart switches communicate using Z-Wave associations, central scene commands, or automation rules through your hub.
-
Pros: Dimming and scene control from all locations in the installation; matching switches; ability to have Zooz switches in any location, regardless of location of direct connection to power line
-
Cons: More expensive, as it requires multiple Zooz switches per installation
-
Virtual Wiring Diagrams: How To Use Multiple Zooz Switches In 3-Way and 4-Way Set-Ups
-
Virtual Programming Instructions: How to Program 2 Zooz Switches in a Virtual 3-Way with Regular Bulbs
-
-
-
ZEN72 Dimmer Momentary or ZEN35 Scene Dimmer Momentary: A Momentary installation uses one Zooz dimmer to control the load while the remaining locations use ZAC99 Momentary Switches instead of traditional dumb switches. The ZAC99 is a wired momentary accessory switch designed specifically for compatible Zooz multi-way setups. Pressing the switch sends a signal to the main Zooz device rather than directly controlling the load itself.
-
Pros: Simple installation; scene control from both locations
-
Cons: ZAC99 behavior is not intuitive; only the top portion of the switch is pressed. If you click the switch once, it will turn on. If you press and hold it while it's on, it will decrease brightness. If you click it again, it'll turn off. Once off, when you press and hold it will increase brightness.
-
-
-
BE3.2: Dimming > Multi-Way > Standard Lights and More Than 6 Bulbs > 4-Way or 5-Way
This section covers larger multi-way dimming setups where the same lighting circuit is controlled from three or four switch locations. Because these installations also involve higher lighting loads with more than six bulbs, both the wiring layout and the installation method play an important role in determining which setup will work best.
The recommendations below are divided based on whether line and load are located in the same box or separated across different boxes, since that directly affects which multi-way configuration options are available.
-
BE3.2.1: Dimming > Multi-Way > Standard Lights & More Than 6 Bulbs > 4-Way or 5-Way > Load & Line in Same Box
-
In this setup, the line and load are both located in the same electrical box, which gives you the most flexibility for configuring larger multi-way dimming circuits. Since all critical wiring is centralized, this layout can support Classic, Virtual, or Momentary installations depending on how much smart control you want from the additional switch locations.
-
ZEN72 Dimmer Classic or ZEN35 Scene Dimmer Classic: This option keeps full dimming control at a single main location while the other standard on/off switches act as companions. The Zooz switch communicates with the other switches through the traveler wiring already present in the wall. You cannot use the ZEN77 Dimmer here, as it has a higher load rating and the inrush current from more than 6 LED bulbs in the installation can damage the dimmer over time.
-
Pros: Simple installation; least expensive option
-
Cons: Dimming & scene control only from the Zooz switch
-
Here is the wiring diagram for the ZEN72 Dimmer and the ZEN35 Scene Dimmer: 4-Way Diagram for ZEN71, ZEN72, ZEN32, and ZEN35 Switches
-
-
-
ZEN72 Dimmer Virtual or ZEN35 Scene Dimmer Virtual: This type of installation uses these Zooz dimmers in multiple wall boxes instead of keeping dumb switches in the secondary locations. Rather than communicating through traditional traveler wiring, the smart switches communicate using Z-Wave associations, central scene commands, or automation rules through your hub.
-
Pros: Dimming and scene control from all locations in the installation; matching switches; ability to have Zooz switches in any location, regardless of location of direct connection to power line
-
Cons: More expensive, as it requires multiple Zooz switches per installation
-
Virtual Wiring Diagrams: How To Use Multiple Zooz Switches In 3-Way and 4-Way Set-Ups
-
Virtual Programming Instructions: How to Program 3 Zooz Switches in a Virtual 4-Way with Regular Bulbs
-
-
-
ZEN72 Dimmer Momentary or ZEN35 Scene Dimmer Momentary: A Momentary installation uses one Zooz dimmer to control the load while the remaining locations use ZAC99 Momentary Switches instead of traditional dumb switches. The ZAC99 is a wired momentary accessory switch designed specifically for compatible Zooz multi-way setups. Pressing the switch sends a signal to the main Zooz device rather than directly controlling the load itself.
-
Pros: Simple installation; scene control from both locations
-
Cons: ZAC99 behavior is not intuitive; only the top portion of the switch is pressed. If you click the switch once, it will turn on. If you press and hold it while it's on, it will decrease brightness. If you click it again, it'll turn off. Once off, when you press and hold it will increase brightness.
-
-
-
-
BE3.2.2: Dimming > Multi-Way > Standard Lights & More Than 6 Bulbs > 4-Way or 5-Way > Load and Line in Separate Boxes
-
In this configuration, the lighting circuit includes more than six bulbs and is controlled from three or four switch locations, while the line and load are located in separate electrical boxes. The combination of a larger lighting load and a more distributed wiring layout limits which installation methods can be used, which is why Virtual and Momentary setups are recommended here.
-
ZEN72 Dimmer Virtual or ZEN35 Scene Dimmer Virtual: This type of installation uses these Zooz dimmers in multiple wall boxes instead of keeping dumb switches in the secondary locations. Rather than communicating through traditional traveler wiring, the smart switches communicate using Z-Wave associations, central scene commands, or automation rules through your hub.
-
Pros: Dimming and scene control from all locations in the installation; matching switches; ability to have Zooz switches in any location, regardless of location of direct connection to power line
-
Cons: More expensive, as it requires multiple Zooz switches per installation
-
Virtual Wiring Diagrams: How To Use Multiple Zooz Switches In 3-Way and 4-Way Set-Ups
-
Virtual Programming Instructions: How to Program 3 Zooz Switches in a Virtual 4-Way with Regular Bulbs
-
-
-
ZEN72 Dimmer Momentary or ZEN35 Scene Dimmer Momentary: A Momentary installation uses one Zooz dimmer to control the load while the remaining locations use ZAC99 Momentary Switches instead of traditional dumb switches. The ZAC99 is a wired momentary accessory switch designed specifically for compatible Zooz multi-way setups. Pressing the switch sends a signal to the main Zooz device rather than directly controlling the load itself.
-
Pros: Simple installation; scene control from both locations
-
Cons: ZAC99 behavior is not intuitive; only the top portion of the switch is pressed. If you click the switch once, it will turn on. If you press and hold it while it's on, it will decrease brightness. If you click it again, it'll turn off. Once off, when you press and hold it will increase brightness.
-
-
-
BE4: Dimming > Multi-Way > RGBW LED Strips
Installing the ZEN56 RGBW Dimmer in a 3-way setup allows you to control the same lighting load from more than one location. Because the ZEN56 is designed differently from a traditional mechanical dimmer, it does not use a standard 3-way switch configuration. Instead, there are two supported wiring methods depending on the type of switches you want to use and whether you can adjust device settings through your hub. Using a momentary switch such as the ZAC99 is the recommended approach. In addition to allowing simple expansion to multiple control points, it requires no configuration changes on the dimmer and provides a more natural dimming experience at the wall. With a momentary switch, you can turn the lights on or off with a quick press and adjust brightness by holding the switch, giving you full control directly from the wall without relying on hub settings.
-
ZEN56 RGBW Dimmer Classic: This option uses two standard single pole switches. In this configuration, the ZEN56 handles the dimming and control logic while the switches act as input triggers. This method requires changing specific parameters on the ZEN56 through your Z-Wave hub, so it should only be used with systems that allow access to advanced device settings. Important: You will need to change out any 3-way switches currently installed for basic single pole switches in each location.
-
ZEN56 RGBW Dimmer Momentary: This option uses momentary switches, like the ZAC99 Momentary Switch. This method does not require any parameter changes on the ZEN56 and works with hubs that may not expose device settings. Momentary switches are wired in series, which also means you can add more than two switches if needed, allowing control of the same lights from multiple locations.
This is the recommended option, as it provides on or off with a quick press and the ability to adjust brightness by holding the switch, giving you full control directly from the wall without relying on hub settings.
We've linked both diagrams for you in the following article: 3-Way Diagrams for the ZEN56 RGBW Dimmer
BE6: Dimming > Multi-Way > 0-10V Dimmable
The ZEN54 0 to 10V Dimmer in a Momentary set-up is the only option currrently available for 0-10V dimmable fixtures.
-
ZEN54 0 to 10V Dimmer Momentary: You can only wire the ZEN54 in a 3-way with momentary switches, and we recommend using the ZAC99 momentary switch. This does require changing the wall switch type in the advanced settings to momentary (parameter 12), so it should only be used with systems that allow access to advanced device settings.
We've linked the diagram for you in the following article: ZEN54 0-10 V Dimmer Wiring Diagrams
BE6: Dimming > Multi-Way > Smart Bulbs up to 150W
This section covers multi-way setups using smart bulbs, where two or more switch locations control the same lighting circuit. Unlike standard dimming installations, smart bulb setups are designed to keep constant power flowing to the bulbs so the bulbs remain connected to your smart home system at all times.
Generally, we don't recommend trying to use dimmers with smart bulbs. Real-time remote dimming that we’re used to when using dimmers with regular bulbs is very hard to accomplish with smart bulbs. Since we’re not able to dim smart bulbs electrically (this is true for both smart and regular dimmers since smart bulbs are equipped with their own dimming mechanism), we need to depend on radio commands which are often translated between two different wireless protocols. This causes delays and prevents a good user experience. We instead recommend creating presets with your favorite smart bulb settings and triggering them with single or multi-tap button presses on the smart switch, such as the ZEN32 Scene Controller.
If you prefer attempting to dim your smart bulbs via radio commands, then the below would be the recommended options.
BE6.1: Dimming > Multi-Way > Smart Bulbs up to 150W > 3-Way
This setup is for smart bulb installations controlled from two switch locations. Since smart bulbs need uninterrupted power to function properly, the recommended configurations are designed to avoid cutting power to the bulbs while still providing convenient wall control and scene functionality. While any of the below options can be used, we recommend the Virtual option for easiest control of the smart bulbs.
ZEN72 Dimmer Virtual or ZEN35 Scene Dimmer Virtual: This installation uses Zooz smart switches in multiple wall boxes instead of keeping dumb switches in the secondary locations. Rather than communicating through traditional traveler wiring, the smart switches communicate using Z-Wave associations, central scene commands, or automation rules through your hub.
-
Pros: Scene control from all locations in the installation; matching switches; ability to have Zooz switches in any location, regardless of location of direct connection to power line
-
Cons: More expensive, as it requires multiple Zooz switches per installation
-
Virtual Wiring Diagrams: How To Use Multiple Zooz Switches In 3-Way and 4-Way Set-Ups
-
Virtual Programming Instructions: How to Program 2 Zooz Switches in a Virtual 3-Way with Smart Bulbs; or How to Program 3 Zooz Switches in a Virtual 4-Way with Smart Bulbs
-
ZEN72 Dimmer Momentary or ZEN35 Scene Dimmer Momentary: A Momentary installation uses one Zooz dimmer to control the load while the remaining locations use ZAC99 Momentary Switches instead of traditional dumb switches. The ZAC99 is a wired momentary accessory switch designed specifically for compatible Zooz multi-way setups. Pressing the switch sends a signal to the main Zooz device rather than directly controlling the load itself.
-
Pros: Simple installation; scene control from both locations
-
Cons: ZAC99 behavior is not intuitive; only the top portion of the switch is pressed. If you click the switch once, it will turn on. If you press and hold it while it's on, it will decrease brightness. If you click it again, it'll turn off. Once off, when you press and hold it will increase brightness.
ZEN72 Dimmer Classic or ZEN35 Scene Dimmer Classic: This option keeps full dimming and scene control at a single main location while the other standard on/off switches act as companions. The Zooz switch communicates with the other switches through the traveler wiring already present in the wall.
-
Pros: Simple installation; least expensive option
-
Cons: Dimming & scene control only from the Zooz switch ; you will be limited in the way you can program your switches in this set-up as well, since the only way to link your switches to smart bulbs when there’s a mechanical switch in the mix is by creating simple If… Then… rules that will rely on status reports from both the switch and the bulbs to keep them all in sync
-
Here are the wiring diagrams for the ZEN72 Dimmer and the ZEN35 Scene Dimmer in a Classic 3-way installation: 3-Way Diagrams for ZEN71, ZEN72, ZEN32, and ZEN35 Switches
-
BE6.2: Dimming > Multi-Way > Smart Bulbs up to 150W > 4-Way or 5-Way
This setup is for smart bulb installations controlled from three or four switch locations. Since smart bulbs need uninterrupted power to function properly, the recommended configurations are designed to avoid cutting power to the bulbs while still providing convenient wall control and scene functionality. While either of the below options can be used, we recommend the Virtual option for easiest control of the smart bulbs.
ZEN72 Dimmer Virtual or ZEN35 Scene Dimmer Virtual: This installation uses Zooz smart switches in multiple wall boxes instead of keeping dumb switches in the secondary locations. Rather than communicating through traditional traveler wiring, the smart switches communicate using Z-Wave associations, central scene commands, or automation rules through your hub.
-
Pros: Scene control from all locations in the installation; matching switches; ability to have Zooz switches in any location, regardless of location of direct connection to power line
-
Cons: More expensive, as it requires multiple Zooz switches per installation
-
Virtual Wiring Diagrams: How To Use Multiple Zooz Switches In 3-Way and 4-Way Set-Ups
-
Virtual Programming Instructions: How to Program 2 Zooz Switches in a Virtual 3-Way with Smart Bulbs; or How to Program 3 Zooz Switches in a Virtual 4-Way with Smart Bulbs
-
ZEN72 Dimmer Momentary or ZEN35 Scene Dimmer Momentary: A Momentary installation uses one Zooz dimmer to control the load while the remaining locations use ZAC99 Momentary Switches instead of traditional dumb switches. The ZAC99 is a wired momentary accessory switch designed specifically for compatible Zooz multi-way setups. Pressing the switch sends a signal to the main Zooz device rather than directly controlling the load itself.
-
Pros: Simple installation; scene control from both locations
-
Cons: ZAC99 behavior is not intuitive; only the top portion of the switch is pressed. If you click the switch once, it will turn on. If you press and hold it while it's on, it will decrease brightness. If you click it again, it'll turn off. Once off, when you press and hold it will increase brightness.
Choosing the right smart switch or dimmer is not just about picking a device you like. The wiring layout, load type, number of bulbs, and the kind of control experience you want all play an important role in determining which setup will work best in your home. Hopefully this guide helped simplify the process and made it easier to narrow down the right option for your specific installation. Whether you are upgrading a simple single pole light switch or building a more advanced multi-way smart lighting system, taking the time to match the right device and wiring method to your setup will help ensure smoother performance, easier installation, and a better overall smart home experience

