
You can automate your standard garage door with the MultiRelay following the steps below. Remember to check your local safety regulations first and make sure you test the device thoroughly after programming it to prevent accidental operation. The ZEN16 MultiRelay is NOT a reliable solution to track the open/close status of your garage door. You will need to install a Z-Wave contact or tilt sensor on the garage door to track its position. It's recommended to always sound an audible alarm (like a loud siren) whenever the doors are being opened or closed remotely.
Here are detailed instructions on how to accomplish an easy and affordable DIY Z-Wave garage door opener solution with the ZEN16 MultiRelay:
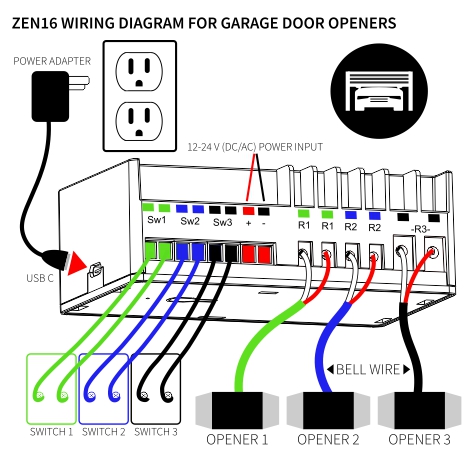
1. WIRE THE MULTIRELAY ZEN16
The device will work great with simple momentary garage door wall switches. If your garage door opener uses a proprietary wireless control system, you will NOT be able to use the ZEN16 MultiRelay (or any other Z-Wave device) to control the opener.
If you have a simple one-button garage door switch, just use the below diagram to wire the MultiRelay next to it (you can wire up to 3 door switches to a single MultiRelay):
-
WIRING TIPS: Always take "before" pictures just in case you need to restore the original set-up or send us images for consultation. use the correct screwdriver size for the terminal screws on your MultiRelay and wall switches (if connecting them). Use appropriate electrical tools when cutting, prepping, and stripping electrical wires. If you don’t have the necessary tools to perform the installation or are not sure which tools to use or how, please hire an electrician to complete the installation for you. Follow the National Electrical Code and your local safety regulations when performing the installation, including (but not limited to), choosing the correct gauge of jumper wires. The recommended gauge for 15 Amp circuits is 14 AWG and 12 AWG for 20 Amp circuits.
-
POWER OFF: turn the circuit power off in the breaker panel before you start. Keep the MultiRelay unplugged from its power source.
-
DISCONNECT THE SWITCH: Open the switch cover and disconnect the 2 wires coming to it from the opener.
-
CONNECT THE MULTIRELAY: Connect the 2 wires coming from the opener to the R1 terminals on the MultiRelay and run 2 jumper wires between the wall switch screws and Sw1 terminals on the MultiRelay as shown in the below diagram.
If you have a wall switch with a light button on it as well and would like to continue using it to turn the light on, please use the below diagram instead (only for use with this particular type of wall switch):

-
RESTORE POWER: Connect the opener and ZEN16 MultiRelay back to their power source. Click here for the recommended power supply to power the MultiRelay ZEN16. Please do NOT use laptop chargers or Apple accessories with the MultiRelay. NEVER connect DC power and USB power to the ZEN16 at the same time.
2. INSTALL ADDITIONAL Z-WAVE DEVICES TO COMPLETE THE SET-UP
Please note that there are 3 versions of the ZEN16 MultiRelay. Please verify your hardware version on the back of your device. You can also check the firmware version against the device change log to check your available options.
ZEN16 500 Series, 700 Series, or 800 Series
-
Z-WAVE OPEN/CLOSE SENSOR: We recommend using a tilt sensor to reliably track the status of your sectional garage door but you can also use any Z-Wave contact sensor for that purpose. You will need an open/close sensor to know whether the door is open or closed.
-
Z-WAVE SIREN: We recommend using the ZSE50 Siren & Chime to sound an alarm whenever the door is being opened or closed remotely for added safety.
ZEN16 700 Series or 800 LR Series
The 700/800 series allows you to select if you want to use a wired sensor on the input to monitor the status. You can also still choose to use the Z-Wave sensor option as well.
-
OPEN/CLOSE SENSOR: You would still have the same option above to use a Z-Wave sensor; however, the 700 series introduced the option to separate the inputs from the outputs, which means you can monitor a wired open/close sensor or reed switch on the input to verify the door status, while maintaining separate control of the garage door on the relay. To utilize this option, check out the wiring diagram and instructions here.
-
Z-WAVE SIREN: We recommend using the ZSE50 Siren & Chime to sound an alarm whenever the door is being opened or closed remotely for added safety.
3. PROGRAM THE MULTIRELAY ON SMARTTHINGS
-
Install the custom driver for the MultiRelay before adding it to SmartThings.
-
Open your SmartThings app and click on the MultiRelay in your device list.
-
Make sure that all of the child relays are in the OFF state. You should have one parent device to be used for changing any settings and for control of the ZEN16 as a whole, and 3 child devices for individual relay control.
-
Click the 3 dots in the top right corner and click on Settings.
-
Set the R1, R2, R3 if using switch type setting (labeled Input Type for Sw1/SW2/Sw3) to "Garage door mode." Exit the settings so they can save.
-
Anytime you turn on any of the child relays now, the garage door opener will activate to either open or close the garage. The relay will automatically turn off a couple of seconds later, simulating momentary contact.
-
You will not be able to monitor the status of the garage door via the ZEN16. You will need to use the recommended Z-Wave sensor to report the on/off status. The Z-Wave sensor and the ZEN16 will not display as a single device in SmartThings.
Once everything is programmed, test it a couple of times to make sure the set-up is fully functional and enjoy your new smart garage door!
If you need help with your set-up, please reach out to us for assistance. Always include your order number and indicate which hub you're using for faster service. Your order number can be from The Smartest House, Amazon, or if Amazon.ca - please send us a screenshot of the order confirmation. This information helps us verify your device model to send the correct firmware file.

