


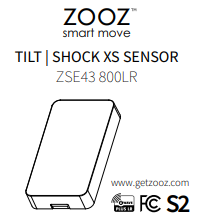
Don't forget to register your product for extended warranty and more perks:
Click here to register your device here.
FEATURES
-
Quick and reliable tilt and vibration alerts to your hub
-
NEW 800 series chip for faster communication and more battery life than ever
-
Extra small for discreet mounting
-
Protective rubber coating
-
Z-Wave Long Range for ultra reliable no-mesh communication
-
The latest S2 security and SmartStart for secure set-up
-
Supports OTA firmware updates
SPECIFICATIONS
-
Model Number: ZSE43 800LR
-
Power: 1 x CR2450 battery
-
Operating Temperature: 5°-104° F
-
Dimensions: 2.2” x 1.3” x 0.4”
-
Range: Up to 150 feet (up to 1300 with ZWLR) line of sight
-
Installation and Use: Indoor only
NOTES ON THE BATTERY
-
The compatible battery type: CR2450
-
The nominal battery voltage: 3V
-
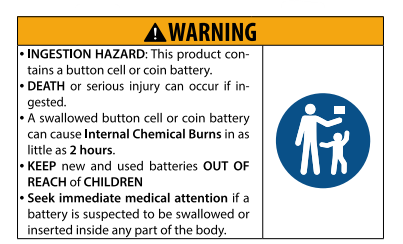
Remove and immediately recycle or dispose of used batteries according to local regulations and keep away from children.
-
Do NOT dispose of batteries in household trash or incinerate.
-
Even used batteries may cause severe injury or death.
-
Call a local poison control center for treatment information.
-
Non-rechargeable batteries are not to be recharged.
-
Do not force discharge, disassemble, heat above 60 degrees C or incinerate. Doing so may result in injury due to vending, leakage, or explosion resulting in chemical burns.
-
Ensure the batteries are installed correctly according to polarity (+ and -).
-
Do not mix old and new batteries, different brands or types of batteries, such as alkaline, carbon-zinc, or rechargeable batteries.
-
Remove and immediately recycle or dispose of batteries from equipment not used for an extended period of time according to local regulations.
-
Always completely secure the battery compartment. If the battery compartment does not close securely, stop using th eproduct, remove the batteries, and keep them away from children.
WARNING
This product should be installed indoors or outdoors under eve upon completion of any building renovations. Ÿ Prior to installation, the device should be stored in a dry, dustand-mold-proof place. Ÿ Do not install the device in a place with direct sun exposure, high temperature, or humidity. Ÿ Keep away from chemicals, water, and dust. Ÿ Ensure the device is never close to any heat source or open flame to prevent fire. Ÿ No part of the device may be replaced or repaired by the user except for the batteries.
INSTALLATION
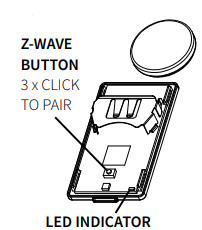
POWER THE SENSOR: Use the triangle tool to gently open the sensor’s cover and access the battery. Pull the tab from under the battery to activate the sensor. Don’t close the cover just yet. The LED indicator will blink once (blue or blue/red if it senses vibration) when the device is powered.

The LED indicator doesn’t blink or light up at all?
-
Make sure the battery is inserted correctly per the positive / negative pole marks. .
-
Try a fresh lithium nonrechargeable battery.
-
Click the Z-Wave button 3 times as quickly as possible to force inclusion/exclusion mode in case you missed when it first flashed.
Z-WAVE CONTROL
There are two methods to add the ZSE43 to your hub; SmartStart or Manual Inclusion. If you want to use Z-Wave Long Range, it must be done via SmartStart.
SmartStart Inclusion
1. Add the Sensor to Your Hub Via SmartStart:
-
POWER MUST BE REMOVED FROM THE DEVICE FIRST; PULL THE BATTERY OUT.
-
Next, initiate SmartStart inclusion (pairing) in the app (or web interface). Device remains unpowered through this process until indicated.
-
If you’re using an S2 hub, it will ask you to enter the DSK key or scan the QR code printed on the sticker on the side of the cover to complete SmartStart inclusion.
2. Power the Sensor:
-
Re-insert the batteries.
-
The LED indicator will start blinking blue and turn green once the sensor is added.
Manual Inclusion
1. Power the Sensor.
2. Add the Sensor to your hub:
-
Put your Z-Wave® hub into inclusion mode
-
Click the Z-Wave® button 3 times as quickly as possible.
-
The LED indicator will start blinking blue to confirm inclusion mode and turn green once the sensor is added successfully.
TIP: It’s best to add your sensor from the installation area so the hub can find the best route to reach it right away. If the signal is weak in your garage, you may need Z-Wave repeaters between the hub and the sensor. Use Z-Wave Long Range if you can!
Below are the SmartStart and manual inclusion processes for the most common Z-Wave hubs:
How to Add the ZSE43 Tilt | Shock Sensor to Home Assistant
How to Add the ZSE43 Tilt | Shock Sensor to HomeSeer
How to Add the ZSE43 Tilt | Shock Sensor to Hubitat
How to Add the ZSE43 Tilt | Shock Sensor to SmartThings
How to Add the ZSE43 Tilt | Shock Sensor to Z-Box
How to Add the ZSE43 Tilt | Shock Sensor to My Z-Wave Hub
TROUBLESHOOTING
The sensor won’t add to your system? Try this:
-
Initiate EXCLUSION in your hub and click the Z-Wave button 3 times as quickly as possible.
-
Click the Z-Wave button quicker when adding it.
-
Bring the sensor closer to your hub, it may be out of range.
-
FACTORY RESET the device.
-
Double-check if the device is powered.
-
Get troubleshooting tips specific to your hub at www.support.getzooz.com.
EXCLUSION (REMOVE DEVICE)
-
Bring the sensor within direct range of your Z-Wave hub.
-
Put the Z-Wave hub into exclusion mode.
-
Click the Z-Wave button 3 times as quickly as possible, the LED will start blinking blue.
-
Your hub will confirm exclusion and the LED indicator will blink green if the process is successful.
Can't Add the ZSE43 Tilt | Shock Sensor to Home Assistant
Can't Add the ZSE43 Tilt | Shock Sensor to HomeSeer
Can't Add the ZSE43 Tilt | Shock Sensor to Hubitat
Can't Add the ZSE43 Tilt | Shock Sensor to SmartThings
Can't Add the ZSE43 Tilt | Shock Sensor to Z-Box
Can't Add the ZSE43 Tilt | Shock Sensor to My Z-Wave Hub
FACTORY RESET
When your network’s primary controller is missing or otherwise inoperable, you may need to reset the device to factory settings manually. In order to complete the process:
-
Make sure the sensor is powered.
-
Click the Z-Wave button twice and hold it the third time for 10 seconds.
-
The LED indicator will blink blue continuously.
-
Once the LED turns solid blue, click the Z-Wave button twice more to finalize the reset.
-
The LED indicator will flash blue 3 times to confirm the reset.
NOTE: All previously recorded activity and custom settings will be erased from the device’s memory.
WAKE UP MODE
The sensor’s wake-up interval is set to 12 hours by default to save battery life. Use the Wake Up Command Class to adjust the interval. Click the Z-Wave button 4 times quickly to wake the sensor up manually. The LED indicator will blink blue for a second to confirm the device is awake. During wakeup, the sensor turns the Z-Wave radio on for one minute to receive communication from the hub. Long wake-up interval will not affect how oen the sensor reports to your hub so we recommend leaving the default setting to conserve battery.
SENSOR MOUNTING
-
We recommend including your sensor to the Z-Wave network from the location you want to install it.
-
Choose a spot in the area you would like to monitor for vibration which will not be easily accessible to potential intruders, like high on the window glass. For tilt (open/close) reports, locate a clean spot on the top panel of your garage door.
-
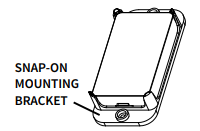
Fix the sensor to the surface with the supplied adhesive tape or use the supplied snap-on mounting bracket. The sensor will report vibration and blink red when the acceleration sensor is tripped and it will change the open/close status and blink blue when the sensor is fully tilted to the vertical or horizontal position.
-
Make sure you install the sensor with the arrow printed on the back pointing up (and the opening slot facing down).
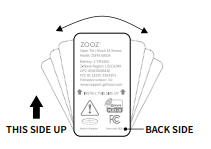
Attach the back side of the sensor to the surface or bracket when mounting it:
VERTICAL & HORIZONTAL TILT
The sensor can report open and close alerts for both vertical and horizontal tilting movement:
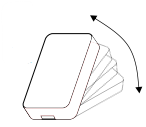
By default, the sensor will report vertical tilt movement only (towards and away from the ground moving up and down). You can enable horizontal tilt reports (towards and away from the ground moving to the le or right side) in the advanced settings. See parameter 17 for details.
VIBRATION NOT WORKING?
-
Make sure the vibration sensor is enabled (parameter 7) and set to high sensitivity (parameter 4) in the advanced settings.
-
There are more advanced parameters that can delay or disable the vibration sensor conditionally so please refer to the full settings article to adjust the values accordingly if needed.
-
Try a fresh battery in case this is a power issue.
-
Exclude and re-include the sensor to your hub. Make sure your hub fully supports Z-Wave vibration reports.
TILT NOT WORKING
-
Make sure you’re testing the default vertical tilt direction and not the side horizontal tilt direction (you need to enable this type of detection in the advanced settings first).
-
The sensor needs to be mounted on the garage door with arrows printed on the back of the sensor facing up. Double check this detail, especially if using the mounting bracket.
-
If the surface you’ve mounted the sensor on is not exactly perpendicular to the ground, you may need to manually calibrate the sensor. Calibration can be initiated from the advanced settings (see parameter 16) or straight from the device. Press and hold the button for 5 seconds until the LED indicator begins to flash rapidly, alternating between red and blue. Mount the sensor in the appropriate position and wait until the LED begins to alternate between red and green which indicates that the sensor has successfully captured its initial position. Wait for another few seconds until the LED flashes green rapidly five times and then turns off to indicate successful calibration.
ADVANCED SETTINGS
All of the settings for the latest version of the sensor can be found here: ZSE43 Tilt | Shock Sensor Advanced Settings
How to Access Advanced Settings for the ZSE43 Tilt | Shock Sensor on Home Assistant
How to Access Advanced Settings for the ZSE43 Tilt | Shock Sensor on HomeSeer
How to Access Advanced Settings for the ZSE43 Tilt | Shock Sensor on Hubitat
How to Access Advanced Settings for the ZSE43 Tilt | Shock Sensor on SmartThings
How to Access Advanced Settings for the ZSE43 Tilt | Shock Sensor on Z-Box
ASSOCIATION
The XS Sensor supports the following association groups:
-
Group 1 for Lifeline communication
-
Group 2 (tilt sensor reports) with up to 5 devices for Basic Set on/off control of the associated devices.
-
Group 3 (vibration sensor reports) with up to 5 devices for Basic Set on/off control of the associated devices.
The value of the basic set command sent to Group 2 and Group 3 can be adjusted in the advanced settings to customize the sensor’s behavior. Please note that not all Z-Wave systems give users access to direct association settings so if you’re note sure where to find it, please get in touch with our support and we’ll be happy to help.
COMMAND CLASSES
COMMAND_CLASS_ZWAVEPLUS_INFO_V2
COMMAND_CLASS_ASSOCIATION_V2
COMMAND_CLASS_MULTI_CHANNEL_ASSOCIATION_V3
COMMAND_CLASS_ASSOCIATION_GRP_INFO_V3
COMMAND_CLASS_TRANSPORT_SERVICE_V2
COMMAND_CLASS_VERSION_V2
COMMAND_CLASS_MANUFACTURER_SPECIFIC
COMMAND_CLASS_DEVICE_RESET_LOCALLY
COMMAND_CLASS_POWERLEVEL
COMMAND_CLASS_BATTERY
COMMAND_CLASS_SECURITY_2
COMMAND_CLASS_NOTIFICATION_V8
COMMAND_CLASS_INDICATOR_V3
COMMAND_CLASS_CONFIGURATION_V4
COMMAND_CLASS_WAKE_UP_V2
COMMAND_CLASS_SUPERVISION
COMMAND_CLASS_FIRMWARE_UPDATE_MD_V5
S2
This product can be included and operated in any Z-Wave network with other Z-Wave certified devices from other manufacturers and/or other applications. All non-battery operated nodes within the network will act as repeaters regardless of vendor to increase reliability of the network. This product features the latest Security 2 (S2) framework to remove smart home network hacking risks. This device is equipped with a unique authentification code for trusted wireless communication.
WARRANTY
This product is covered under a 12- month limited warranty and 5-year extended warranty if registered within 30 days of purchase. To read the full warranty policy, register your product, or file a warranty claim, please go to ww.getzooz.com/warranty.
IN NO EVENT SHALL ZOOZ OR ITS SUBSIDIARIES AND AFFILIATES BE LIABLE FOR ANY INDIRECT, INCIDENTAL, PUNITIVE, SPECIAL, OR CONSEQUENTIAL DAMAGES, OR DAMAGES FOR LOSS OF PROFITS, REVENUE, OR USE INCURRED BY CUSTOMER OR ANY THIRD PARTY, WHETHER IN AN ACTION IN CONTRACT, OR OTHERWISE EVEN IF ADVISED OF THE POSSIBILITY OF SUCH DA-MAGES. ZOOZ'S LIABILITY AND CUSTOMER'S EXCLUSIVE REMEDY FOR ANY CAUSE OF ACTION ARISING IN CON-NECTION WITH THIS AGREEMENT OR THE SALE OR USE OF THE PRODUCTS, WHETHER BASED ON NEGLIGENCE, STRICT LIABILITY, BREACH OF WARRANTY, BREACH OF AGREEMENT, OR EQUITABLE PRINCIPLES, IS EXPRESSLY LIMITED TO, AT ZOOZ'S OPTION, REPLACEMENT OF, OR REPAYMENT OF THE PURCHASE PRICE FOR THAT POR-TION OF PRODUCTS WITH RESPECT TO WHICH DA-MAGES ARE CLAIMED. ALL CLAIMS OF ANY KIND ARISING IN CONNECTION WITH THIS AGREEMENT OR THE SALE OR USE OF PRODUCTS SHALL BE DEEMED WAIVED UNLESS MADE IN WRITING WITHIN THIRTY (30) DAYS FROM ZOOZ'S DELIVERY, OR THE DATE FIXED FOR DELIVERY IN THE EVENT OF NONDELIVERY.
FCC NOTE THE MANUFACTURER IS NOT RESPONSIBLE FOR ANY RADIO OR TV INTERFERENCE CAUSED BY UNAUTHORIZED MODIFICATIONS TO THIS EQUIPMENT. SUCH MODIFICATIONS COULD VOID THE USER’S AUTHORITY TO OPERATE THE EQUIPMENT. STORE INDOORS WHEN NOT IN USE. SUITABLE FOR DRY LOCATIONS ONLY. DO NOT IMMERSE IN WATER. NOT FOR USE WHERE DIRECTLY EXPOSED TO WATER. This device complies with Part 15 of the FCC Rules. Operation is subject to the following conditions:
-
This device may not cause harmful interference.
-
This device must accept any interference received, including interference that may cause undesired operation.
This equipment has been tested and found to comply with the limits for a Class B digital device, pursuant to part 15 of the FCC Rules. These limits are designed to provide reasonable protection against harmful interference in a residential installation. This equipment generates, uses and can radiate radio frequency energy and, if not installed and used according to instructions, may cause harmful interference to radio communications. However, there is no guarantee that interference will not occur in any given installation. If this equipment causes harmful interference to radio or television reception, the user may try to correct the interference by taking one or more of the following measures:
-
Reorient or relocate receiving antenna
-
Increase the separation between equipment and receiver
-
Connect equipment into a separate outlet or circuit from receiver
-
Consult the dealer or an experienced radio/TV technician for additional assistance
All brand names displayed are trademarks of their respective holders.
© Zooz 2026

