
Don't forget to register your product for extended warranty and more perks:
Click here to register your device here.
FEATURES
-
Z-Wave® on/off control of large loads up to 40A
-
Great for pool pumps, electric heaters, or boilers
-
Energy monitoring live and over time
-
LED indicator for easier troubleshooting
-
Z-Wave® Long Range for ultra reliable no-mesh communication
-
NEW 800 series chip for faster performance
-
Built-in overload protection and SGS certification
SPECIFICATIONS
-
Model Number: ZEN78 800LR
-
Z-Wave® Region: US/CA/MX
-
Power: 120-240 VAC, 60 Hz
-
Maximum Load: 40 A, 9600 W (resistant load)
-
Standby power consumption: 1W
-
Operating Temperature: 32° – 104° F
-
Range: Up to 300 feet (or up to 1300 with ZWLR)
-
Installation and Use: Indoor only (IPX3)
-
Dimensions: 8.6” x 5.5” x 2”
CAUTION
This is an electrical device - please use caution when installing and operating the High Power Relay. Remote control of appliances may result in unintentional or automated activation of power.
This device is intended for installation in accordance with the National Electric Code and local regulations. It is recommended that a licensed electrician perform this installation.
WARNING
This device may contain small parts which may be a choking hazard to children under 3. Keep small parts away from children.
RISK OF ELECTRIC SHOCK
-
More than one disconnect switch may be required to de-energize the equipment before servicing (Applicable to all switches without plugs and Dimmer products).
-
DO NOT use this device near water and do not expose it to rain or moisture.
-
DO NOT attempt to dry device with a hair dryer or a microwave oven.
-
DO NOT attempt to take apart, open, service, or modify the product, accessories, or power supply. Doing so could present the risk of electric shock or other hazard. Any evidence of any attempt to open and/or modify this device, including any peeling, puncturing, or removal of any of the labels, will void the Limited Warranty.
-
DO NOT use any device in combination with a Wall Switch - 2 controlling a receptacle (Applicable to all switches without plugs and Dimmer products).
-
Turn off main power at circuit breaker before installing or repairing before installing or servicing any In-Wall series products.
AC ADAPTER SAFETY
Failure to take the following precautions can result in serious injury or death from electric shock or in damage to the device. To select an appropriate power source for your device:
-
Use only the power supply unit, plug adapters, and AC power cord that came with your device or that you received from an authorized retailer.
-
Do not use non-standard power sources, such as generators or inverters, even if the voltage and frequency appear acceptable. Only use AC power provided by a standard wall outlet.
-
Do not overload your wall outlet, extension cord, power strip, or other electrical receptacle. Confirm that they are rated to handle the total current (in amps [A]) drawn by the device (indicated on the power supply unit) and any other devices that are on the same circuit.
-
On devices where the AC prongs may be folded for storage, before plugging the AC adapter into a power outlet, make sure its prongs are fully extended.
-
On devices where the AC prongs are removable and where the power supply uses a universal adapter, before plugging the AC adapter into a power outlet, make sure the prong assembly is of the proper con figuration for the power outlet and fully seated into the adapter.
HARDWARE GUIDE
INSTALLATION
1. Turn the power off at the breaker.
2. Mount the High Power Relay at your chosen location, ensuring easy access to existing wires.
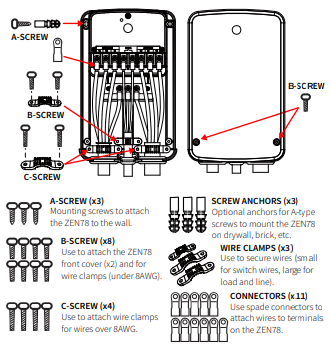
3. Lift off the front cover of the device (NOTE: cover screws are not pre-installed, they are provided in bag B with the screw accessories).
4. Carefully remove the wires from the load or disconnector.
5. Strip insulation on wires as needed. For stranded wires, use the included spade connectors for a secure connection. Feed wires through the relay’s seal plugs.
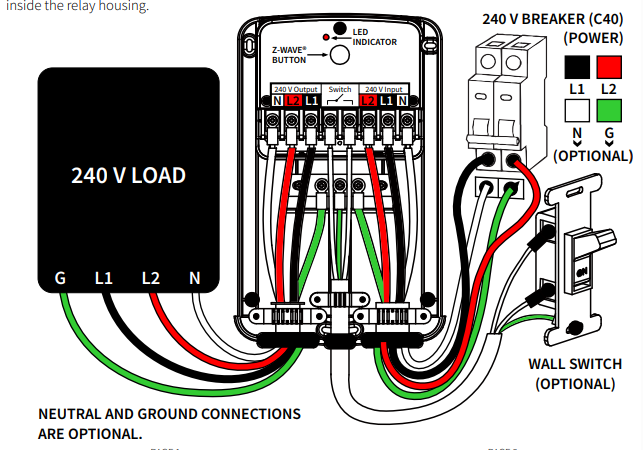
6. Make electrical connections. Refer to the appropriate wiring diagram for power, load, and optional external switch connections. Loosen the relay terminal screws, insert the wires, and tighten securely.
7. Double check that all connections are firm and all terminals are fully tightened.
8. Use the included wire clamps to secure wiring inside the relay housing
9. Close the cover, then attach and tighten the front cover (type B) screws.
10. Restore power to the circuit and test the device. The LED indicator on the ZEN78 will pulse red when power is restored. The easiest way to test the device is to click the Z-Wave® button on the ZEN78 - the connected load will change its status (turn on or off) when the Z-Wave® button is clicked.
Troubleshooting: If the device doesn’t power on, please turn off the breaker and make sure there are no loose connections. Double check you followed the correct diagram for your installation.
Z-WAVE CONTROL
There are 2 methods to add the relay to your hub:
SmartStart:
-
DO NOT POWER ON THE DEVICE YET.
-
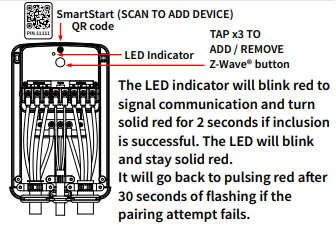
Use the hub UI / app to scan the SmartStart code on the device. The SmartStart QR code / security PIN is located on the back of the dimmer.
-
Once completed, power the device for SmartStart inclusion, it will be added automatically.
-
Do NOT press the Z-Wave® button. (Except for SmartThings, you may need to tap the Z-Wave® button 3 times). See below for QR codes to hub-specific instructions.
Manual Inclusion:
-
Initiate inclusion (pairing) in the app or hub UI.
-
Make sure the device is powered and finalize the inclusion at the relay: tap the Z-Wave® button 3 times quickly.
-
The LED indicator will blink green rapidly to signal communication and turn green for 2 seconds if inclusion is successful or turn red for 2 seconds if the pairing attempt fails. If the LED is not blinking rapidly, you did not click the button fast enough.
How to Add the ZEN78 High Power Relay to Home Assistant
How to Add the ZEN78 High Power Relay to HomeSeer
How to Add the ZEN78 High Power Relay to Hubitat
How to Add the ZEN78 High Power Relay to SmartThings
How to Add the ZEN78 High Power Relay to Z-Box
How to Add the ZEN78 High Power Relay to My Z-Wave Hub
TROUBLESHOOTING
The Relay won’t add to your hub? Try this:
-
Initiate EXCLUSION and click the Z-Wave® button 3 times quickly.
-
Click the Z-Wave® button 3 times as quickly as possible to add or try it in a non-secure mode.
-
Factory reset the device.
-
Bring the Relay closer to your hub, it may be out of range.
-
Double-check if the device is powered.
EXCLUSION (REMOVING / UNPAIRING DEVICE)
-
Bring the High Power Relay within direct range of your Z-Wave® gateway (hub).
-
Put the Z-Wave® hub into exclusion mode
-
Click the Z-Wave® button 3 times quickly.
-
Your hub will confirm exclusion and the Relay will disappear from your controller's device list.
Can't Add My ZEN78 High Power Relay to Home Assistant
Can't Add My ZEN78 High Power Relay to HomeSeer
Can't Add My ZEN78 High Power Relay to Hubitat
Can't Add My ZEN78 High Power Relay to SmartThings
Can't Add My ZEN78 High Power Relay to Z-Box
Can't Add My ZEN78 High Power Relay to My Z-Wave Hub
FACTORY RESET
When your network’s primary controller is missing or otherwise inoperable, you may need to reset the device to factory settings manually. In order to complete the process, power the ZEN78 Relay, then click the Z-Wave® button once and immediately aer, press and hold the button for 20 seconds. The LED indicator will flash for 20 seconds and turn solid red for 2 seconds to indicate successful reset. All previously recorded activity and custom settings will be erased from the device’s memory.
ADVANCED SETTINGS
Please refer to your controller's user guide for advanced programming instructions as they are a little different for every software.
ZEN78 High Power Relay Advanced Settings
How to Access the ZEN78 High Power Relay's Advanced Settings on Home Assistant
How to Access the ZEN78 High Power Relay's Advanced Settings on HomeSeer
How to Access the ZEN78 High Power Relay's Advanced Settings on Hubitat
How to Access the ZEN78 High Power Relay's Advanced Settings on SmartThings
How to Access the ZEN78 High Power Relay's Advanced Settings on Z-Box
ASSOCIATION
The Switch supports Group 1 with up to 5 devices for Lifeline communication. This device will send Basic Set and Switch Binary Set commands to devices associated in Group 2 when it changes status. It will send Basic Set ON to Group 3 and Basic Set OFF commands to Group 4 when overheat alarm is triggered. It will send Basic Set ON to Group 5 and Basic Set OFF commands to Group 6 when overheat alarm is cleared. It will send Basic Set ON to Group 7 and Basic Set OFF commands to Group 8 when freeze alarm is triggered. It will send Basic Set ON to Group 9 and Basic Set OFF commands to Group 10 when freeze alarm is cleared. It will send Basic Set and Switch Binary Set commands to devices associated in Group 11 when the external switch changes status.
S2
This product can be included and operated in any Z-Wave® network with other Z-Wave® certified devices from other manufacturers and/or other applications. All non-battery operated nodes within the network will act as repeaters regardless of vendor to increase reliability of the network. This is an SGS certified device. SGS, like ETL or UL, is a Nationally Recognized Testing Laboratory. The SGS mark is proof of product compliance to North American safety standards.
COMMAND CLASSES
ZWAVEPLUS_INFO V2
ASSOCIATION V2
ASSOCIATION_GROUP_INFO V3
TRANSPORT_SERVICE V2
VERSION V3
METER V6
SENSOR_MULTILEVEL V11
MANUFACTURER_SPECIFIC V2
DEVICE_RESET_LOCALLY V1
INDICATOR V3
POWERLEVEL V1
SWITCH_BINARY V2
CONFIGURATION V4
CRC_16_ENCAP V1
SECURITY_2 V1
APPLICATION_STATUS V1
SUPERVISION V1
FIRMWARE_UPDATE_MD V5
NOTIFICATION V8
CENTRAL_SCENE V3
WIRE AND CORD SAFETY
Arrange all wires and cords so that people and pets are not likely to trip over or accidentally pull on them as they move around or walk through the area. Do not allow children to play with cables, wires, and cords. To avoid damaging the power cords and power supply:
-
Protect the power cords from being walked on.
-
Protect cords from being pinched or sharply bent, particularly where they connect to the power outlet, the power supply unit, and the device.
-
Do not jerk, knot, sharply bend, or otherwise abuse the power cords.
-
Do not expose the power cords to sources of heat.
-
Keep children and pets away from the power cords. Do not allow them to bite or chew on them.
-
When disconnecting the power cords, pull on the plug—do not pull on the cord.
-
If a power cord or power supply becomes damaged in any way, stop using it immediately.
-
Unplug your device during lightning storms or when unused for long periods of time.
-
For devices with an AC power cord that connects to the power supply, always connect the power cord according to the following instructions:
-
Step 1: Plug the AC power cord into the power supply until it seats fully.
-
Step 2: Plug the other end of the AC power cord into the wall outlet.
-
WARRANTY
This product is covered under a 12-month warranty and under a 5-year limited warranty if registered within 30 days of purchase. To read the full warranty policy or file a warranty claim, visit www.getzooz.com/warranty.
IN NO EVENT SHALL ZOOZ OR ITS SUBSIDIARIES AND AFFILIATES BE LIABLE FOR ANY INDIRECT, INCIDENTAL, PUNITIVE, SPECIAL, OR CONSEQUENTIAL DAMAGES, OR DAMAGES FOR LOSS OF PROFITS, REVENUE, OR USE INCURRED BY CUSTOMER OR ANY THIRD PARTY, WHE-THER IN AN ACTION IN CONTRACT, OR OTHERWISE EVEN IF ADVISED OF THE POSSIBILITY OF SUCH DA-MAGES. ZOOZ'S LIABILITY AND CUSTOMER'S EXCLUSIVE REMEDY FOR ANY CAUSE OF ACTION ARISING IN CON-NECTION WITH THIS AGREEMENT OR THE SALE OR USE OF THE PRODUCTS, WHETHER BASED ON NEGLIGENCE, STRICT LIABILITY, BREACH OF WARRANTY, BREACH OF AGREEMENT, OR EQUITABLE PRINCIPLES, IS EXPRESSLY LIMITED TO, AT ZOOZ'S OPTION, REPLACEMENT OF, OR REPAYMENT OF THE PURCHASE PRICE FOR THAT POR-TION OF PRODUCTS WITH RESPECT TO WHICH DA-MAGES ARE CLAIMED. ALL CLAIMS OF ANY KIND ARISING IN CONNECTION WITH THIS AGREEMENT OR THE SALE OR USE OF PRODUCTS SHALL BE DEEMED WAIVED UNLESS MADE IN WRITING WITHIN THIRTY (30) DAYS FROM ZOOZ'S DELIVERY, OR THE DATE FIXED FOR DELI-VERY IN THE EVENT OF NONDELIVERY.
FCC NOTE: THE MANUFACTURER IS NOT RESPONSIBLE FOR ANY RADIO OR TV INTERFERENCE CAUSED BY UNAUTHORIZED MODIFICATIONS TO THIS EQUIPMENT. SUCH MODIFICATIONS COULD VOID THE USER’S AUTHORITY TO OPERATE THE EQUIPMENT. STORE INDOORS WHEN NOT IN USE. SUITABLE FOR DRY LOCATIONS ONLY. DO NOT IMMERSE IN WATER. NOT FOR USE WHERE DIRECTLY EXPOSED TO WATER.
This device complies with Part 15 of the FCC Rules. Operation is subject to the following conditions:
-
This device may not cause harmful interference
-
This device must accept any interference received, including interference that may cause undesired operation.
This equipment has been tested and found to comply with the limits for a Class B digital device, pursuant to part 15 of the FCC Rules. These limits are designed to provide reasonable protection against harmful interference in a residential installation. This equipment generates, uses and can radiate radio frequency energy and, if not installed and used according to instructions, may cause harmful interference to radio communications. However, there is no guarantee that interference will not occur in any given installation. If this equipment causes harmful interference to radio or television reception, the user may try to correct the interference by taking one or more of the following measures:
-
Reorient or relocate receiving antenna
-
Increase the separation between equipment and receiver
-
Connect equipment into a separate outlet or circuit from receiver
-
Consult the dealer or an experienced radio/TV technician for additional assistance
This Class B digital apparatus complies with Canadian ICES-003. This device complies with Industry Canada licence-exempt RSS standard(s). Operation is subject to the following two conditions:
-
This device may not cause interference
-
This device must accept any interference, including interference that may cause undesired operation of the device.
Le présent appareil est conforme aux CNR d'Industrie Canada applicables aux appareils radio exempts de licence. L'exploitation est autorisée aux deux conditions suivantes :
-
l'appareil ne doit pas produire de brouillage
-
l'utilisateur de l'appareil doit accepter tout brouillage radioélectrique subi, même si le brouillage est susceptible d'en compromettre le fonctionnement.
RF warning statement: The device has been evaluated to meet general RF exposure requirement. To maintain compliance with RSS-102 — Radio Frequency (RF) Exposure guidelines, this equipment should be installed and operated with a minimum distance of 20cm between the radiator and your body.
All brand names displayed are trademarks of their respective holders.
© Zooz 2025

