


Don't forget to register your product for extended warranty and more perks:
Click here to register your device here.
FEATURES
-
Manual or Z-Wave on/off control with instant status updates
-
800 series Z-Wave chip for better range and faster control
-
Direct 3-Way: works with regular on/off switches in a 3-way
-
Scene control: trigger actions with multi-tap (select hubs only)
-
Smart bulb mode: disable relay and control the light via Z-Wave
-
Z-Wave Long Range for ultra reliable no-mesh communication
-
Remembers and restores on/off status aer power failure
-
Adjustable LED indicator in 4 colors and 3 brightness levels Ÿ Works with LED and incandescent bulbs (don’t use with fluoresecent tubes lights)
SPECIFICATIONS
-
Model Number: ZEN71 800LR
-
Z-Wave Signal Frequency: 908.42 MHz
-
Power: 120 VAC, 60 Hz
-
Maximum Load: 150W LED or CFL bulbs, 960W Incandescent, 1800W (15A) Resistive, 1/2 hp motor (DON’T use with receptacles)
-
Range: Up to 500 feet line of sight
-
Operating Temperature: 32-104° F (0-40° C)
-
Installation and Use: Indoor only
CAUTION
Before You Install: This switch is intended for installation in accordance with the National Electric Code and local regulations. It is recommended that a licensed electrician perform this installation.
-
This is an electrical device - please use caution when installing and operating the on/off switch.
-
Remote control of appliances may result in unintentional or automated activation of power.
-
Do not use this Z-Wave device to control electric heaters or other appliances which produce the risk of fire, burns, or electrical shock when unattended.
-
To reduce risk of overheating and possible damage to other equipment, do not install this unit to control a receptacle; a motor-operated appliance; a fluorescent lighting fixture; or a transformer-supplied fixture.
WARNING
-
This product should be installed indoors upon completion of any building renovations.
-
Prior to installation, the device should be stored in a dry, dust-and-mold-proof place.
-
Do not install the switch in a place with direct sun exposure, high temperature, or humidity.
-
Keep away from chemicals, water, and dust.
-
Ensure the device is never close to any heat source or open flame to prevent fire.
-
Ensure the device is connected to an electric power source that does not exceed the maximum load power.
-
No part of the device may be replaced or repaired by the user.
WIRING: READ IT!
-
CHECK THE LOAD: lights only (150W for LED’s, 600W for incande-scent), DON’T CONNECT THIS SWITCH TO OUTLETS OR TUBE LIGHTS.
-
POWER OFF: turn the circuit power off in the breaker panel before you start. If installing in a multi-switch box with multiple circuits, turn power off at all of the circuits.
-
CHECK THE WIRES: mark load (most oen black), line (most oen black), neutral (most oen white), and ground (most oen bare). 14 AWG wires only! Don’t rely exclusively on your multimeter to identify the wires!
-
REMOVE THE OLD SWITCH: disconnect the wires and label them with the included label stickers.
-
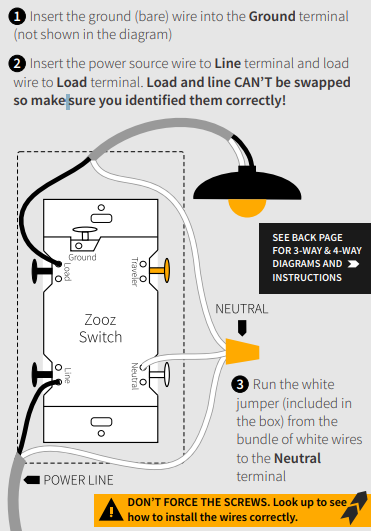
CONNECT THE Z-WAVE SWITCH: follow all installation steps carefully. Wire the switch EXACTLY like in the diagram.
HOW TO INSTALL THE WIRES
-
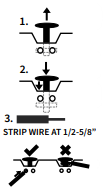
LIFT SCREW: carefully pull the screw away from the switch to make sure it’s loose. DO NOT force it. NO POWER TOOLS!
-
PRESS DOWN: press the loose screw down with your finger so it catches the thread.
-
INSERT WIRE: make sure the wire is perfectly straight, then insert it into the terminal while holding the screw down. DO NOT wrap wires around the terminal screws!
-
TIGHTEN: turn the screw clockwise to tighten the wire. DO NOT OVERTIGHTEN!
ZEN71 WIRING DIAGRAM FOR SINGLE POLE INSTALLATION
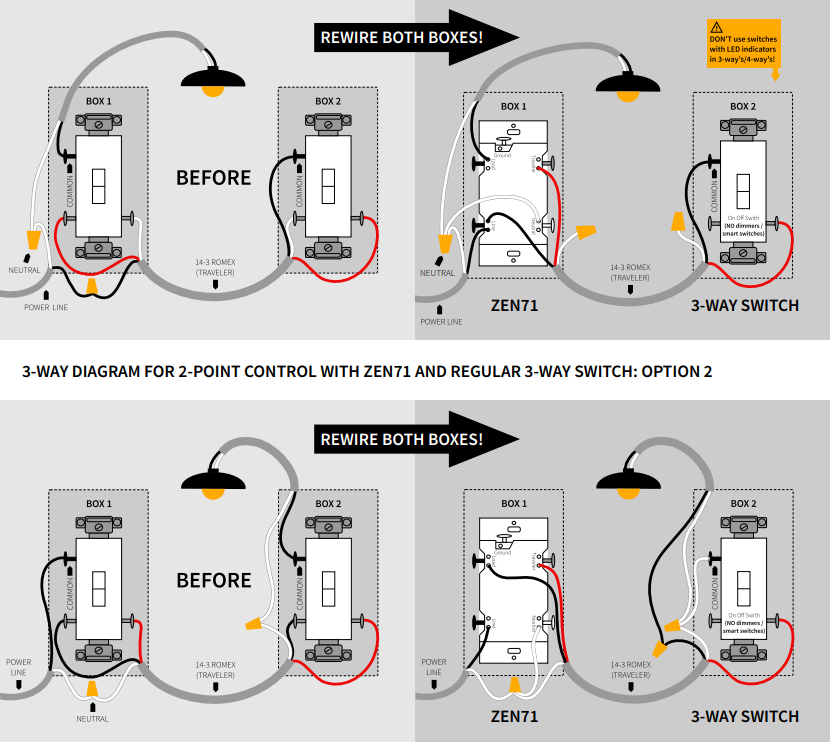
3-WAY WIRING DIAGRAMS
STOP: Wire and screw position, as well as color codes are for illustration only. You should not follow the colors and positioning in the illustration blindly. Always identify all wires prior to installing Zooz switches and make sure you can match the diagrams to your set-up exactly. Don’t experiment or attempt a “trial-and-error” installation for your own safety. Don’t disconnect any wires before documenting your set-up in each box with detailed images!
NOTE: If you are not comfortable identifying the wiring and completing the installation, please consult a licensed electrician. Make sure you have identified all wiring correctly before connecting the switch. If your wiring doesn’t match any of the below diagrams, contact our support: [email protected].
ON/OFF SWITCHES ONLY: Do not connect Zooz Z-Wave switches to an existing 3-way dimmer, illuminated switch, or an electronic add-on switch. Zooz switches can only be wired with mechanical on/off or momentary switches in a 3-way or 4-way setting! To simplify the diagrams, we did not include connections for the ground wire. Remember that all Zooz switches need to be wired according to the electrical code, with ground wire connected to the ground terminal.
POWER OFF: Cut power to the circuit before handling the wiring. Always install your Zooz switch in the box with direct connection to power line. Diagrams and instructions in this manual are for ZEN71 and ZEN72 models ONLY!
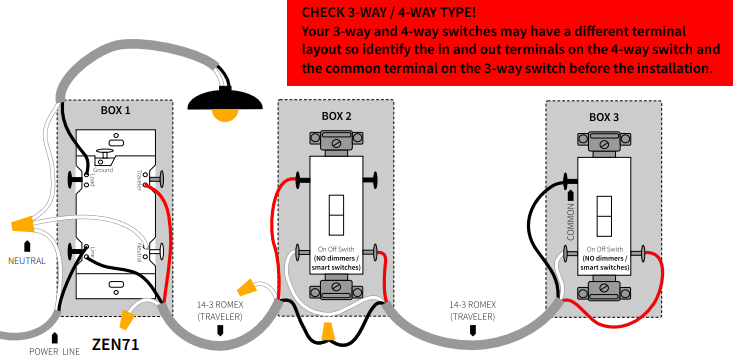
4-WAY WIRING DIAGRAM
NOTE: Use regular 3-way on/off switches ONLY in this set-up. Replace any 4-way switches or 3-way dimmers if needed. To simplify the diagrams, we did not include connections for the ground wire. Remember that all Zooz switches need to be wired according to the electrical code, with ground wire connected to the ground terminal.
Each box needs to be rewired according to the 4-way diagram.
Follow this diagram ONLY if you confirmed you have direct connection to power and light in the same box. If they're in separate boxes, use the ZEN76 model instead or ask us about using the ZEN71 with ZAC99 momentary switches in 4-way and 5-way installations. You also have the option of a virtual installation using 3 x Zooz switches as well: How To Use Multiple Zooz Switches In 3-Way and 4-Way Set-Ups.
If you have power or load coming into the box with the 4-way switch, contact us for custom instructions: [email protected].
COMPLETE INSTALLATION
Secure your Z-Wave switch in the box with mounting screws, handling the wires with care. Isolate all bare wires and screws with electrical tape. Install the wall plate and restore power to circuit.
TEST THE SWITCH
The LED indicator should light up as soon as you turn the power back on if the switch (light) is OFF. Tap the upper paddle for ON and lower paddle for OFF. If the test fails, please check that:
-
power is fully restored to the circuit
-
wiring matches the instructions exactly
-
the load isn’t too large and overheating the switch causing it to shut of
Z-WAVE CONTROL
There are 2 methods to add the device to your hub:
SmartStart:
-
DO NOT POWER ON THE DEVICE YET.
-
Use the hub UI / app to scan the SmartStart code on the device. The SmartStart QR code / security PIN is located on the front metal panel of the switch.
-
Once completed, power the device for SmartStart inclusion, it will be added automatically.
-
Do NOT press any buttons on the switch. (Except for SmartThings, you may need to click the upper paddle 3 times). See below for QR codes to hub-specific instructions
Manual Inclusion:
-
Initiate inclusion (pairing) in the app or hub UI.
-
Make sure the device is powered and finalize the inclusion at the switch: click the upper paddle 3 times quickly.
-
The LED indicator will blink blue to signal communication and turn green for 3 seconds if inclusion is successful or turn red for 3 seconds if the pairing attempt fails.
How to Add the ZEN71 On/Off Switch to Home Assistant
How to Add the ZEN71 On/Off Switch to HomeSeer
How to Add the ZEN71 On/Off Switch to Hubitat
How to Add the ZEN71 On/Off Switch to SmartThings
How to Add the ZEN71 On/Off Switch to Z-Box
How to Add the ZEN71 On/Off Switch to My Z-Wave Hub
TROUBLESHOOTING
The switch won’t add to your system? Try this:
-
Initiate EXCLUSION and tap the lower paddle 3 times quickly.
-
FACTORY RESET the switch.
-
Bring the gateway controller (hub) closer to the switch, it may be out of range.
-
Get troubleshooting tips for your hub at www.support.getzooz.com
The switch won’t control the lights manually anymore? Try this:
-
Turn the power off at the breaker and check if a wire didn’t get loose.
-
Exclude the switch from the hub or reset it in case manual control was accidentally disabled.
-
The load may be incompatible so try it with a single incandescent bulb.
EXCLUSION (REMOVING / UNPAIRING DEVICE)
-
Bring your Z-Wave gateway (hub) close to the switch if possible
-
Put the Z-Wave hub into exclusion mode (not sure how to do that? [email protected])
-
Tap the lower paddle on the switch 3 times quickly (the LED indicator will start blinking blue)
-
Your hub will confirm exclusion, the LED indicator on the switch will turn green for 3 seconds, and the device will disappear from your controller's device list.
Can't Add the ZEN71 On/Off Switch to Home Assistant
Can't Add the ZEN71 On/Off Switch to HomeSeer
Can't Add the ZEN71 On/Off Switch to Hubitat
Can't Add the ZEN71 On/Off Switch to SmartThings
Can't Add the ZEN71 On/Off Switch to Z-Box
Can't Add the ZEN71 On/Off Switch to My Z-Wave System
FACTORY RESET
If your primary controller is missing or inoperable, you may need to reset the device to factory settings. To reset the switch, press and hold the lower paddle for 10 seconds until the LED indicator starts blinking. Release paddle, and immediately aer, tap the lower paddle 5 times to complete the reset. The LED indicator will flash blue 3 times and turn red for 3 seconds to confirm successful reset. NOTE: All previously recorded activity and custom settings will be erased from the device’s memory.
ADVANCED SETTINGS
Here are all of the settings available for the most up-to-date version of the switch: ZEN71 On/Off Switch Advanced Settings.
How to Access the Advanced Settings for the ZEN71 On/Off Switch on Home Assistant
How to Access the Advanced Settings for the ZEN71 On/Off Switch on HomeSeer
How to Access the Advanced Settings for the ZEN71 On/Off Switch on Hubitat
How to Access the Advanced Settings for the ZEN71 On/Off Switch on SmartThings
How to Access the Advanced Settings for the ZEN71 On/Off Switch on Z-Box
SCENE CONTROL
You can trigger scenes or control other connected devices in your network using this switch. Just enable the setting in Parameter 9 and verify that your hub supports scene control. Assign scenes or actions to 1-tap, 2-tap, 3-tap, 4-tap, and 5- tap as well as to held and released for any of the paddles.
How to Program Scene Control on Zooz Switches on Home Assistant
How to Program Scene Control on Zooz Switches on HomeSeer
How to Program Scene Control on Zooz Switches on Hubitat
How to Program Scene Control on Zooz Switches on SmartThings
How to Program Scene Control on Zooz Switches on Z-Box
ASSOCIATION
This on/off switch supports Group 1 with up to 1 devices for lifeline communication and Group 2 with up to 5 devices. This device will send BASIC REPORT to Group 1 and BASIC SET command to group 2 when operated manually. You can set direct association to have the switch control another Z-Wave device independently of the hub by using Group 2. Not every hub exposes direct association settings in the interface so please go to www.support.getzooz.com to see if your system allows for direct association.
RANGE TEST TOOL
You can now easily check if the switch is within your Z-Wave hub’s range. NOTE: This function may only be activated once the switch has been included to a Z-Wave network.
Press and hold the lower paddle for 10 seconds until the LED indicator starts blinking. Release the paddle and within 2 seconds, tap the lower paddle 2 times quickly. The LED indicator will then report signal strength.
Solid green = direct communication with the primary controller is stable
Flashing green = direct communication with the primary controller is established but signal is weak
Solid blue = stable communication with hub via repeaters
Flashing blue = communication with the primary controller is established via repeaters but signal is weak
Solid red = communication with the primary controller has failed Tap the lower paddle to exit testing mode.
S2
This product can be included and operated in any Z-Wave network with other Z-Wave certified devices from other manufacturers and/or other applications. All non-battery operated nodes within the network will act as repeaters regardless of vendor to increase reliability of the network. This product features the latest Security 2 (S2) framework to remove smart home network hacking risks. This device is equipped with a unique authentication code for trusted wireless communication.
ETL
This is an ETL certified device. ETL, just like UL, is a Nationally Recognized Testing Laboratory. The ETL mark is proof of product compliance with North American safety standards.
WARRANTY
This product is covered under a 1-year limited warranty and extended 5-year warranty once registered. To read the full warranty policy or file a warranty claim, please go to www.getzooz.com/warranty.
IN NO EVENT SHALL ZOOZ OR ITS SUBSIDIARIES AND AFFILIATES BE LIABLE FOR ANY INDIRECT, INCIDENTAL, PUNITIVE, SPECIAL, OR CONSEQUENTIAL DAMAGES, OR DAMAGES FOR LOSS OF PROFITS, REVENUE, OR USE INCURRED BY CUSTOMER OR ANY THIRD PARTY, WHETHER IN AN ACTION IN CONTRACT, OR OTHERWISE EVEN IF ADVISED OF THE POSSIBILITY OF SUCH DA-MAGES. ZOOZ'S LIABILITY AND CUSTOMER'S EXCLUSIVE REMEDY FOR ANY CAUSE OF ACTION ARISING IN CON-NECTION WITH THIS AGREEMENT OR THE SALE OR USE OF THE PRODUCTS, WHETHER BASED ON NEGLIGENCE, STRICT LIABILITY, BREACH OF WARRANTY, BREACH OF AGREEMENT, OR EQUITABLE PRINCIPLES, IS EXPRESSLY LIMITED TO, AT ZOOZ'S OPTION, REPLACEMENT OF, OR REPAYMENT OF THE PURCHASE PRICE FOR THAT PORTION OF PRODUCTS WITH RESPECT TO WHICH DA-MAGES ARE CLAIMED. ALL CLAIMS OF ANY KIND ARISING IN CONNECTION WITH THIS AGREEMENT OR THE SALE OR USE OF PRODUCTS SHALL BE DEEMED WAIVED UNLESS MADE IN WRITING WITHIN THIRTY (30) DAYS FROM ZOOZ'S DELIVERY, OR THE DATE FIXED FOR DELI-VERY IN THE EVENT OF NONDELIVERY.
FCC NOTE THE MANUFACTURER IS NOT RESPONSIBLE FOR ANY RADIO OR TV INTERFERENCE CAUSED BY UNAUTHORIZED MODIFICATIONS TO THIS EQUIPMENT. SUCH MODIFICATIONS COULD VOID THE USER’S AUTHORITY TO OPERATE THE EQUIPMENT. STORE INDOORS WHEN NOT IN USE. SUITABLE FOR DRY LOCATIONS ONLY. DO NOT IMMERSE IN WATER. NOT FOR USE WHERE DIRECTLY EXPOSED TO WATER. This device complies with Part 15 of the FCC Rules. Operation is subject to the following conditions:
-
This device may not cause harmful interference.
-
This device must accept any interference received, including interference that may cause undesired operation.
This equipment has been tested and found to comply with the limits for a Class B digital device, pursuant to part 15 of the FCC Rules. These limits are designed to provide reasonable protection against harmful interference in a residential installation. This equipment generates, uses and can radiate radio frequency energy and, if not installed and used according to instructions, may cause harmful interference to radio communications. However, there is no guarantee that interference will not occur in any given installation. If this equipment causes harmful interference to radio or television reception, the user may try to correct the interference by taking one or more of the following measures:
-
Reorient or relocate receiving antenna - Increase the separation between equipment and receiver
-
Connect equipment into a separate outlet or circuit from receiver
-
Consult the dealer or an experienced radio/TV technician for additional assistance
All brand names displayed are trademarks of their respective holders.
© Zooz 2025

