
Here is a full list of advanced settings (parameters/preferences) for the ZEN12 Motion Dimmer:
LED Indicator
Parameter 1: Choose if you want the LED indicator to turn on when the dimmer (light) is on or off, or if you want it to remain on or off at all times.
Values: 0 – LED on when switch off; 1 – LED on when switch on; 2 – LED always off; 3 – LED always on. Default: 0.
Size: 1 byte dec
LED Indicator Color
Parameter 2: Choose the color of the LED indicator.
Values: 0 – white; 1 – blue; 2 – green; 3 – red; 4 – yellow; 5 – cyan; 6 – magenta. Default: 0.
Size: 1 byte dec
LED Indicator Brightness
Parameter 3: Choose the LED indicator's brightness level from 1 to 100%.
Values: 1-10; where 1 is 10% and 10 is 100%. Default: 5.
Size: 1 byte dec
Auto Turn-On Timer
Parameter 4: Auto-on timer will automatically turn the dimmer on after x minutes once it has been turned off.
Values: 0 – Timer disabled; 1-65535 (minutes). Default: 0.
Size: 4 byte dec
Auto Turn-Off Timer
Parameter 5: Auto-off timer will automatically turn the dimmer off after x minutes once it has been turned on.
Values: 0 – Timer disabled; 1-65535 (minutes). Default: 0.
Size: 4 byte dec
Auto Turn-On Timer Trigger
Parameter 6: Decide when the auto-on timer is triggered. Expert users only, see documentation for details.
Values: 0 – Disable timer; 1 – Enable if turned from by button; 2 – Enable if turned from by 3-way switch; 3 – Enable if turned from by button or 3-way switch; 4 – Enable if turned from by Z-Wave; 5 – Enable if turned from by Z-Wave or button; 6 – Enable if turned from by Z-Wave or 3-way switch; 7 – Enable if turned from by Z-Wave, button, or 3-way switch. Default: 7.
Size: 1 byte dec
Auto Turn-Off Timer Trigger
Parameter 7: Decide when the auto-off timer is triggered. Expert users only, see documentation for details.
Values: 0 – Disable timer; 1 – Enable if turned on from button; 2 – Enable if turned on from 3-way switch; 3 – Enable if turned on from button or 3-way switch; 4 – Enable if turned on from Z-Wave; 5 – Enable if turned on from Z-Wave or button; 6 – Enable if turned on from Z-Wave or 3-way switch; 7 – Enable if turned on from Z-Wave, button, or 3-way switch. Default: 7.
Size: 1 byte dec
Scene Control
Parameter 8: Enable or disable scene control functionality for quick multi tap triggers.
Values: 0 – scene control disabled; 1 – scene control enabled. Default: 0.
Size: 1 byte dec
Scene Indicator
Parameter 9: Enable the LED indicator to signal when a central scene event is triggered from any of the buttons (see documentation for details).
Values: 0 – scene indicator disabled; 1 – scene indicator enabled. Default: 0.
Size: 1 byte dec
Disable Button Programming
Parameter 10: Enable (0) or disable (1) programming functionality on the dimmer buttons. Expert users only, changes not recommended.
Values: 0 – programming enabled; 1 – programming disabled. Default: 0.
Size: 1 byte dec
Load Control (Smart Bulb Mode)
Parameter 11: Enable or disable physical and Z-Wave on/off and dimming control. Disable both for smart bulbs.
Values: 0 – Disable buttons; 1 – Enable buttons and Z-Wave; 2 – Disable buttons and Z-Wave. Default: 1.
Size: 1 byte dec
On/Off Status After Power Failure
Parameter 12: Set the on off status for the dimmer after power failure.
Values: 0 – always off once restored; 1 – always on once restored; 2 – remembers and restores status. Default: 2.
Size: 1 byte dec
Disable Motion Trigger
Parameter 13: Enable (0) or disable (1) motion trigger to control the connected light.
Values: 0 – enable motion trigger; 1 – disable motion trigger. Default: 0.
Size: 1 byte dec
Sensor Mode
Parameter 14: Choose the sensor mode for your motion dimmer. Disable motion sensor, enable only in night mode, or disable both sensors.
Values: 0 – disable both sensors; 1 – motion sensor always enabled; 2 – motion sensor enabled in night mode only; 3 – only lux sensor enabled (dusk to dawn mode). Default: 1.
Size: 1 byte dec
Night Mode
Parameter 15: Set the lux value for night mode (when the lux sensor signals "night" / "it's dark" to the dimmer).
Values: 1-1000 (lux). Default: 25.
Size: 2 byte dec
Day Mode
Parameter 16: Set the lux value for day mode (when the lux sensor signals "day" / "there's enough natural light" to the dimmer).
Values: 1-1000 (lux). Default: 100.
Size: 2 byte dec
Motion Clear Delay
Parameter 17: Set the amount of time the device waits to send a motion clear notification after the last motion event is detected.
Values: 0-3600 seconds. Default: 30.
Size: 2 byte dec
Auto Turn-Off After Dusk
Parameter 18: The dimmer turns off after x number of minutes when turned on in night mode and when parameter 14 is set to value 3.
Values: 0 – dimmer on until day mode or manual override; 1-1200 (minutes). Default: 0.
Size: 2 byte dec
Lux Reporting Threshold
Parameter 19: Set the threshold for lux reporting. Set value to 0 to to ignore changes and report based on frequency.
Values: 0 – Lux reporting based on changes disabled; 1-200 lux. Default: 20.
Size: 2 byte dec
Lux Reporting Frequency
Parameter 20: Set the reporting interval for lux. Values 5-120 (minutes) will send a report regardless of the reporting threshold setting.
Values: 5-120 minutes. Default: 10.
Size: 1 byte dec
Motion Sensitivity
Parameter 21: Set motion sensitivity for the motion detector to minimize false alerts. Set 1 to the lowest sensitivity level or 10 to the highest.
Values: 1-10 -1 indicates the lowest sensitivity and 10 indicates the highest sensitivity. Default: 5.
Size: 1 byte dec
Lux Offset
Parameter 22: Set the lux reporting offset. Value 100 = no offset, values 0-99 decrease the value (ex: 75 means deduct 25 lux from the measured value), values 101-200 increase the value (ex: value 147 means add 47 lux to the measured value).
Values: 0-99 – negative offset; 100 – no offset; 101-200 – positive offset. Default: 100.
Size: 1 byte dec
Disable LED Indicator Flash On Setting Change
Parameter 23: Choose if the LED should flash whenever a parameter is adjusted on the device to confirm the change (0) or disable this feature (1).
Values: 0 – LED indicator flashes to confirm a setting change; 1 – LED indicator doesn't flash if a setting is changed. Default: 0.
Size: 1 byte dec
Physical Ramp Rate ON
Parameter 24: Adjust the ramp rate ON for your dimmer when the top button is pressed for a smooth fade-in effect (in seconds).
Values: 0 – instant on; 1-99 (seconds). Default: 0.
Size: 1 byte dec
Physical Ramp Rate OFF
Parameter 25: Adjust the ramp rate OFF for your dimmer when the top button is pressed for a smooth fade-out effect (in seconds).
Values: 0 – instant off; 1-99 (seconds). Default: 2.
Size: 1 byte dec
Dimming Speed
Parameter 26: Set the number of seconds it takes to get from 0% to 100% brightness when pressing and holding the dimming button (physical dimming).
Values: 1-99 (seconds). Default: 5.
Size: 1 byte dec
Z-Wave Ramp Rate ON
Parameter 27: Adjust the ramp rate ON for your dimmer when controlled with Z-Wave for a smooth fade-in effect (in seconds).
Values: 0 – instant on; 1-99 (seconds); 255 – match physical. Default: 255.
Size: 1 byte dec
Z-Wave Ramp Rate OFF
Parameter 28: Adjust the ramp rate OFF for your dimmer when controlled with Z-Wave for a smooth fade-out effect (in seconds).
Values: 0 – instant on; 1-99 (seconds); 255 – match physical. Default: 255.
Size: 1 byte dec
Remote Z-Wave Dimming Duration
Parameter 29: Set the number of seconds it takes to get from 0% to 100% brightness on dimmers and smart bulbs directly associated with ZEN12 in Groups 3 and 4.
Values: 1-99 (seconds). Default: 5.
Size: 1 byte dec
Minimum Brightness
Parameter 30: Set the minimum brightness level (in %) for your dimmer. You won’t be able to dim the light below the set value.
Values: 1-99 (%). Default: 1.
Size: 1 byte dec
Maximum Brightness
Parameter 31: Set the maximum brightness level (in %) for your dimmer. You won’t be able to add brightness to the light beyond the set value.
Values: 1-99 (%). Default: 99.
Size: 1 byte dec
Top Button Double Tap
Parameter 32: Choose what you'd like the dimmer to do when you double-tap the top button.
Values: 0 – on to full brightness; 1 – on to the custom brightness (from param 34); 2 – on to max brightness (from param 31); 3 – double tap disabled. Default: 0.
Size: 1 byte dec
Top Button Single Tap
Parameter 33: Choose what you'd like the dimmer to do when you tap the top button once.
Values: 0 – on to the last brightness level; 1 – on to the custom brightness (from param 34); 2 – on to max brightness (from param 31)
3 – on to full brightness. Default: 0.
Size: 1 byte dec
Top Button Custom Brightness On
Parameter 34: Set the custom brightness level (or leave the last brightness level) for single tap and double tap (see params 32 and 33) on the top button.
Values: 0 – last brightness level; 1-99 (%). Default: 0.
Size: 1 byte dec
3-Way Switch Type
Parameter 35: Choose the type of 3-way switch you want to use with this dimmer in a 3-way set-up.
Values: 0 – Toggle on/off switch; 1 – Toggle switch with dimming mode; 2 – Momentary switch (ZAC99); 3 – Momentary switch (ZAC99) with smart sequence. Default: 0.
Size: 1 byte dec
Multilevel Dimming Reports
Parameter 36: Choose how you'd like the dimmer to report when paddles are tapped and held and physical / Z-Wave control is enabled or disabled.
Values: 0 – Reports each brightness level if physical and Z-Wave control disabled (reports final level if physical and Z-Wave control enabled); 1 – Always reports final brightness level only (Z-Wave multilevel reports, physical basic reports)' 2 – Reports each brightness level if physical and Z-Wave control disabled (reports final level if physical and Z-Wave control enabled), all multilevel reports. Default: 2.
Size: 1 byte dec
Scene Control From Remote 3-Way Switch
Parameter 37: Enable scene control functionality from the momentary switch connected to ZEN12 in a 3-way installation.
Values: 0 – scene control disabled commands from the remote 3-way switch disabled; 1 – scene control commands from the remote 3-way switch enabled. Default: 0.
Size: 1 byte dec
Manual Override Timer
Parameter 38: The dimmer resumes sensor triggers after x number of seconds when turned on or off physically from the buttons or via Z-Wave.
Values: 1-3600 seconds. Default: 10.
Size: 1 byte dec
Basic Set Custom Brightness On
Parameter 39: Set custom brightness (or leave last brightness) for Basic Set ON commands when the ZEN12 is triggered by another device in direct association.
Values: 0 – last brightness level; 1-99 (%). Default: 0.
Size: 1 byte dec
Scene Control Multi-Tap
Parameter 40: Disable multi-tap scene control so that only single taps report via central scene.
Values: 0 – multi-tap for scene control enabled; 1 – multi-tap for scene control disabled. Default: 0.
Size: 1 byte dec
Gamma Factor
Parameter 41: Adjust the gamma factor for your dimmer to improve dimming performance (experts only). See documentation for details.
Values: 10-50 = 1.0 – 5.0 gamma. Default: 10.
Size: 1 byte dec
Disabled Load Behavior
Parameter 42: Set reporting behavior for disabled physical control of the load connected to the dimmer (smart bulb mode).
Values: 0 – Reports status / changes LED; 1 – Doesn't report status / change LED. Default: 0.
Size: 1 byte dec
Night Light
Parameter 43: Set the brightness level the dimmer will turn on to when off and when the left dimming button is held DOWN for 2 seconds.
Values: 0 – feature disabled; 1 – 99 (%). Default: 20.
Size: 1 byte dec
On Off Switch Mode
Parameter 44: Convert the dimmer to an on off switch. When enabled, the dimmer will behave as a switch without the ability to dim.
Values: 0 – disabled; 1 – enabled. Default: 0.
Size: 1 byte dec
LED Indicator Multi-Color
Parameter 45: Choose the color of the LED indicator in opposite switch state (instead of off). 0 – off, 1 – white, 2 – blue, 3 – green, 4 – red.
Values: 0 – off; 1 – white; 2 – blue; 3 – green; 4 – red; 5 – yellow; 6 – cyan; 7 – magenta. Default: 0.
Size: 1 byte dec
Dimming Button Orientation
Parameter 46: Choose if you want the left or right dimming button to increase brightness and dim the connected light. Value 1 to reverse default.
Values: 0 – left button dims, right button increases brightness; 1 – left button increases brightness, right button dims. Default: 0.
Size: 1 byte dec
How to Access the Advanced Settings for the ZEN12 Motion Dimmer
How to Access the Advanced Settings for the ZEN12 Motion Dimmer on Home Assistant
How to Access the Advanced Settings for the ZEN12 Motion Dimmer on HomeSeer
How to Access the Advanced Settings for the ZEN12 Motion Dimmer on Hubitat
How to Access the Advanced Settings for the ZEN12 Motion Dimmer on SmartThings
How to Access the Advanced Settings for the ZEN12 Motion Dimmer on Z-Box
Associations
Group 1: Lifeline and BASIC REPORT
Group 2: BASIC SET
Group 3: MULTILEVEL SET
Group 4: MULTILEVEL CHANGE when operated manually
Group 5: BASIC SET when motion is triggered
Group 6: BASIC SET when lux sensor is triggered
Central Scene Mapping
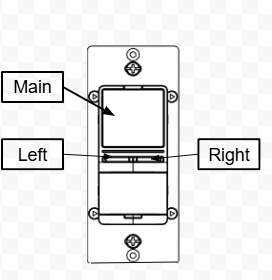
Main Button
1 x tap: load on; Scene 1, attribute 00
2 x tap: Scene 1, attribute 02
3 x tap: enter inclusion (pairing) mode or exclusion mode; Scene 1, attribute 03
4 x tap: Scene 1, attribute 04
5 x tap: Scene 1, attribute 05
held: Scene 1, attribute 01
released: Scene 1, attribute 02
Left Button
1 x tap: Scene 2, attribute 00
2 x tap: Scene 2, attribute 01
3 x tap: Scene 2, attribute 02
4 x tap: Scene 2, attribute 03
5 x tap: Scene 2, attribute 04
held: Scene 2, attribute 05
released: Scene 2, attribute 06
Right Button
1 x tap: Scene 3, attribute 00
2 x tap: Scene 3, attribute 01
3 x tap: Scene 3, attribute 02
4 x tap: Scene 3, attribute 03
5 x tap: Scene 3, attribute 04
held: Scene 3, attribute 05
released: Scene 3, attribute 06
Remote Switch (available when using a ZAC99 with the ZEN12 in a 3-way. Remember to set parameter 35 to value 2 or 3 to access these scene control options)
1 x tap: Scene 4, attribute 00
2 x tap: Scene 4, attribute 01
3 x tap: Scene 4, attribute 02
4 x tap: Scene 4, attribute 03
5 x tap: Scene 4, attribute 04
held: Scene 4, attribute 05
released: Scene 4, attribute 06
Manual Control
Inclusion: Click the main button 3 times as quickly as possible, and the LED's will start blinking blue to indicate communication. The LED's will turn solid green for 2 seconds when inclusion is successful, or will turn red if inclusion fails.
Exclusion: Click the main button 3 times; all the LED's will blink magenta. The LED's will turn solid green for 2 seconds when excluded successfully and the LED's will be solid red for 2 seconds if exclusion fails.
Factory Reset: On the main button: tap it once, then press and hold it for 10 seconds until the LED's all start blinking green. Press the left button 5 times to reset to the ZEN12 to factory settings. The LED's will flash red 5 times quickly to confirm a successful reset.
Parameter 9 (Scene Indicator):
0 – Disable scene indicator
1 – Enable scene indicator as below:
[Main button] - White
[Left button] – Blue
[Right button] - Green
[External button] - Red
Tap 1x- 1 LED from right lit on 2 seconds
Tap 2x- 2 LEDs from right lit 2 seconds
Tap 3x- 3 LEDs from right lit 2 seconds
Tap 4x- 4 LEDs from right lit 2 seconds
Tap 5x- 5 LEDs from right lit 2 seconds
Held down- The left and right LEDs lit 2 seconds
Supported Command Classes
Z-Wave Plus Info V2
Transport service V2
Security 2 V1
Supervision V1
Switch Multilevel V4
Notification V8
Sensor Multilevel V11
Configuration V4
Central Scene V3
Association V2
Multi channel association V3
Association group information V3
Version V3
Manufacturer specific V2
Device reset locally V1
Indicator V3
Power level V1
Firmware Update V5

