
Pick your favorite way to program the ZEN34 from the options below! From scene control (multi-tap) to direct association, programming the ZEN34 Remote Switch on the Z-Box Hub is simple and intuitive.
To program the multi-tap functions on the ZEN34, you can follow the standard block scene creation flow, or you can even program the scene straight from the ZEN34 Remote Switch device menu for a simplified and faster approach.
Direct association is another way to program the ZEN34, which allows you to bypass the hub and have the ZEN34 send direct messages to another Z-Wave device.
You'll need to ensure that you're logged in to the WEB UI with a local connection (same Wi-Fi network as your Z-Box Hub)
To Create the Central Scene from the ZEN34 Remote Switch Device Menu:
1. If not on the Home Menu already, from the sidebar navigation menu of the Z-Box web interface, click on the house icon.

2. Hover over the device icon for which you want to create a scene, then click on the setting gear icon.

3. Click on the Advanced tab.

4. From the Button configuration menu, you can configure actions on the device button by creating dedicated scenes according to your needs.

5. For the below example, we will use the ZEN34 Remote Switch, for which you can create up to 14 different actions.

6. To add an action click on Add Action next to the trigger of your choice.

7. You will be redirected to the New Block Scene general scene settings menu. Provide all required information and click Save to proceed.

8. The trigger will be set as per your selection. If required, you can change the button and trigger selection.

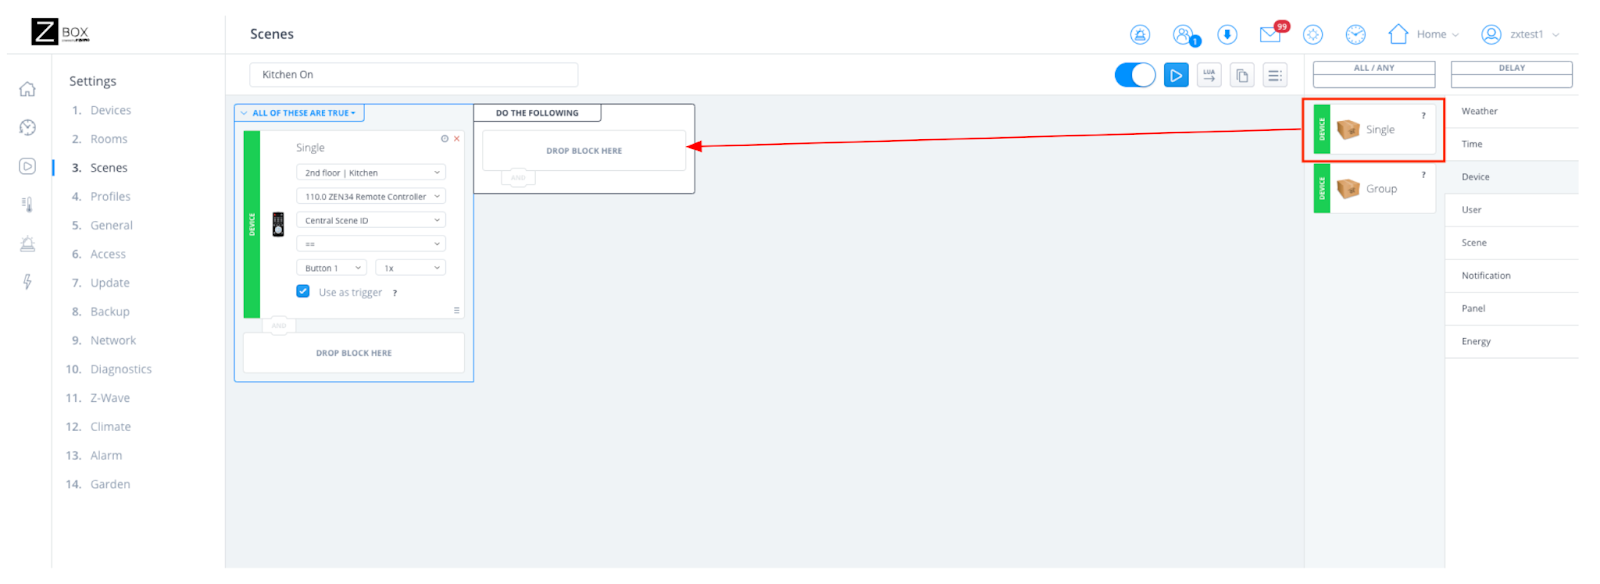
9. To assign an action, drag one of the tiles to the ‘Do the following’ section.
10. Once you are done specifying the action, click Save.

11. To review the scene or to add additional actions, navigate back to the Device Advance Settings section. To edit or edit any of the actions, navigate to Settings/Scenes and select the action/scene that you want to edit.

To Set Up Direct Association from the ZEN34 Remote Switch Device Menu:
1. If not on the Home Menu already, from the sidebar navigation menu of the Z-Box web interface, click on the house icon.
2. Hover over the device icon for which you want to create a scene, then click on the setting gear icon.
3. Click on the Associations tab.

4. Choose your group for the associated device (Group 2 is for On/Off, Group 3 is Multilevel/Dimming).

5. Select your target device and click the + symbol. Once done, please manually wake the ZEN34 to receive the change, then hit Save.
Please don't hesitate to reach out to us with any questions!

