


The Zooz ZEN12 Motion Dimmer combines dimming control, scene control, motion detection, and ambient light monitoring in a single device. Its three physical buttons can trigger Hubitat automations through Central Scene commands, while the built-in motion and lux sensors can be used as independent automation triggers.
The multi-color LED indicator can also be customized to reflect the state of the connected load or provide visual feedback when a Central Scene command is triggered.
The ZEN12 Motion Dimmer is officially integrated with Hubitat, so its switch, dimmer, motion, illuminance, button, and advanced setting functions should be available through the built-in driver without installing custom code.
If the ZEN12 does not display correctly, confirm that your Hubitat hub is running the latest platform version. You may then need to exclude and re-include the ZEN12 so it can be interviewed and recognized correctly.
You can find all available configuration options in the ZEN12 Motion Dimmer Advanced Settings.
Central Scene / Scene Control
Central Scene programming allows the ZEN12 to send button-press information to Hubitat. Hubitat interprets the command and runs the automation assigned to that button and press type. This provides more flexibility than standard on/off control because each button can trigger different actions based on whether it is tapped, double tapped, held, or released. For example, the main button can continue controlling the connected light normally while a double tap triggers a separate automation. The smaller dimming buttons can also trigger Hubitat automations without losing their normal dimming functions.
Enable Scene Control
Scene control is disabled by default on the ZEN12. Before creating button automations in Hubitat:
-
Open the ZEN12 Motion Dimmer from the Devices page.
-
Locate the Scene Control setting (parameter 8) under Preferences.
-
Enable scene control.
-
Click Save Preferences.
If you only want single-tap scene reports, Parameter 40 can be set to value 1 to disable multi-tap, held, and released events. Leave Parameter 40 set to its default value of 0 for full scene control functionality.
Scene Numbers and Button Mapping
The ZEN12 uses the following Central Scene numbers:
|
Button |
Scene number |
Description |
|---|---|---|
|
Main button |
1 |
Large on/off button |
|
Left dimming button |
2 |
Decreases brightness by default |
|
Right dimming button |
3 |
Increases brightness by default |
|
ZAC99 remote switch |
4 |
Available in a compatible 3-way installation |
Each button supports the following Central Scene key attributes:
|
Key attribute |
Action type |
|---|---|
|
0 |
Key pressed once |
|
1 |
Key released |
|
2 |
Key held down |
|
3 |
Key pressed 2 times |
|
4 |
Key pressed 3 times |
|
5 |
Key pressed 4 times |
|
6 |
Key pressed 5 times |
For example:
-
Pressing the main button once sends Scene 1, Key Attribute 0.
-
Double tapping the left dimming button sends Scene 2, Key Attribute 3.
-
Holding the right dimming button sends Scene 3, Key Attribute 2.
-
Releasing the right dimming button sends Scene 3, Key Attribute 1.
The main button will continue controlling the connected load when tapped once unless physical control has been disabled through the Load Control setting.
Three taps on the main button also initiate inclusion or exclusion. This action reports Scene 1, Key Attribute 4 while performing the inclusion or exclusion function. If you plan to use the triple tap on the main button for scene control, please disable the inclusion/exclusion process by disabling parameter 10.
The button labels displayed in Hubitat may differ from the raw Scene Number and Key Attribute terminology. Hubitat converts the Central Scene reports into button events that can be selected in Button Controller, Rule Machine, and other automation apps.
The button actions exposed in an automation may depend on the Hubitat platform and driver version. If an expected multi-tap action is missing, first update Hubitat to the latest platform version and click Configure on the ZEN12 device page.
ZEN12 with a ZAC99 Momentary Switch
If a ZAC99 Momentary Switch is connected to the ZEN12 in a compatible 3-way installation, it can report separately as Scene 4.
To enable Central Scene reports from the ZAC99, configure the following settings:
-
Set Parameter 8 to value 1 to enable scene control.
-
Set Parameter 35 to value 2 or 3 for the appropriate momentary switch behavior.
-
Set Parameter 37 to value 1 to enable scene control from the remote switch.
The ZAC99 can then send the same seven Central Scene key attributes as the built-in ZEN12 buttons.
A standard mechanical on/off switch cannot provide the same Central Scene options. It changes the electrical state of the traveler circuit rather than providing the momentary input required for multi-tap scene commands.
The ZAC99 is an SPST momentary switch, so only the upper portion is pressed. Its local behavior depends on the option selected under Parameter 35.
Central Scene Summary
-
The main button uses Scene 1.
-
The left dimming button uses Scene 2.
-
The right dimming button uses Scene 3.
-
A connected ZAC99 Momentary Switch can use Scene 4.
-
Each scene supports single tap, release, hold, double tap, triple tap, four taps, and five taps at the Z-Wave level.
-
Parameter 8 must be set to value 1 before Central Scene commands can be used.
-
Parameter 37 must also be enabled to receive Central Scene commands from a connected ZAC99.
Programming Central Scene
Hubitat provides several built-in apps that can use the ZEN12’s button events. Button Controller is recommended for button-based automations, while Rule Machine provides more advanced conditions and actions.
Basic Rule
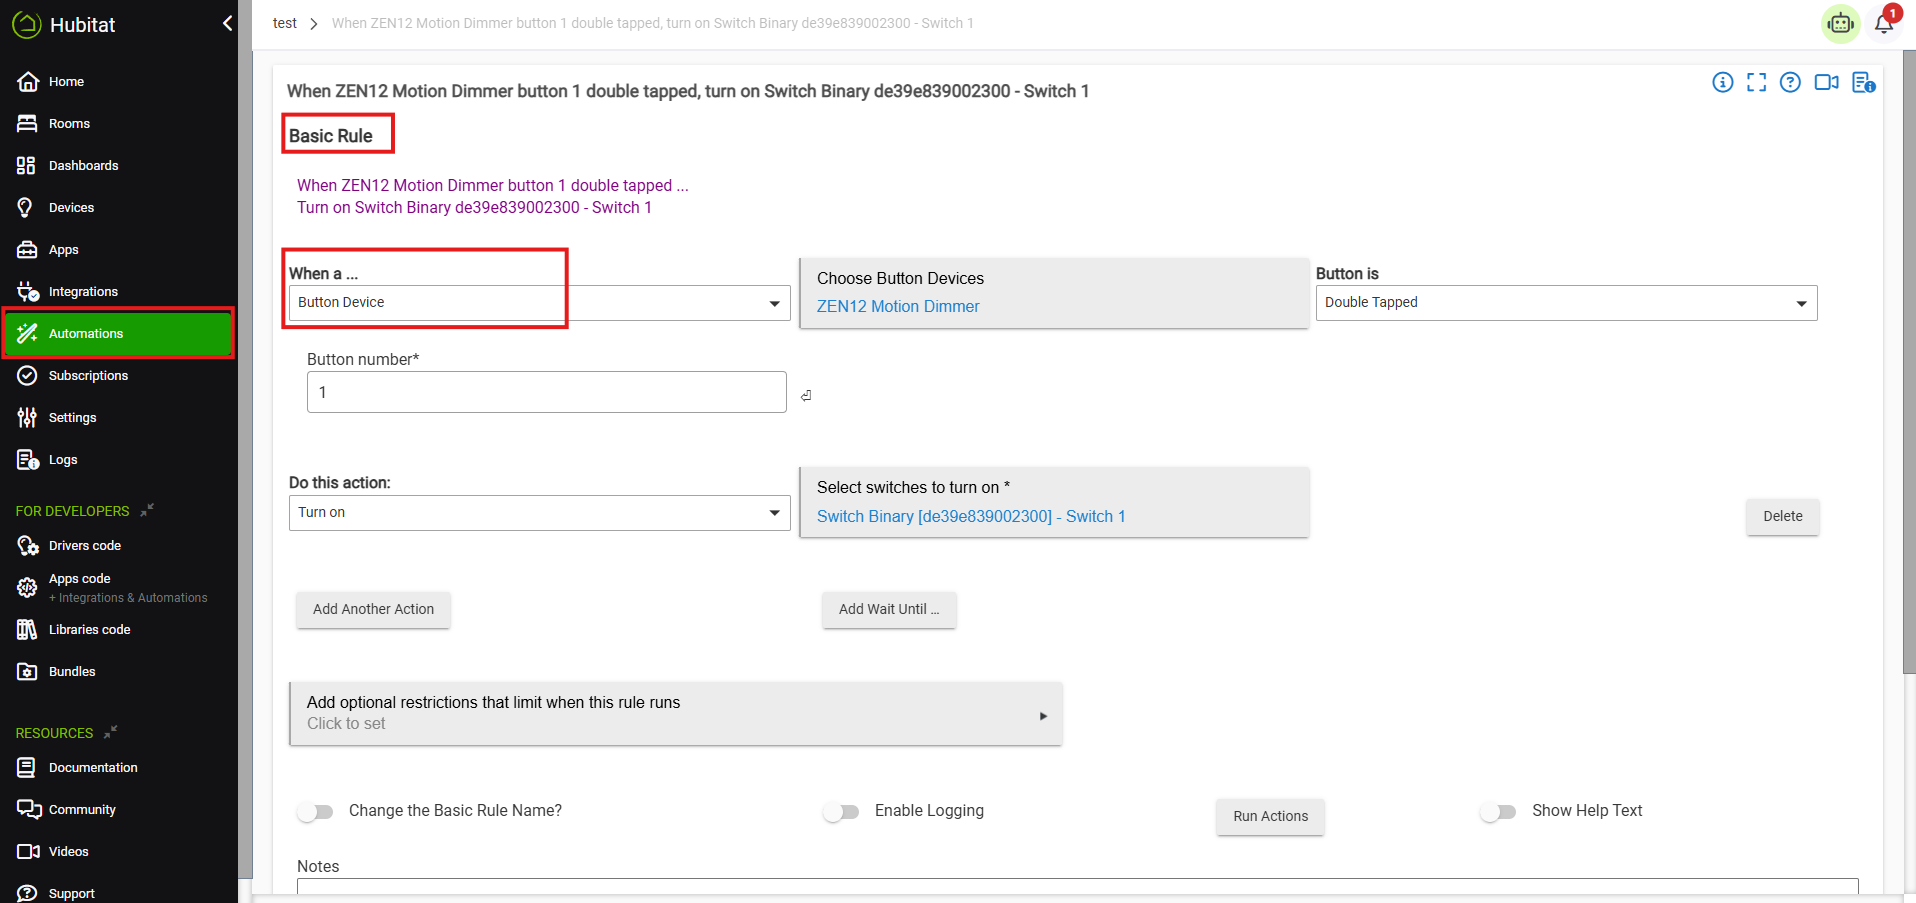
This is the simplest method to utilize central scene programming.
Simple go to Automations > Basic Rule. Ensure the first field When a is filled with Button Device. This tells Hubitat you are using the central scene option for the device, rather than the device status itself. Fill in all other fields as desired.
Simple Automation Rules
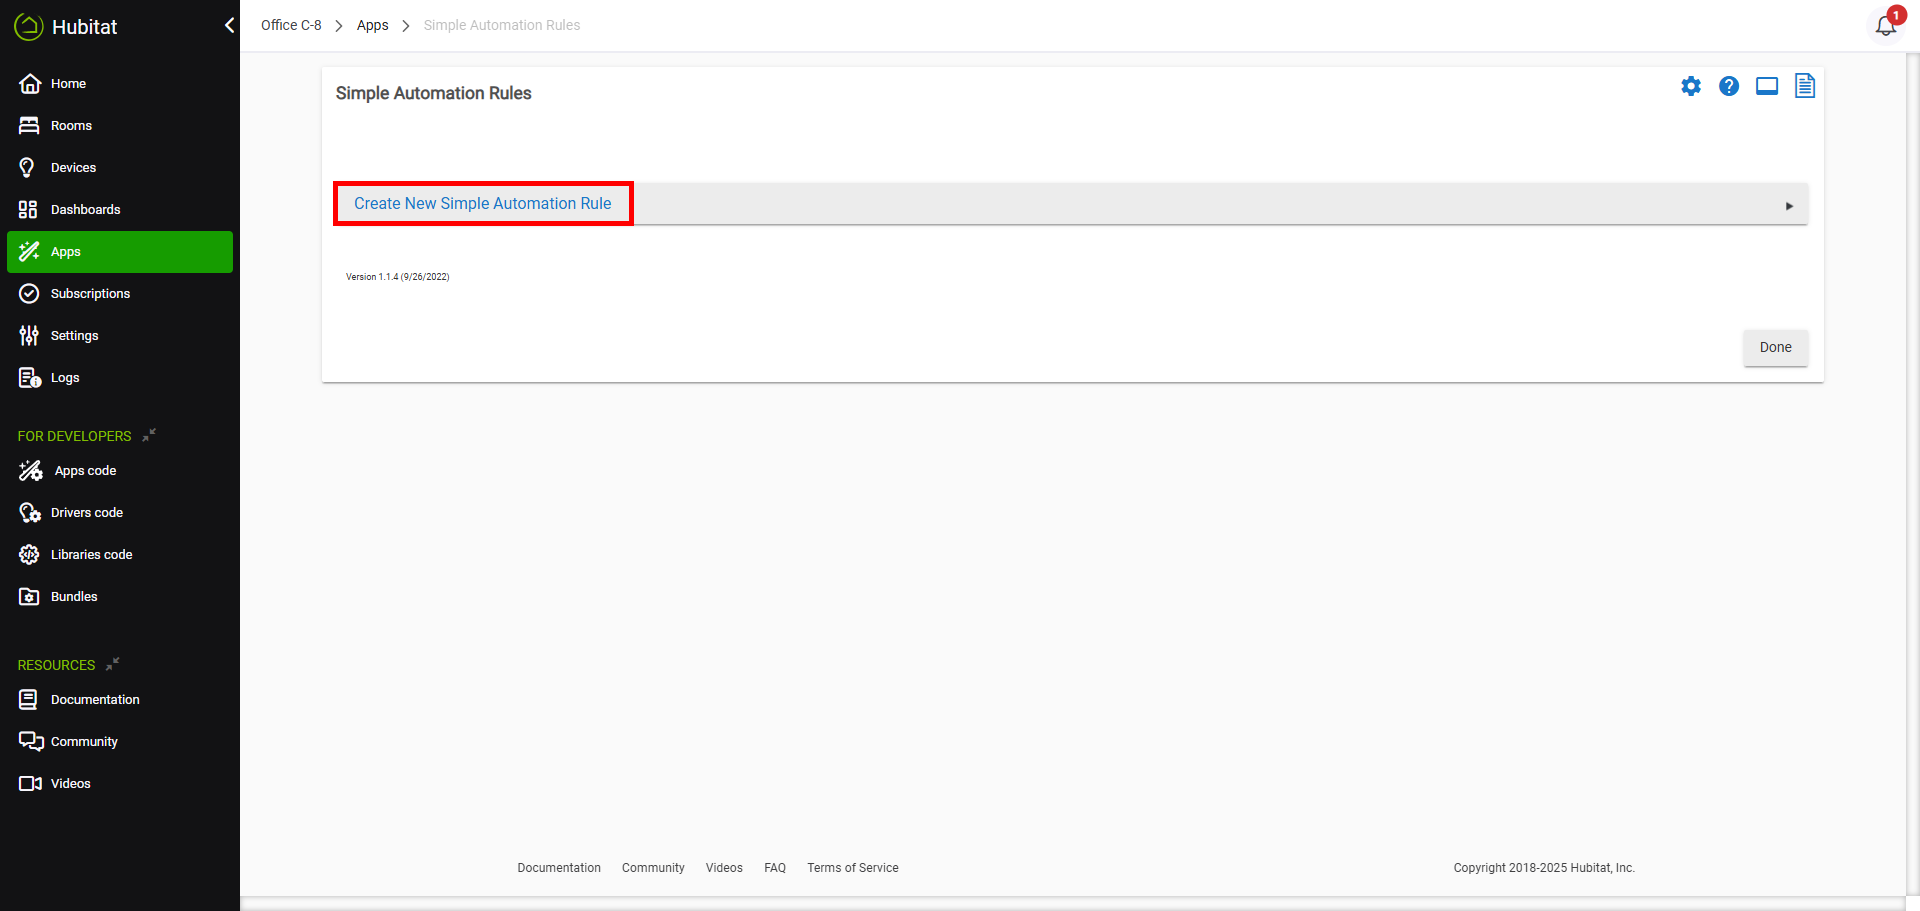
Another option is to use the Simple Automation Rules app. If it's not already available on your hub:
1. Click on Apps in the side menu

2. Click on "+ Add Built-in App" in the top right corner

3. Select Simple Automation Rules

4. Click on the Simple Automation Rules app under Apps now that you've added it.

5. Click on Create New Simple Automation Rule
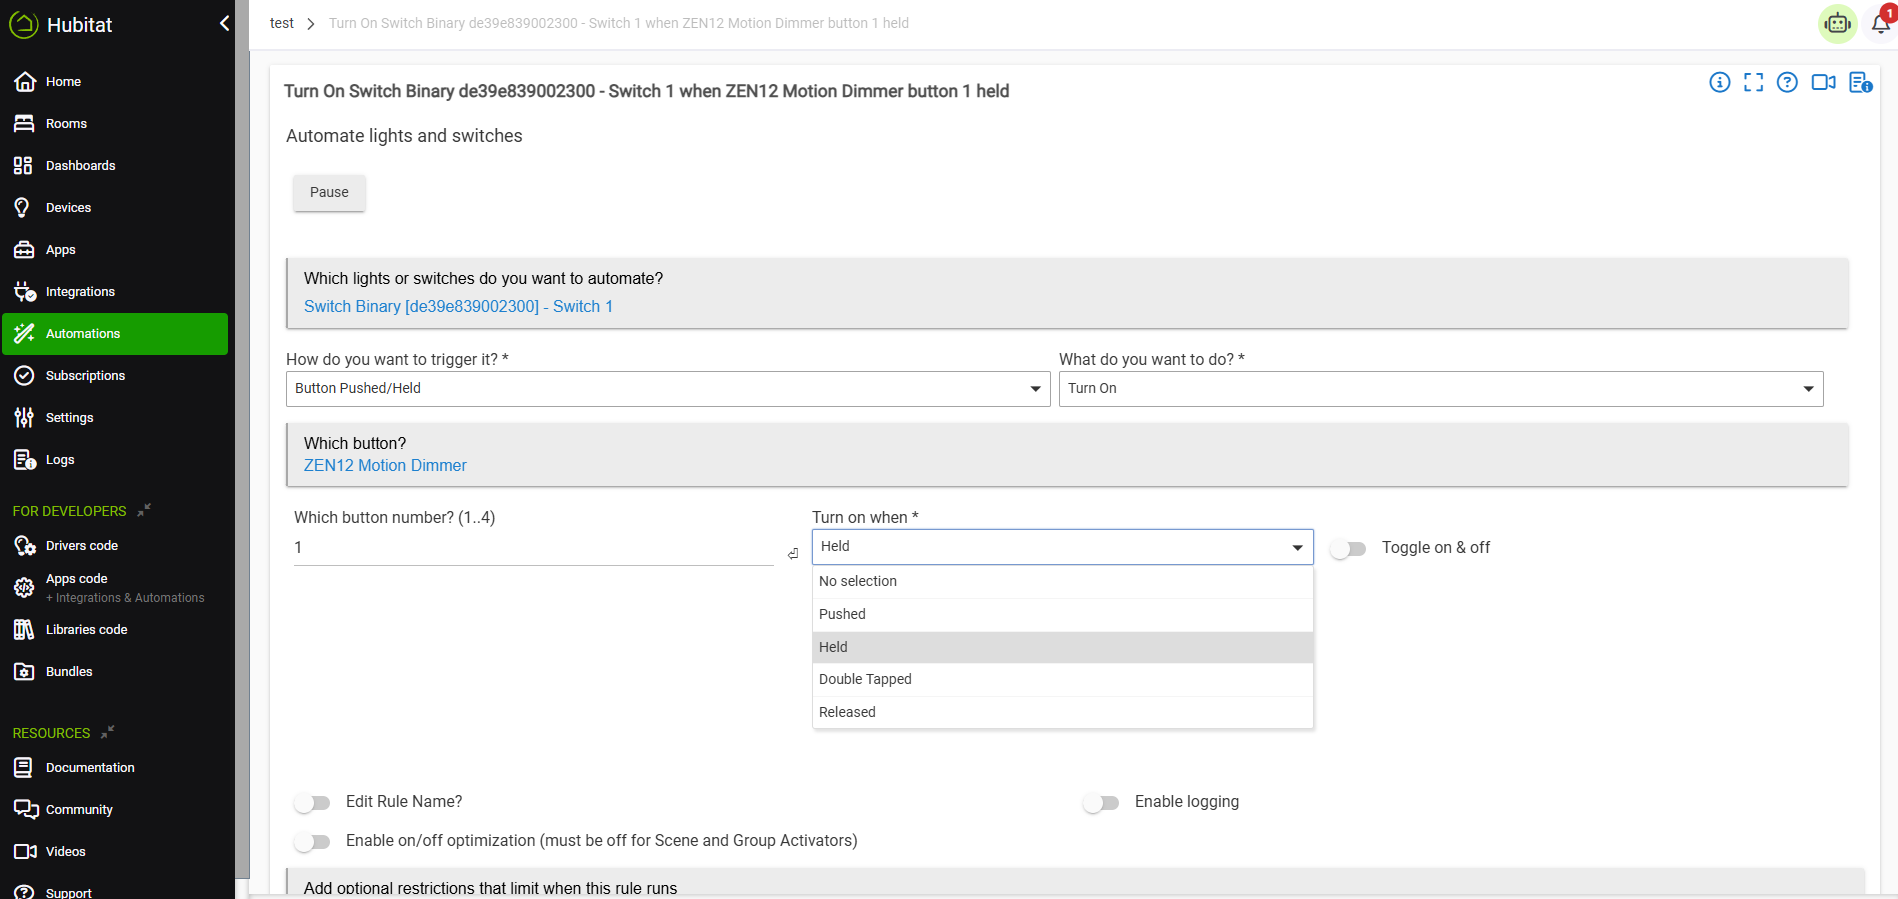
6. With Simple Automation rules, you start with the device you want to control in the first field, then move in to the controlling device options. Hubitat only exposes the single, double, held, and released options with native integrations.
Using the Built-In Motion and Lux Sensors
The ZEN12 includes a PIR motion sensor and an ambient light sensor. Hubitat exposes these as motion and illuminance capabilities, allowing them to be used independently in automations. For example, you can create a rule that turns on a light when the ZEN12 reports active motion, but only when its illuminance reading is below a selected value. The motion sensor can detect motion up to approximately 26 feet when the sensitivity is set to its highest level of 10. At the default sensitivity setting of 5, the practical detection range is approximately 13 feet. Settings 1 and 2 reduce the range to approximately 7 feet.
The following advanced settings affect sensor operation:
|
Parameter |
Function |
|---|---|
|
13 |
Enable or disable motion control of the connected load |
|
14 |
Select motion, night-only motion, lux-only, or disabled sensor mode |
|
15 |
Set the Night Mode lux threshold |
|
16 |
Set the Day Mode lux threshold |
|
17 |
Set the motion clear delay |
|
19 |
Set the lux reporting threshold |
|
20 |
Set the lux reporting frequency |
|
21 |
Set the motion sensitivity |
|
22 |
Apply a lux reporting offset |
|
38 |
Set the manual override timer |
Using the Sensors Without Direct Load Control
The motion sensor can continue reporting motion to Hubitat even if you do not want it to control the load connected to the ZEN12 directly.
Set Parameter 13 to value 1 to disable the motion trigger for the connected light. You can then create your preferred motion lighting logic in Hubitat.
This is useful when you want to:
-
Apply different brightness levels based on time or mode
-
Use different motion timeouts during the day and night
-
Control multiple lights from the ZEN12 sensor
-
Add illuminance conditions
-
Prevent motion from turning on the light during selected modes
-
Use the sensor only for notifications or other automations
Using Illuminance as a Condition
The ZEN12 reports ambient light in lux. You can use this value as a condition in Rule Machine so lights only turn on when the room is dark enough.
The reporting behavior is controlled by:
-
Parameter 19: Lux Reporting Threshold
-
Parameter 20: Lux Reporting Frequency
-
Parameter 22: Lux Offset
The Night Mode and Day Mode thresholds used internally by the ZEN12 are controlled separately through Parameters 15 and 16.
How to Program the LED Indicator on Your ZEN12 Motion Dimmer in Hubitat
The ZEN12 has one multi-color LED banner. It can reflect the state of the connected load, remain on or off, display a second color in the opposite state, or provide temporary feedback when a Central Scene command is triggered.
The native LED settings are available under Preferences on the ZEN12 device page.
LED Indicator Mode
Parameter 1 controls the LED indicator mode:
|
Value |
LED behavior |
|---|---|
|
0 |
LED on when the ZEN12 load is off |
|
1 |
LED on when the ZEN12 load is on |
|
2 |
LED always off |
|
3 |
LED always on |
When Parameter 1 is set to value 0 or 1, the LED automatically follows the state of the load controlled by the ZEN12.
Setting the LED Color
Parameter 2 controls the primary LED color:
|
Value |
Color |
|---|---|
|
0 |
White |
|
1 |
Blue |
|
2 |
Green |
|
3 |
Red |
|
4 |
Yellow |
|
5 |
Cyan |
|
6 |
Magenta |
Setting the LED Brightness
Parameter 3 controls the brightness of the LED indicator:
-
Values 1 through 10
-
Value 1 represents 10% brightness
-
Value 10 represents 100% brightness
-
Default value: 5
Using Two LED Colors
Parameter 45 allows the LED to display a second color instead of turning completely off in the opposite switch state:
|
Value |
Opposite-state color |
|---|---|
|
0 |
Off |
|
1 |
White |
|
2 |
Blue |
|
3 |
Green |
|
4 |
Red |
|
5 |
Yellow |
|
6 |
Cyan |
|
7 |
Magenta |
For example, the LED can display green when the ZEN12 load is on and red when the load is off.
To configure this behavior:
-
Select the preferred primary color under LED Indicator Color.
-
Select the desired opposite-state color under LED Indicator Multi-Color.
-
Select whether the primary color should correspond to the load being on or off under LED Indicator.
-
Click Save Preferences.
Disable the Confirmation Flash
The ZEN12 normally flashes the LED indicator whenever a configuration setting is changed. This flash can be disabled through Parameter 23.
-
Value 0: LED flashes when a setting is changed
-
Value 1: LED does not flash when a setting is changed
Open the ZEN12 Preferences, enable the option to disable the LED flash on setting changes, and click Save Preferences.
Scene Indicator
Parameter 9 can temporarily use the LED banner to confirm which button and press type generated a Central Scene command.
-
Value 0: Scene indicator disabled
-
Value 1: Scene indicator enabled
When enabled, the ZEN12 uses the following colors:
|
Button |
Scene indicator color |
|---|---|
|
Main button |
White |
|
Left dimming button |
Blue |
|
Right dimming button |
Green |
|
ZAC99 remote switch |
Red |
The number of illuminated LED sections represents the number of taps:
-
One tap illuminates one LED section for two seconds.
-
Two taps illuminate two LED sections for two seconds.
-
Three taps illuminate three LED sections for two seconds.
-
Four taps illuminate four LED sections for two seconds.
-
Five taps illuminate five LED sections for two seconds.
-
A held-button event illuminates the left and right LED sections for two seconds.
Using the LED to Reflect Another Device
The ZEN12 does not automatically know the status of a different device controlled by a Hubitat automation. The ZEN12 LED will only follow its own load state when configured through the standard LED Indicator setting.
Dynamically synchronizing the LED with an unrelated device requires a Hubitat driver that exposes a runtime command for changing the ZEN12 LED parameters from Rule Machine. The current built-in ZEN12 driver provides access to the LED options under Preferences, but these settings are not intended as dynamic automation actions. If a compatible driver adds a setParameter or dedicated LED command in the future, Rule Machine could use that command to set:
-
Parameter 1 to value 3 when the controlled device turns on
-
Parameter 1 to value 2 when the controlled device turns off
Until that functionality is exposed by the driver, the native Hubitat integration can configure the LED to follow the ZEN12 load, remain on or off, use two colors based on the ZEN12 load state, or display Central Scene feedback.
NOTE ON CUSTOM DRIVERS: We work with all of the platforms to provide thoughtful integration for our devices. While the most open platforms like Home Assistant or Z-Box allow for full functionality out-of-the-box, other platforms like Hubitat often require dedicated custom code for expanded functionality of Z-Wave devices, even though it's a standardized protocol. If a feature is not exposed in the native integration on the platform, please let Hubitat support and our team know so we can work together to add it based on your feedback. We aim to support as many platforms as possible while balancing development costs and keeping device pricing reasonable. Customer feedback helps guide where we invest in additional platform-specific work.
For more information, refer to the ZEN12 Motion Dimmer Product Manual and ZEN12 Motion Dimmer Advanced Settings.
Please contact Zooz Support if you have any questions about programming your ZEN12 Motion Dimmer on Hubitat.

