


The Zooz ZEN12 combines a smart dimmer with built-in motion and lux sensors, three programmable physical buttons, and advanced automation capabilities. Each button can trigger automations through Central Scene commands, while Direct Association allows the dimmer, motion sensor, or lux sensor to control other Z-Wave devices directly.
This gives you the flexibility to create advanced Home Assistant automations or simple device-to-device control. You can also customize the ZEN12 LED indicator to reflect the status of its connected load, display two different status colors, or provide visual feedback based on another device in your smart home.
Below, we’ll cover Central Scene programming, Direct Association, and LED indicator programming for the ZEN12 on Home Assistant.
Central Scene / Scene Control
Each button on the ZEN12 sends a unique Scene Number, allowing Home Assistant to recognize which of the three buttons was pressed. The Key Attribute identifies the type of interaction, such as a single tap, double tap, hold, or release. These combinations allow each button to trigger multiple automations based on how it is pressed. For example, a single tap of the main button could control the connected light, while a double tap could activate a group of lights, and a triple tap could change the operating mode of another device.
Enable Scene Control
Scene control is disabled by default on the ZEN12. Before programming Central Scene triggers, access the ZEN12 advanced settings and configure the following parameters:
-
Parameter 8: Set to
1to enable scene control. -
Parameter 40: Leave set to
0to enable multi-tap scene control.
If Parameter 40 is set to 1, only single-tap Central Scene commands will be available.
You can access these settings from the ZEN12 device page under the Z-Wave configuration options.
Scene Numbers, Endpoints, and Button Mapping
Home Assistant displays each Central Scene trigger using both an Endpoint and a Scene Number. All Central Scene commands from the ZEN12 are reported on Endpoint 0. Endpoint 0 is the root Z-Wave endpoint for the ZEN12 and represents the device itself. It is not an additional button or component, and no endpoint configuration is required.
Here is how the ZEN12 buttons are displayed in Home Assistant:
|
Button |
Endpoint |
Scene Number |
Home Assistant Trigger |
|---|---|---|---|
|
Main Button |
|
|
Central Scene action on Endpoint 0 Scene 001 |
|
Left Button |
|
|
Central Scene action on Endpoint 0 Scene 002 |
|
Right Button |
|
|
Central Scene action on Endpoint 0 Scene 003 |
|
ZAC99 Remote Button |
|
|
Central Scene action on Endpoint 0 Scene 004 |
The ZAC99 trigger is available only when a ZAC99 momentary switch is connected and remote scene control is properly configured.
Each button supports seven Key Attributes:
|
Key Attribute |
Home Assistant Value |
Action Type |
|---|---|---|
|
|
|
Pressed once |
|
|
|
Released |
|
|
|
Held down |
|
|
|
Pressed twice |
|
|
|
Pressed three times |
|
|
|
Pressed four times |
|
|
|
Pressed five times |
For example:
-
Pressing the main button once = Endpoint 0, Scene 001,
KeyPressed -
Holding the left button = Endpoint 0, Scene 002,
KeyHeldDown -
Double tapping the right button = Endpoint 0, Scene 003,
KeyPressed2x
Programming Central Scene
We recommend using the ZEN12 with the latest Z-Wave integration for Home Assistant.
You can program Central Scene commands using Z-Wave JS events or by creating an automation directly from the ZEN12 device page. We’ve included both methods below.
Automations From the Device Screen
This method is more intuitive and much simpler than the event process outlined below.
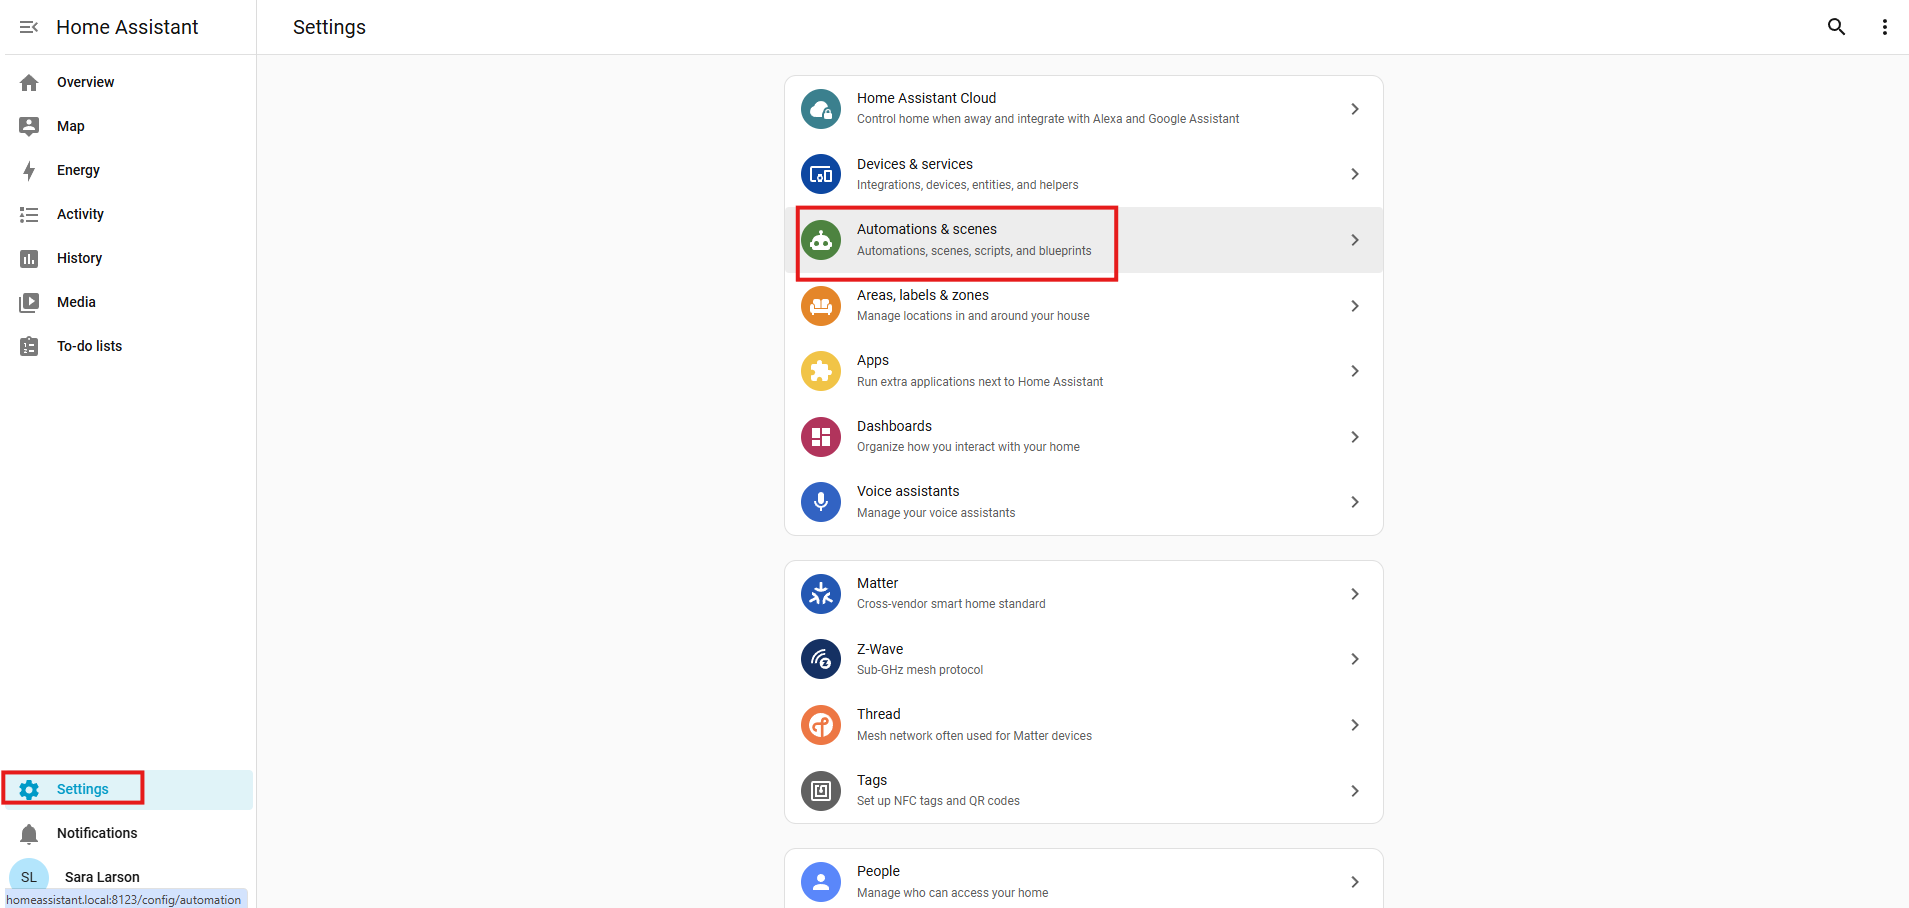
1. Select Settings > Automations & Scenes:
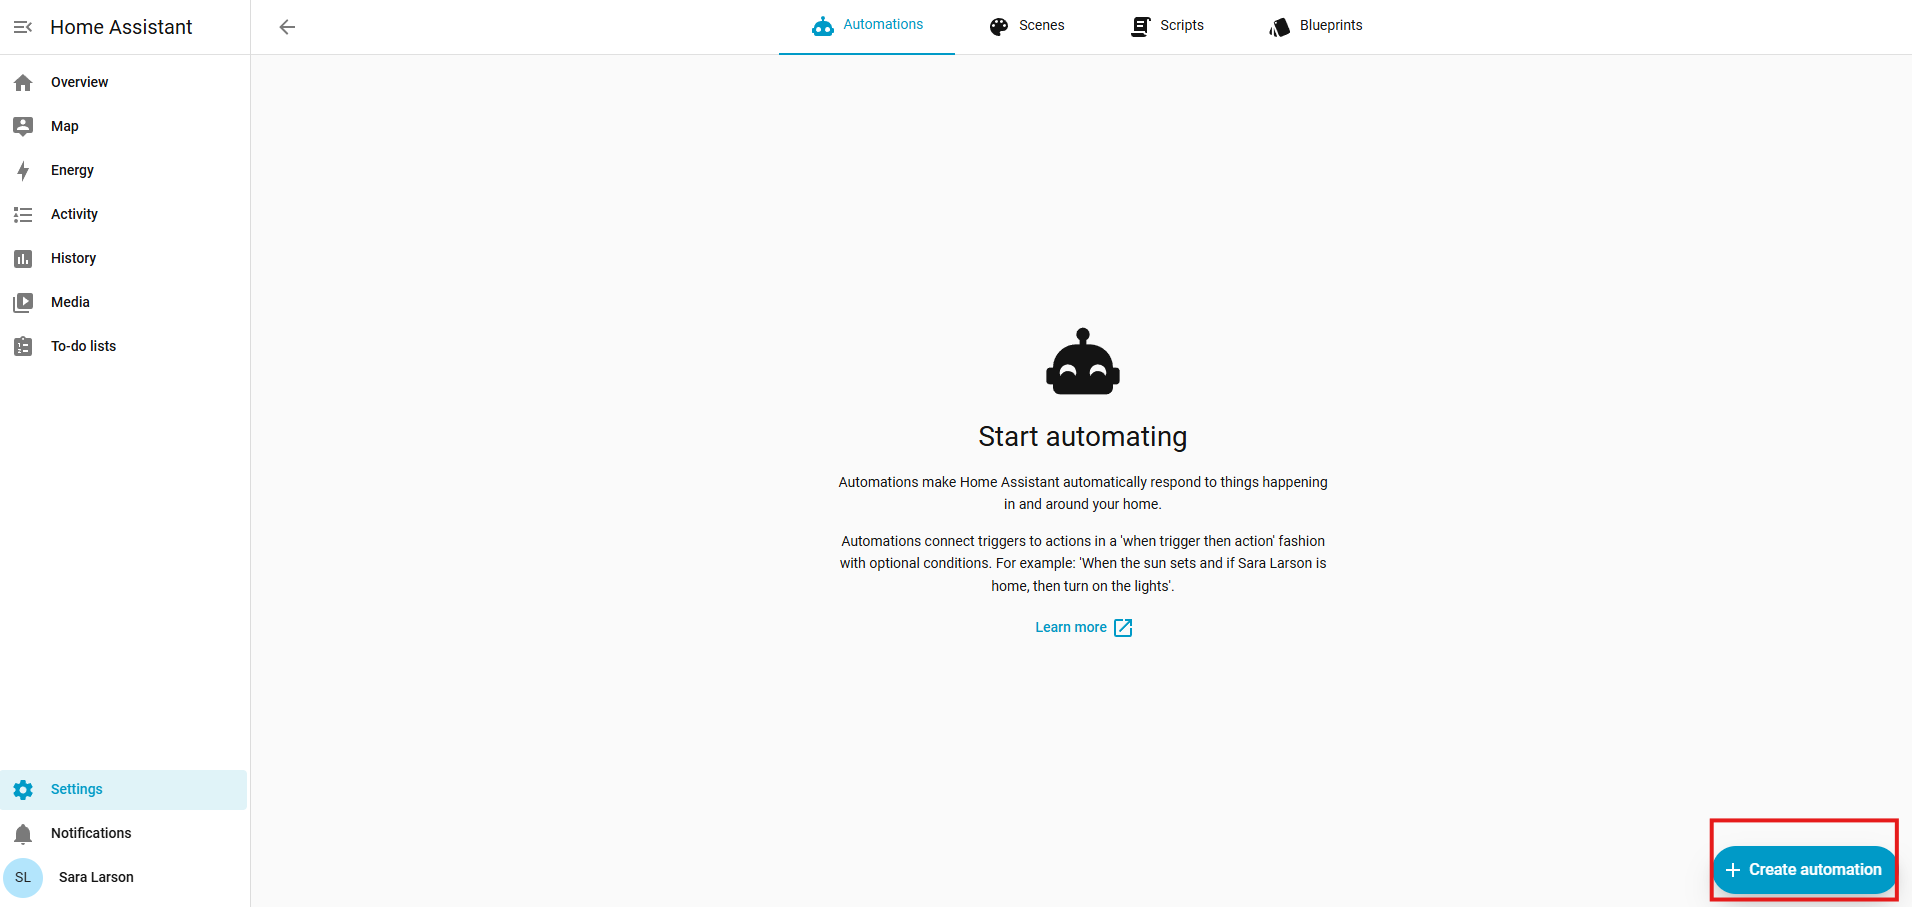
2. Select Create Automation:
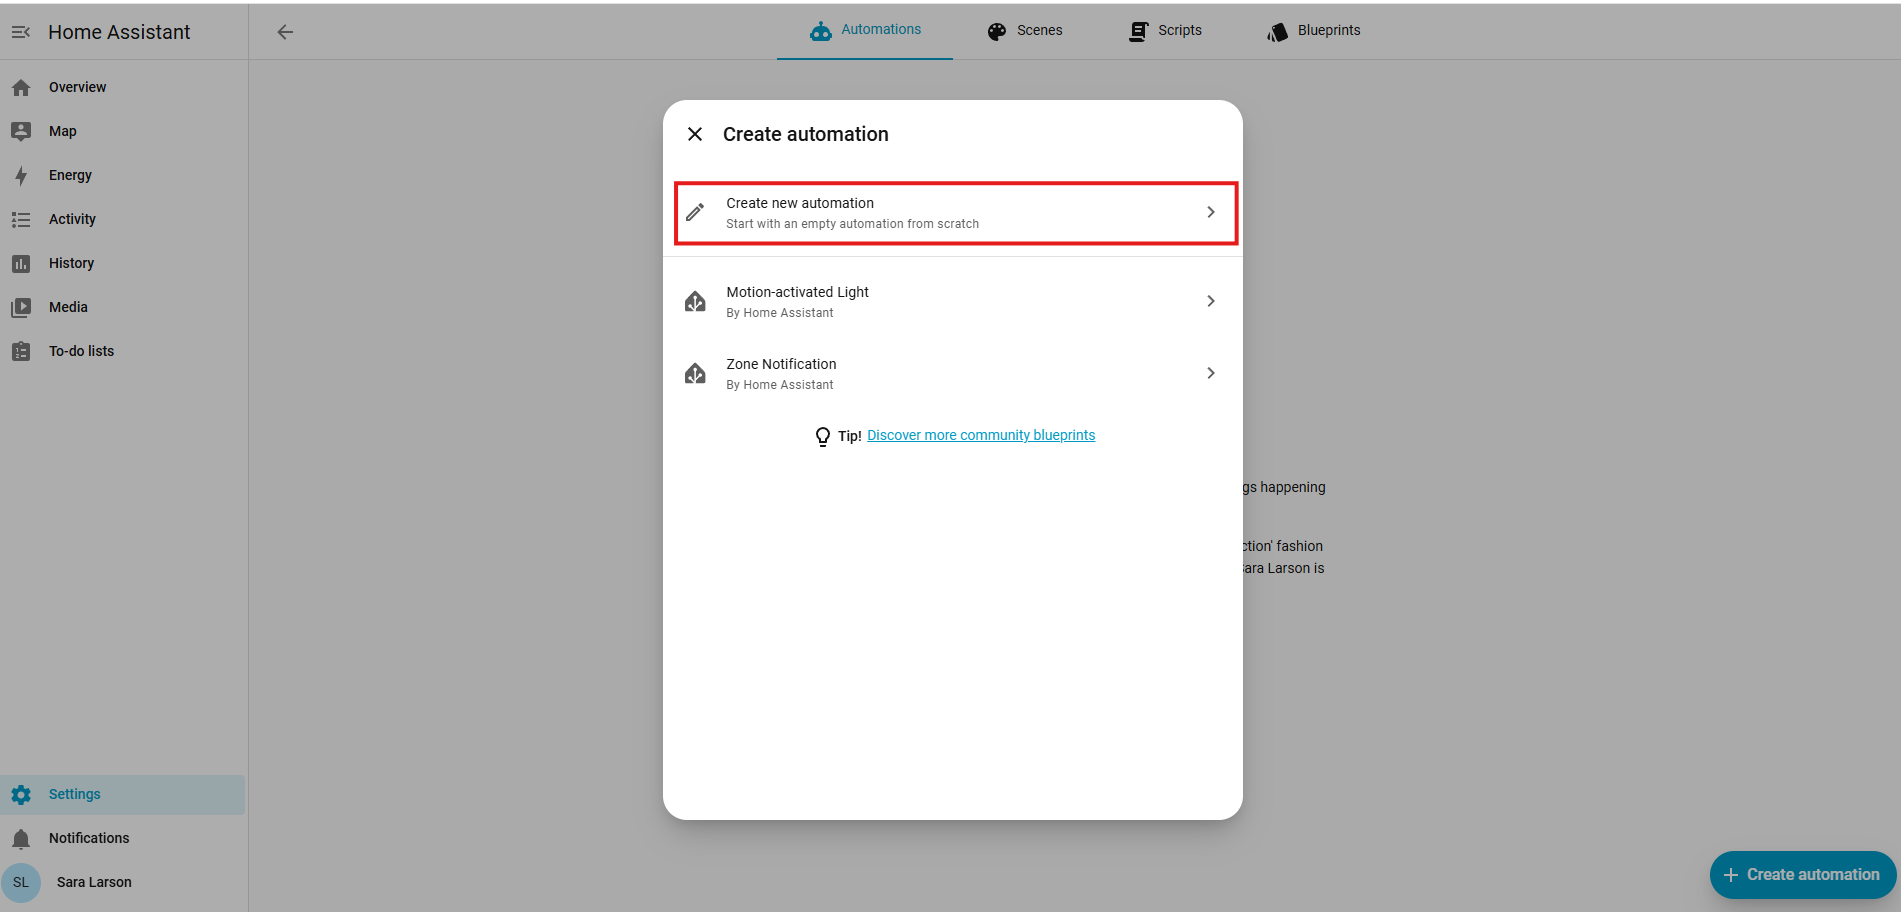
3. Select Create New Automation:
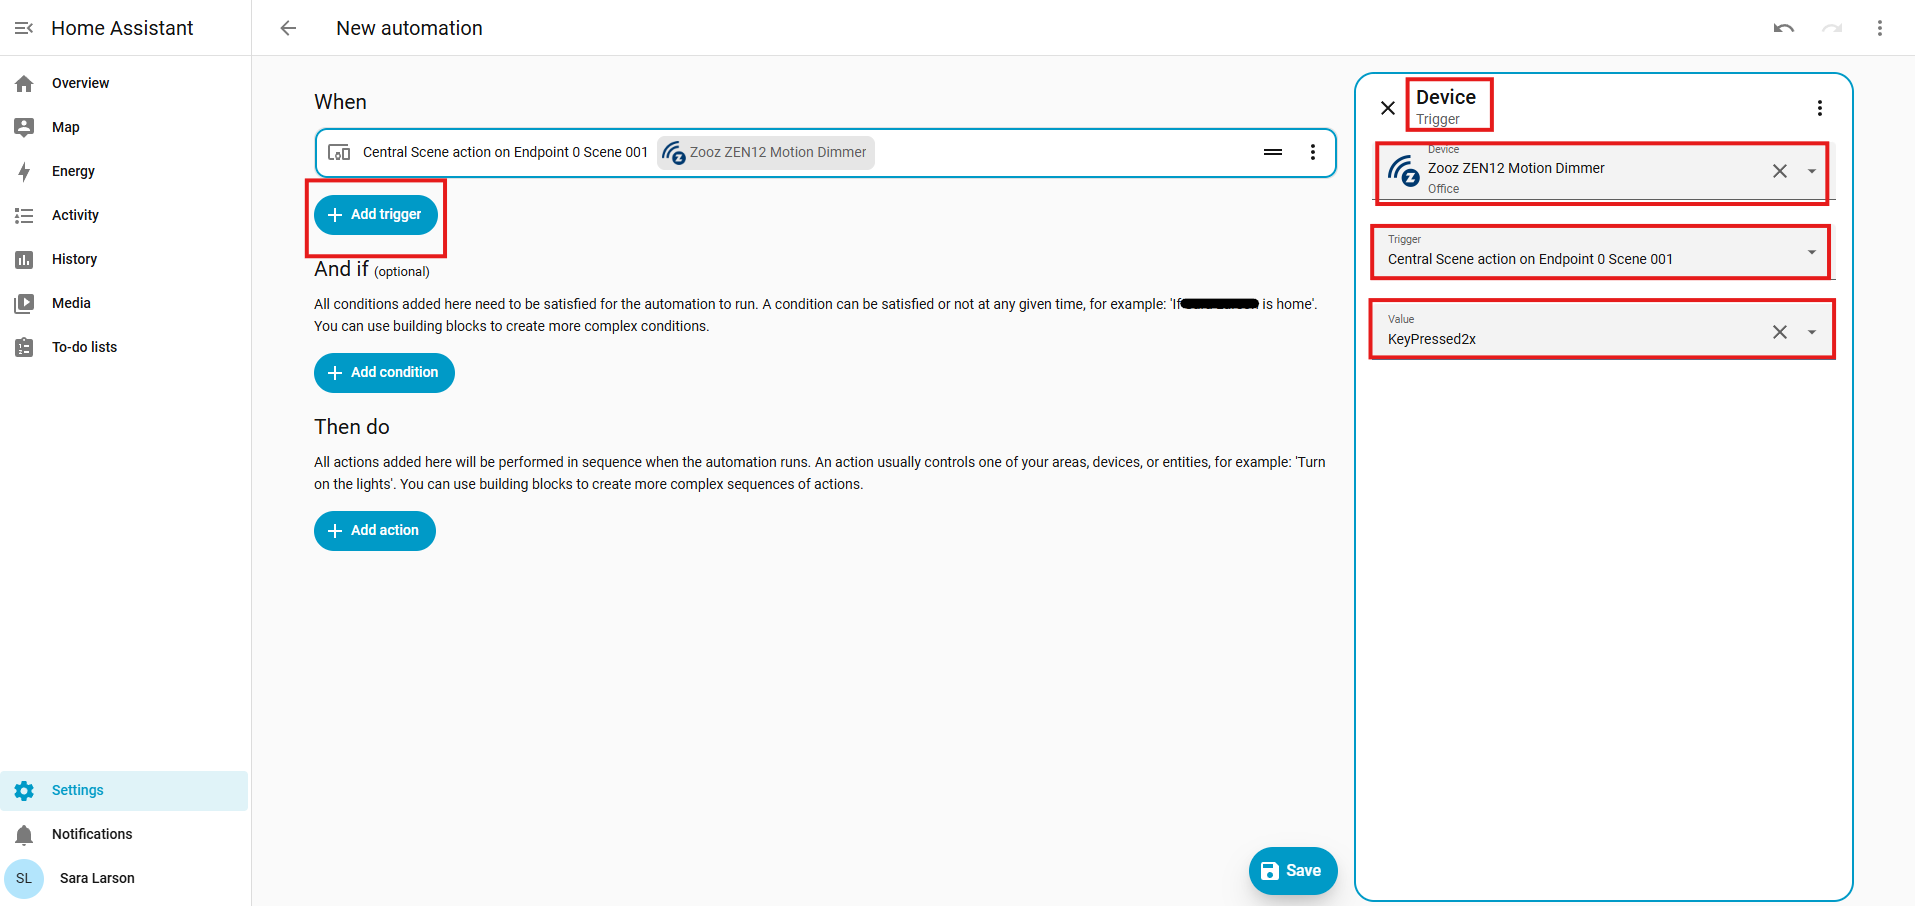
4 Select Use device as trigger. Open the Trigger menu and select the Central Scene trigger for the desired button:
- Endpoint 0 Scene 001: Main button
- Endpoint 0 Scene 002: Left button
- Endpoint 0 Scene 003: Right button
- Endpoint 0 Scene 004: ZAC99 remote button, when configured
Under Value, select the desired button action, such as pressed once, held down, released, or pressed multiple times.
5. Add any optional conditions.
6. Under Then do, select Add action.
7. Choose the device, scene, notification, or other action you would like the ZEN12 button to trigger.
8. Configure the action and click Save.
If the Central Scene triggers do not appear, confirm that Parameter 8 is enabled. If only single-tap triggers are available, confirm that Parameter 40 is set to 0.
Z-Wave JS Events
Central Scene commands are generated as zwave_js_value_notification events. You can view the event data by listening for this event in Home Assistant before creating your automation.
-
Go to Developer Tools.
-
Open the Events tab.
-
Under Listen to events, enter:
zwave_js_value_notification
-
Select Start listening.
-
Press the desired button on the ZEN12.
-
Home Assistant will display the event data, including the ZEN12 node ID, Scene Number, and Key Attribute.
All ZEN12 Central Scene events use Endpoint 0.
You can then use Event as the automation trigger type with:
zwave_js_value_notification
Use the following event data:
node_id: X
property_key: "001"
value: KeyPressed
Replace X with the Z-Wave node ID assigned to the ZEN12.
Use the appropriate property_key for the button:
|
Button |
|
|---|---|
|
Main Button |
|
|
Left Button |
|
|
Right Button |
|
|
ZAC99 Remote Button |
|
Use the appropriate value for the button action:
|
Button Action |
Event Value |
|---|---|
|
Pressed once |
|
|
Released |
|
|
Held down |
|
|
Pressed twice |
|
|
Pressed three times |
|
|
Pressed four times |
|
|
Pressed five times |
|
For example, the following event data would trigger an automation when the right button is pressed twice:
node_id: X
property_key: "003"
value: KeyPressed2x
After configuring the trigger, add any conditions and actions you would like Home Assistant to perform. You can learn more about Z-Wave JS events here.
Direct Association
The standard Home Assistant Z-Wave integration does not currently provide an interface for programming device-to-device association groups. To program Direct Association, you will need to use Z-Wave JS UI, which exposes the association groups for each Z-Wave node.
Direct Association creates a direct link between two Z-Wave devices. One device acts as the trigger and sends commands directly to the receiving device without using a Home Assistant automation.
For example, the ZEN12 can send on/off or dimming commands directly to another Z-Wave switch or dimmer when its buttons are operated. Its built-in motion and lux sensors can also send Basic Set commands directly to associated devices.
Direct Association is best suited for simple, unconditional actions such as turning a device on or off or adjusting its brightness. Communication works in one direction. The ZEN12 sends a command to the associated device but does not receive status feedback from that device through the association.
Association Groups
The ZEN12 supports Group 1 with one device and Groups 2–6 with up to five devices in each group.
The supported groups can also be found in the ZEN12 Motion Dimmer Product Manual and the ZEN12 Motion Dimmer Advanced Settings.
| Group | Command | Function |
|---|---|---|
| 1 | Lifeline & Basic Report | Communication with the Z-Wave hub |
| 2 | Basic Set | Sends on/off commands when the ZEN12 is operated manually |
| 3 | Multilevel Set | Sends brightness-level commands to associated dimmers |
| 4 | Multilevel Change | Starts and stops dimming on associated devices when the ZEN12 dimming buttons are held and released |
| 5 | Basic Set | Sends on/off commands when the motion sensor is triggered or cleared |
| 6 | Basic Set | Sends on/off commands when the lux sensor changes between the configured night and day conditions |
Group 1 is assigned to the Z-Wave hub and should not be changed.
Use Group 2 to control an associated switch or dimmer with on/off commands from the ZEN12.
Groups 3 and 4 are intended for dimmers and smart bulbs that support Multilevel commands. Group 3 communicates the brightness level, while Group 4 allows the ZEN12 dimming buttons to start and stop brightness changes on the associated device.
Parameter 29 determines how long it takes an associated dimmer or smart bulb to move from 0% to 100% brightness when controlled through Groups 3 and 4.
Group 5 allows the built-in motion sensor to control another Z-Wave device directly. The timing of the motion-clear command is affected by the Motion Clear Delay configured in Parameter 17.
Group 6 allows the built-in lux sensor to control another Z-Wave device based on the configured night and day thresholds in Parameters 15 and 16.
Limitations and Considerations
Security level: Before programming Direct Association, verify that the ZEN12 and the target device were added with the same Z-Wave security level. For example, the association may not be available or work correctly if one device was included with S2 Authenticated security and the other was included with S0 or without security.
Supported commands: The target device must support the command sent by the selected association group. Use Basic Set groups for on/off control and Multilevel groups for dimmers or other devices that support Multilevel commands.
One-way communication: Direct Association does not provide status synchronization between the associated devices. The ZEN12 sends a command but does not check whether the receiving device successfully changed state.
Conditions and schedules: Direct Association cannot evaluate additional conditions such as time, Home Assistant mode, presence, or the status of another device. Use a Home Assistant automation instead if the action requires conditional logic.
Z-Wave Long Range: Direct Association is not available when the ZEN12 or target device is included using Z-Wave Long Range. Z-Wave Long Range devices communicate directly with the hub and do not communicate directly with other Z-Wave devices. Include both devices using standard Z-Wave mesh if you plan to use Direct Association.
You can read more about the requirements, limitations, and recommendations for programming and using Direct Association here.
Programming Direct Association Through Z-Wave JS UI
Direct Association programming can be a little confusing if you're not familiar with how Z-Wave JS UI references the associations. Some important notes about the association fields:
-
Endpoint (Source): This is the "brain" of the device sending the command.
-
For a single channel device, like a simple switch or dimmer, this is always the Root Endpoint.
-
However, for multi-channel devices (like the ZEN30 Double Switch), you must specify which physical part is doing the talking: Endpoint 1 would refer to the Dimmer, while Endpoint 2 would refer to the Relay on the ZEN30 for example.
-
-
Group: This is the "type" of message being sent. Both your sending and receiving device must support the same groups for the association to work. See the device manual for the supported groups for your device. Here are some basic groups that all of our dimmers support:
-
Lifeline (Group 1): Always reserved for the Controller (your Z-Wave stick) to report status.
-
Basic Set (Group 2): Sends a simple "Turn On" or "Turn Off" command.
-
Multilevel Set (Group 3): Sends specific brightness percentages (dimming).
-
-
Node (Target): The specific device ID you want to receive the command.
-
Target Endpoint: The specific sub-component on the receiving device that should react. This is only applicable for multichannel devices that have more than one endpoint. If you're sending the message to a single channel device like a switch, you would leave it as none, since this will address the device as a whole.
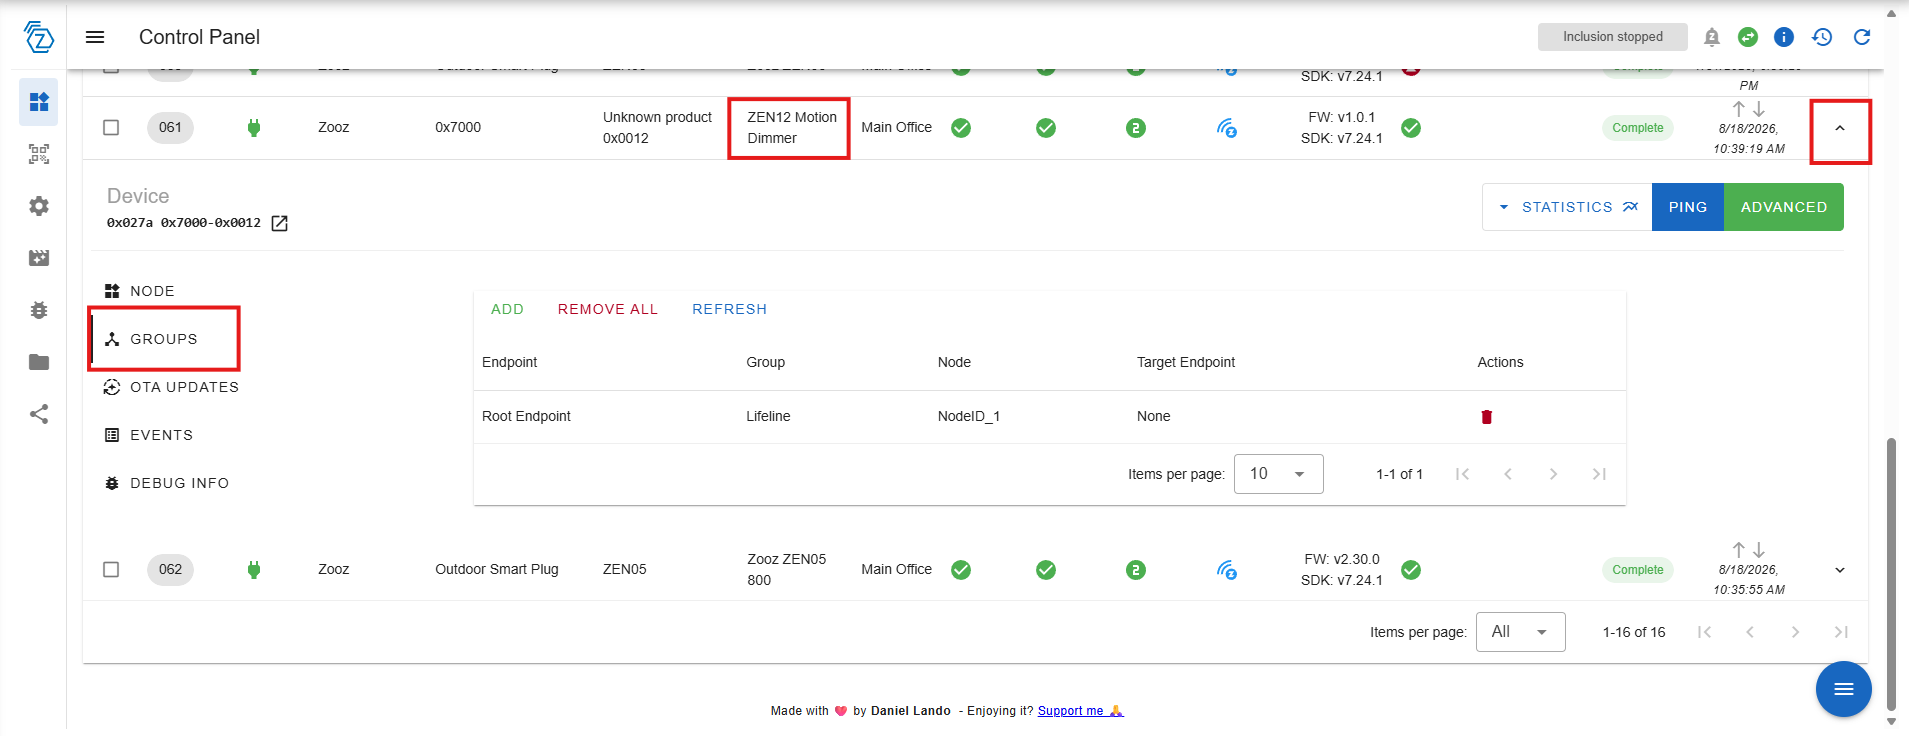
If you use Z-Wave JS UI, you can manage associations from the Groups tab under the ZEN12 node.
1. Open the Z-Wave JS UI control panel > select the ZEN12 from the nodes table. The ZEN12 is the controlling device in the association > open the Groups tab.
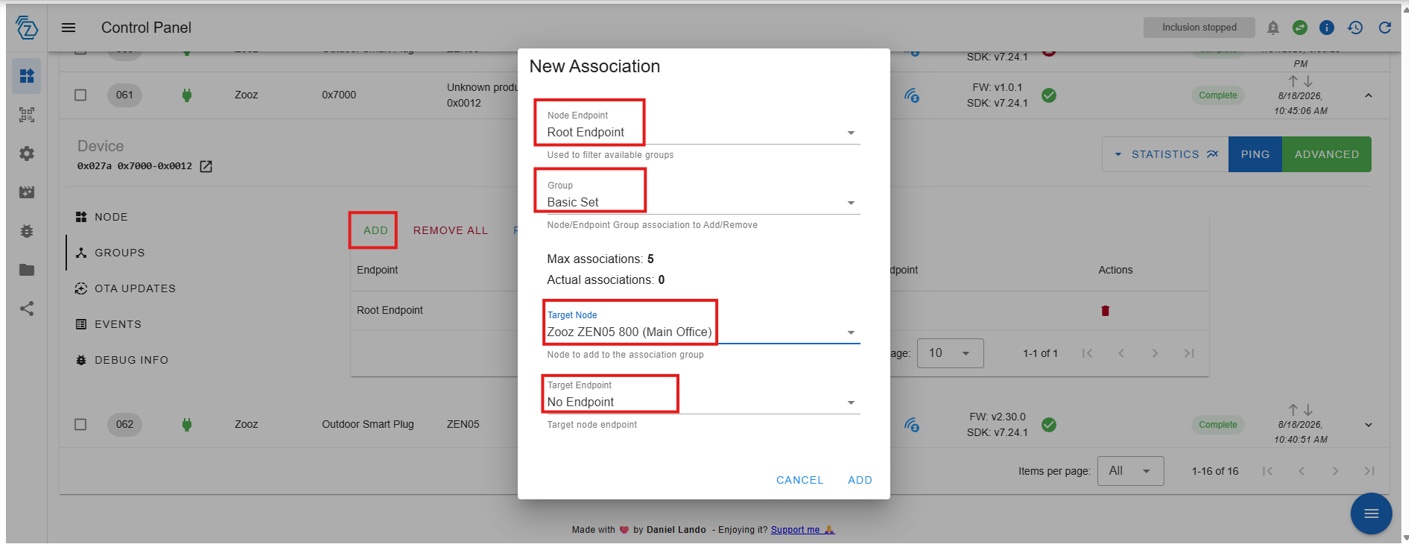
2. Select Add > choose the association group for the desired function (we're using Group 2 for manual on/off control in our example) > select the target node you want the ZEN12 to control > select the appropriate target endpoint if the receiving device has multiple endpoints. For a standard single-channel switch or dimmer, use the root endpoint unless the device documentation specifies otherwise > select Add to save the association.
-
Group 2 for manual on/off control
-
Group 3 for brightness-level control
-
Group 4 for start/stop dimming
-
Group 5 for motion-triggered on/off control
-
Group 6 for lux-triggered on/off control
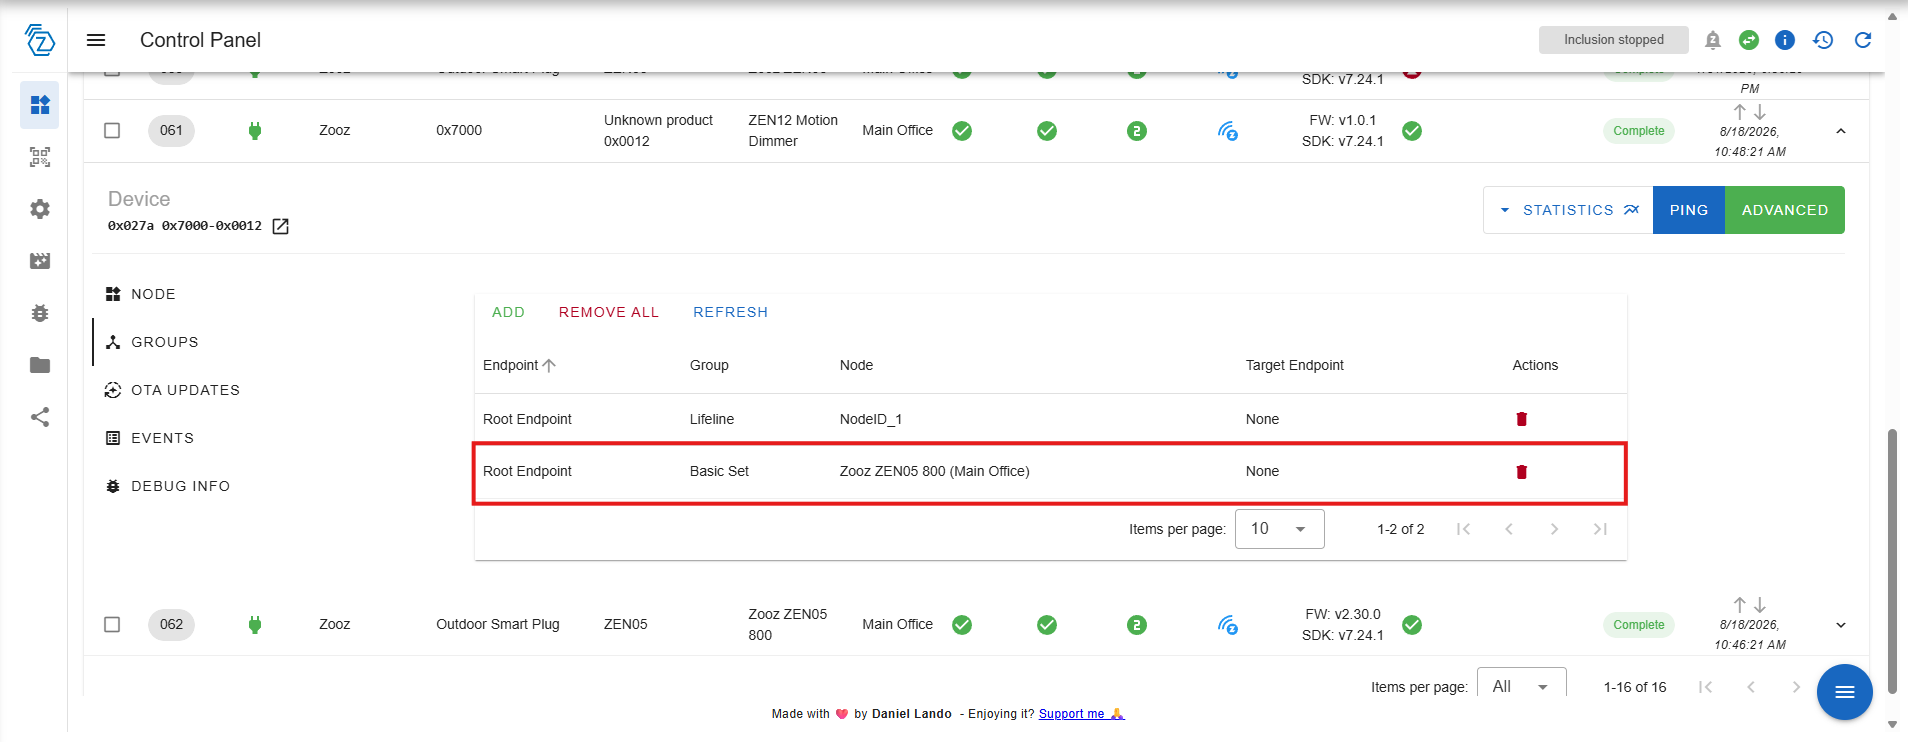
3. Confirm that the association appears under the selected group.
How to Program the LED Indicator on Your ZEN12 in Home Assistant
The ZEN12 includes a customizable LED indicator that can reflect the status of its own connected load, display different colors in each load state, or serve as a notification indicator for another device.
Configuring the LED for the Connected Load
The ZEN12 can display the status of its own connected load without a separate Home Assistant automation.
Parameter 1 determines when the primary LED color is displayed:
|
Value |
LED Behavior |
|---|---|
|
|
LED on when the connected light is off |
|
|
LED on when the connected light is on |
|
|
LED always off |
|
|
LED always on |
Parameter 2 determines the primary LED color:
|
Value |
Color |
|---|---|
|
|
White |
|
|
Blue |
|
|
Green |
|
|
Red |
|
|
Yellow |
|
|
Cyan |
|
|
Magenta |
Parameter 3 determines the LED brightness:
|
Value |
Brightness |
|---|---|
|
|
10% |
|
|
20% |
|
|
30% |
|
|
40% |
|
|
50% |
|
|
60% |
|
|
70% |
|
|
80% |
|
|
90% |
|
|
100% |
Parameter 45 allows the LED to display a second color instead of turning off during the opposite load state:
| Value | Opposite-State Color |
|---|---|
0 |
Off |
1 |
White |
2 |
Blue |
3 |
Green |
4 |
Red |
5 |
Yellow |
6 |
Cyan |
7 |
Magenta |
For example, to display green when the connected light is on and red when it is off:
-
Set Parameter 1 to
1. -
Set Parameter 2 to
2. -
Set Parameter 45 to
4.
The LED will display green when the connected load is on and red when it is off.
Scene Indicator
Parameter 9 controls whether the LED provides temporary visual feedback when a Central Scene command is triggered:
-
0: Scene indicator disabled -
1: Scene indicator enabled
When enabled, the LED identifies the button used:
|
Button |
Scene Indicator Color |
|---|---|
|
Main Button |
White |
|
Left Button |
Blue |
|
Right Button |
Green |
|
ZAC99 Remote Button |
Red |
The number of illuminated indicator segments corresponds to the number of taps:
-
One tap: one segment illuminated for two seconds
-
Two taps: two segments illuminated for two seconds
-
Three taps: three segments illuminated for two seconds
-
Four taps: four segments illuminated for two seconds
-
Five taps: five segments illuminated for two seconds
-
Held: left and right segments illuminated for two seconds
This temporary Central Scene feedback is separate from the regular LED behavior configured through Parameters 1–3 and 45.
Using the LED as a Notification Indicator
The ZEN12 LED can also reflect the status of a different Home Assistant device or condition. For example, it could display green when another light is on and red when that light is off.
Home Assistant provides the zwave_js.set_config_parameter action for changing an individual Z-Wave configuration parameter from an automation. Since the ZEN12 LED settings each use a separate parameter, use this action rather than the bulk partial-parameter action.
You can learn more about the Set device configuration parameter action here.
To create an automation that changes the ZEN12 LED when another device turns on:
1. Go to Settings > Automations & scenes.
2. Select Create automation, then Create new automation.
3. Under When, select Add trigger > select the device whose status you want the ZEN12 LED to reflect > configure the trigger to run when that device turns on. For our example, we're using the motion detected status reported by the ZSE70 Outdoor Motion Sensor as our trigger.
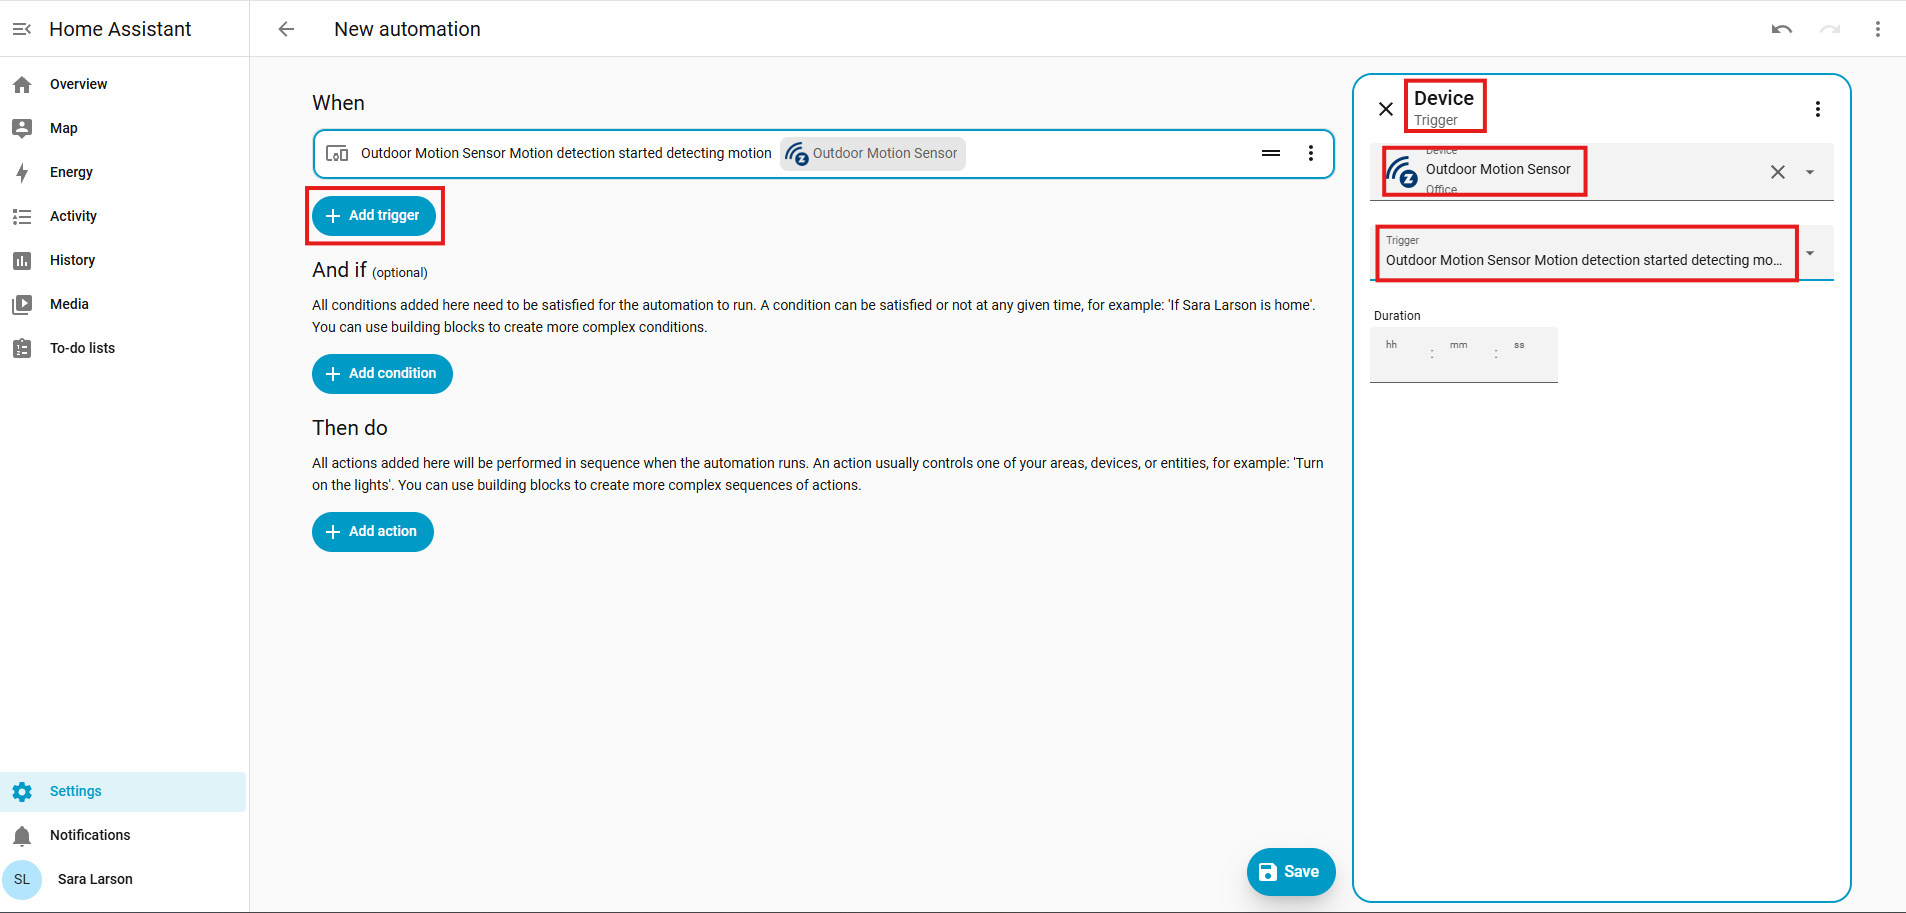
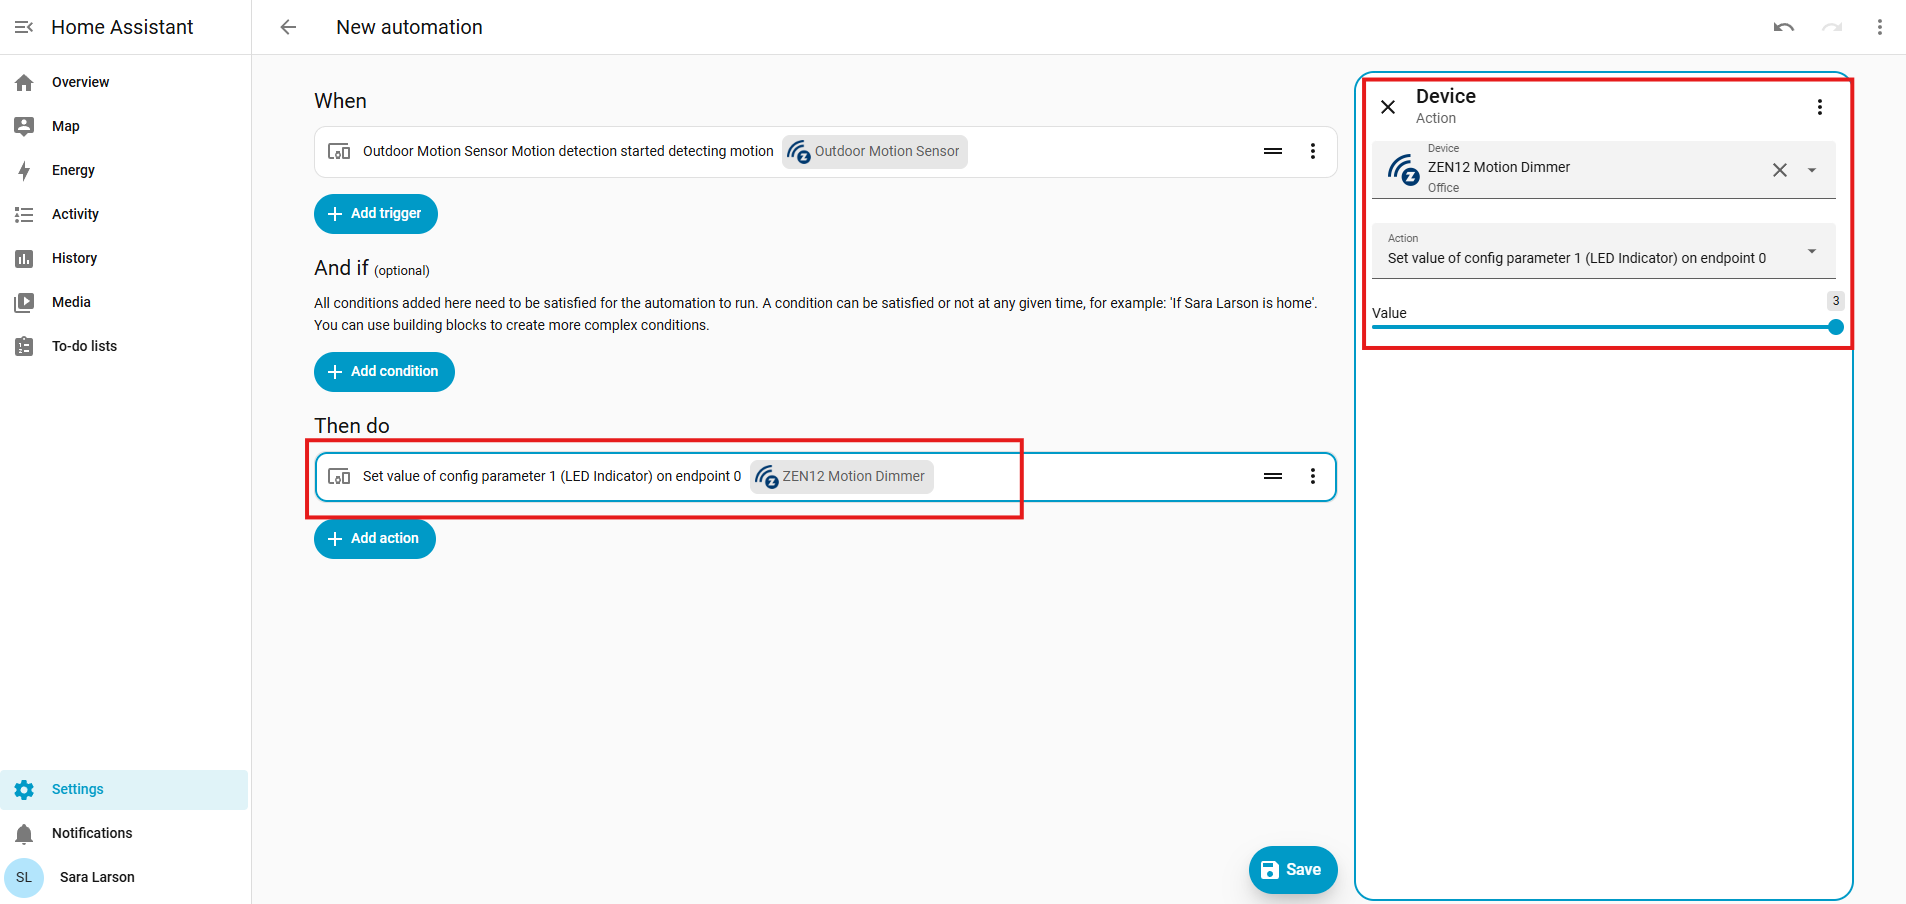
4. Under Then do, select Add action > select Device > select the ZEN12 as the target device > select set value of config parameter 1 > select value 3 to keep the ZEN12 LED illuminated.
5. Add another action in the Then do section > follow the same process as above but choose set value of config parameter 2 > select value 2 to set the color to green for example.
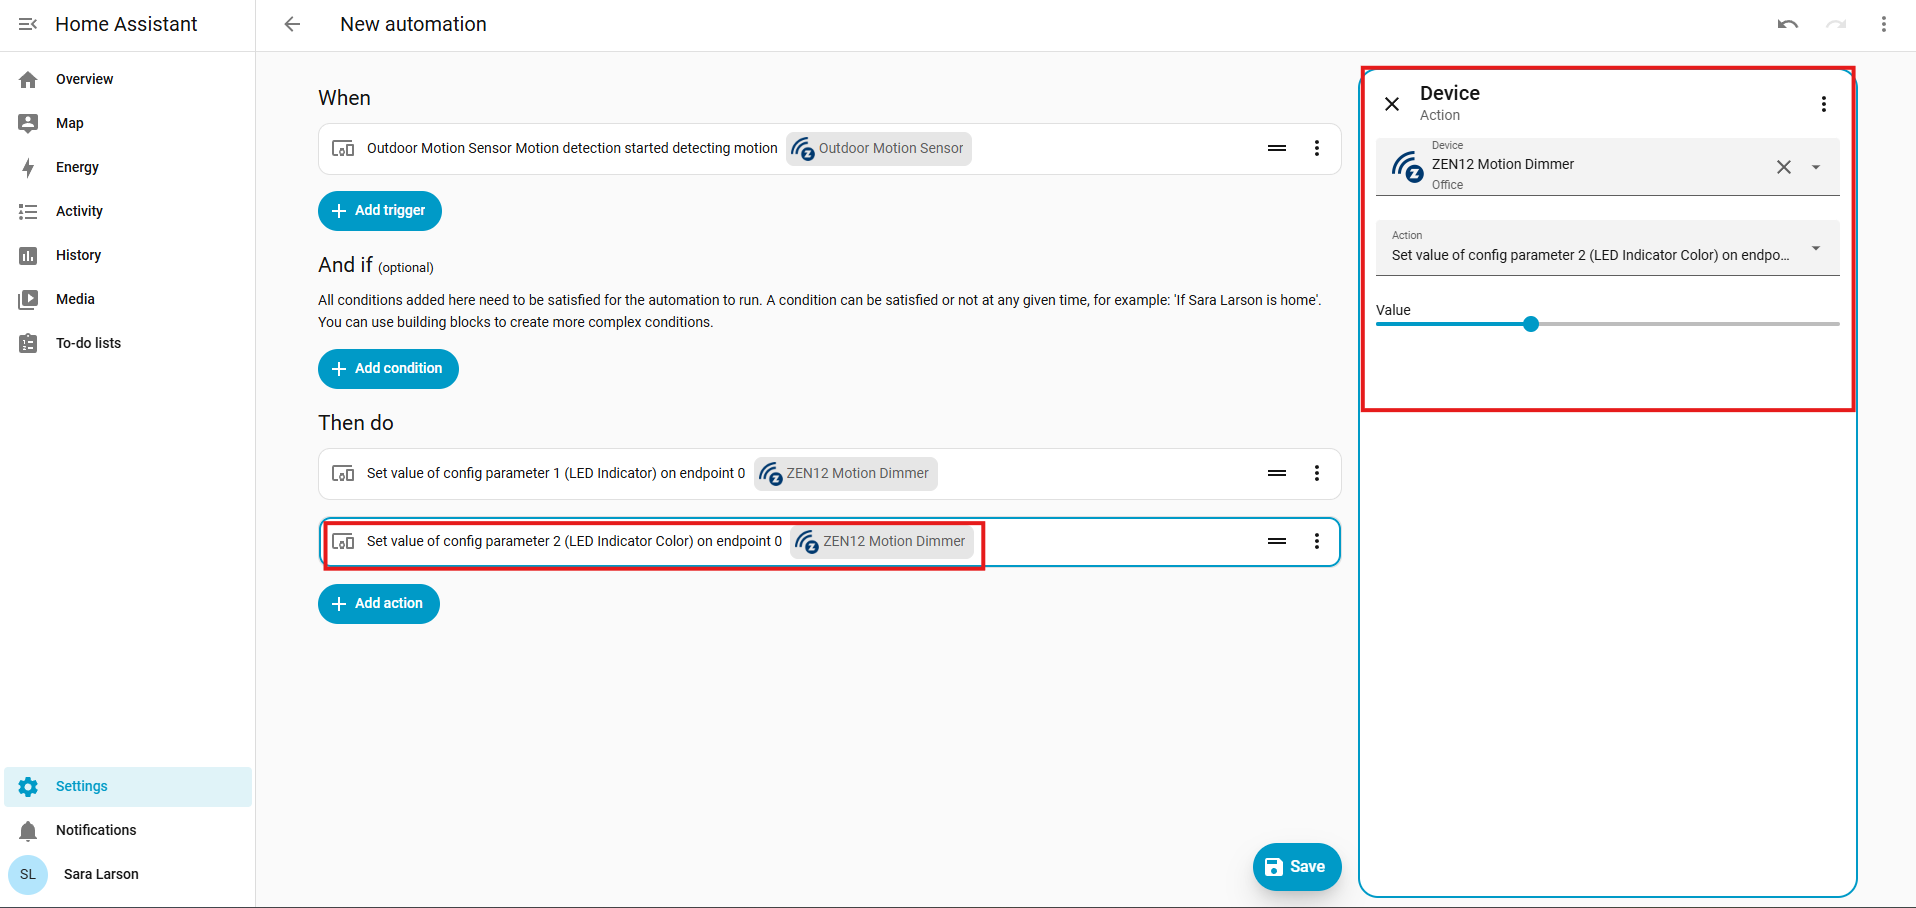
6. Click Save when done. You now have an automation that sets the LED indicator for the ZEN12 to On / Green whenever the ZSE70 Outdoor Motion Sensor detects motion.
YAML Example
The following automation changes the ZEN12 LED to green when the monitored light turns on:
triggers:
  - trigger: state
    entity_id:
      - light.monitored_light
    to: "on"

actions:
  - action: zwave_js.set_config_parameter
    target:
      device_id: YOUR_ZEN12_DEVICE_ID
    data:
      parameter: 1
      value: 3

  - action: zwave_js.set_config_parameter
    target:
      device_id: YOUR_ZEN12_DEVICE_ID
    data:
      parameter: 2
      value: 2
The following automation changes the ZEN12 LED to red when the monitored light turns off:
triggers:
  - trigger: state
    entity_id:
      - light.monitored_light
    to: "off"

actions:
  - action: zwave_js.set_config_parameter
    target:
      device_id: YOUR_ZEN12_DEVICE_ID
    data:
      parameter: 2
      value: 3
Replace:
-
light.monitored_lightwith the entity ID of the device being monitored. -
YOUR_ZEN12_DEVICE_IDwith the Home Assistant device ID assigned to the ZEN12. -
The Parameter 2 values with the desired LED colors.
Do you have more questions about programming the ZEN12? Please reach out to us for additional assistance.

