
You can automate up to 2 zones of your landscape lights with a single ZEN17 Universal Relay. If your Z-Wave hub is integrated with a smart speaker, you'll be able to control these lights with voice commands too.
Adding Z-Wave to your low-voltage landscape lights is a great way to save energy and time. Set them on a daily schedule based on sunset and sunrise or turn them on and off based on a timer, whatever works for your needs. Simply set the automation and don't worry about it again!
Just check that your Z-Wave system supports individual control of each relay in the compatibility list. Review your existing wiring to make sure you're able to identify each connection and match it with the diagram we provide. If you're not able to follow the instructions or don't have the necessary tools to complete the installation, please hire a licensed electrician to finalize the project.
Here are the detailed instructions for the landscape installation using your ZEN17 Universal Relay:
WIRE THE ZEN17 UNIVERSAL RELAY
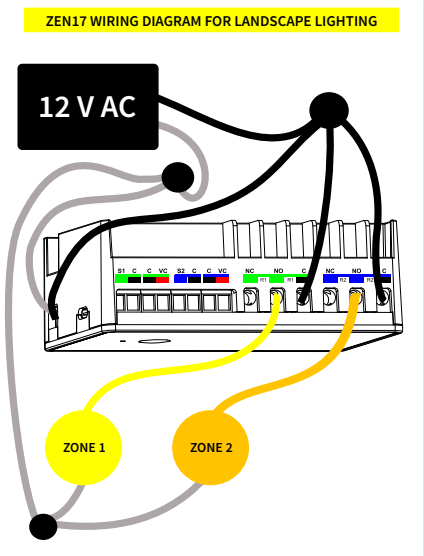
Use the ZEN17 to trigger the landscape lights via Z-Wave and add optional wall switches if desired. The below diagram doesn't show manual switch connections so if you'd like to modify your installations this way, please get in touch with us for details.
-
WIRING TIPS: Always take "before" pictures just in case you need to restore the original set-up or send us images for consultation. Use the correct screwdriver size for the terminal screws on your ZEN17 and wall switches (if connecting them). Use appropriate electrical tools when cutting, prepping, and stripping electrical wires. If you don’t have the necessary tools to perform the installation or if you're not sure how to operate the electrical tools, please hire an electrician to complete the installation for you. Follow the National Electrical Code and your local safety regulations when performing the installation, including (but not limited to), choosing the correct gauge of jumper wires. The recommended gauge for 15 Amp circuits is 14 AWG and 12 AWG for 20 Amp circuits.
-
POWER OFF: turn the circuit power off in the breaker panel before you start. Keep the ZEN17 unplugged from its power source.
-
CONNECT ZEN17 TO THE LIGHTS: Connect the negative from the power supply to the - (negative) terminal on the ZEN17 and to one side of the light. Connect the positive from the power supply to the + (positive) terminal on the ZEN17 and to the C (common) terminal on R1/R2 . Then connect the lights to NO on R1/R2 to complete the circuit, just as shown in the diagram below.
PROGRAMMING
Restore power to the ZEN17 Universal Relay and include the device to your Z-Wave hub. You should see 3 new devices display: 1 master device to control both relays at the same time and 2 child devices for individual control of each relay (zone). You can now trigger each zone via Z-Wave by turning the relays on and off individually or together using the master device. You won't need to adjust any of the advanced settings to start controlling the landscape zones with your ZEN17 Universal Relay from your hub.
If the relays aren't responding correctly, please double check that all connections are firm and that the ZEN17 is properly powered. Calculate the Wattage needed to power all of the landscape lighting and verify that the power supply is powerful enough to handle it (the ZEN17 itself uses very little power). Please remember to turn the power off at the breaker when handling the wires.
If you have any additional questions about controlling your landscape lights with the ZEN17 Universal Relay, please reach out to us! We're always happy to help.

