
The Zooz ZEN32 is a powerful Z-Wave scene controller featuring five customizable physical buttons. Each button can be individually programmed to trigger automations through Central Scene commands or to directly control other Z-Wave devices using Direct Association. This dual-mode capability allows users to choose between flexible, hub-based automation logic or simple device-to-device control. Whether you're aiming to activate complex Home Assistant scenes or simply control a nearby light switch, programming the ZEN32 offers a smart and adaptable solution for seamless home automation.
Below, we'll cover what Central Scene and Direct Association are and how you can program either option on Home Assistant. Scroll to the bottom of the article for instructions on programming the LED indicators to reflect the status of the controlled device.
Central Scene / Scene Control
Each button on the ZEN32 sends a unique Scene Number, allowing Home Assistant to recognize which of the five buttons was pressed. What makes this controller especially versatile is its use of Key Attributes, which identify the type of interaction—such as a single tap, double tap, hold, or release. These combinations of Scene Numbers and Key Attributes give users granular control over automations, enabling one button to perform multiple functions based on how it's pressed. For example, a single tap might turn on a light, while a hold could dim it, and a double tap could activate an entire scene.
Scene Numbers and Button Mapping
Here's how the ZEN32 buttons are mapped to Central Scene scene numbers:
|
Button |
Scene Number |
Description |
|
Switch Button |
|
The large center button |
|
Button 1 |
|
Small button, top left |
|
Button 2 |
|
Small button, top right |
|
Button 3 |
|
Small button, bottom left |
|
Button 4 |
|
Small button, bottom right |
|
ZAC99 (if used in 3-way) |
|
Reports separately when used |
Each button supports 7 key attributes (aka action types):
|
Key Attribute |
Action Type |
|
0 |
Key Pressed Once |
|
1 |
Key Released |
|
2 |
Key Held Down |
|
3 |
Key Pressed 2x |
|
4 |
Key Pressed 3x |
|
5 |
Key Pressed 4x |
|
6 |
Key Pressed 5x |
So for example:
-
Pressing Button 1 once = Scene 1, Key Attribute 0
-
Holding Switch Button = Scene 5, Key Attribute 2
-
Double tapping Button 3 = Scene 3, Key Attribute 3
ZEN32 + ZAC99 Momentary in 3-Way Setup
Are you looking to have scene control options from the other locations when installing the ZEN32 in a multi-way location? You can use the ZAC99 Momentary switch in the other location(s) in your multi-way installation and use the reported events to trigger scenes.
This option is not available from a standard, dumb on/off switch because the ZEN32 is designed to trigger scenes based on momentary inputs—quick presses that send a signal to activate a programmed scene. A standard "dumb" on/off switch physically changes the electrical state (open or closed circuit) instead of providing the momentary signal input. With a momentary switch like the ZAC99, the ZEN32 consistently receives clean, simple press events it can interpret correctly to trigger scenes, ensuring smooth and reliable scene control.
The ZAC99 is SPST and only the top portion of the switch is pressed. If you click the switch once, it will turn on. If you press and hold it while it's on, it will decrease brightness (when connected with a dimmer in a 3-way). If you click it again, it'll turn off. Once off, when you press and hold it will increase brightness.
If you're wiring a ZAC99 momentary switch to the ZEN32 to control it from another location (e.g. a 3-way circuit), the ZAC99 will trigger Scene 6 with the same key attributes:
|
Device/Input |
Scene Number |
|
ZAC99 |
|
This allows the hub to recognize the input from the remote switch and automate accordingly.
For example:
-
Tapping ZAC99 once = Scene 6, Key Attribute 0
-
Holding ZAC99 = Scene 6, Key Attribute 2
This gives you full automation capability from both the ZEN32 and the auxiliary switch location.
Summary
-
The ZEN32 uses scene numbers 1–5 for its built-in buttons.
-
Each button supports 7 types of press actions via key attributes.
-
If a ZAC99 momentary switch is wired for remote control, it reports as Scene 6.
-
Your hub can create distinct automations for each combo of button and press type.
Programming Central Scene
We recommend using the ZEN32 Scene Controller with the latest JS Z-Wave integration for Home Assistant. You can program the device using central scene commands there. You have the option of programming using JS Events, or programming using Automations from the device screen. We've included both below:
JS Events
Multi-tap triggers can be assigned to all buttons on the ZEN32, including the main switch button, whether you have a load connected to it or not.
Use "Event" as the Trigger Type and “zwave_js_value_notification” as the Event Type (learn more about JS events here) followed by:
label: Scene 001 [use 001 for remote button 1, 002 for remote button 2, 003 for remote button 3, 004 for remote button 4, and 005 for the main switch button]
value: KeyPressed [KeyPressed = 1 x tap, KeyReleased = released, KeyHeldDown = held, KeyPressed2x = 2 x tap, KeyPressed3x = 3 x tap, KeyPressed4x = 4 x tap, KeyPressed5x = 5 x tap]
Then proceed with the action you'd like to trigger with the Scene Controller.
Automations from the Device Screen
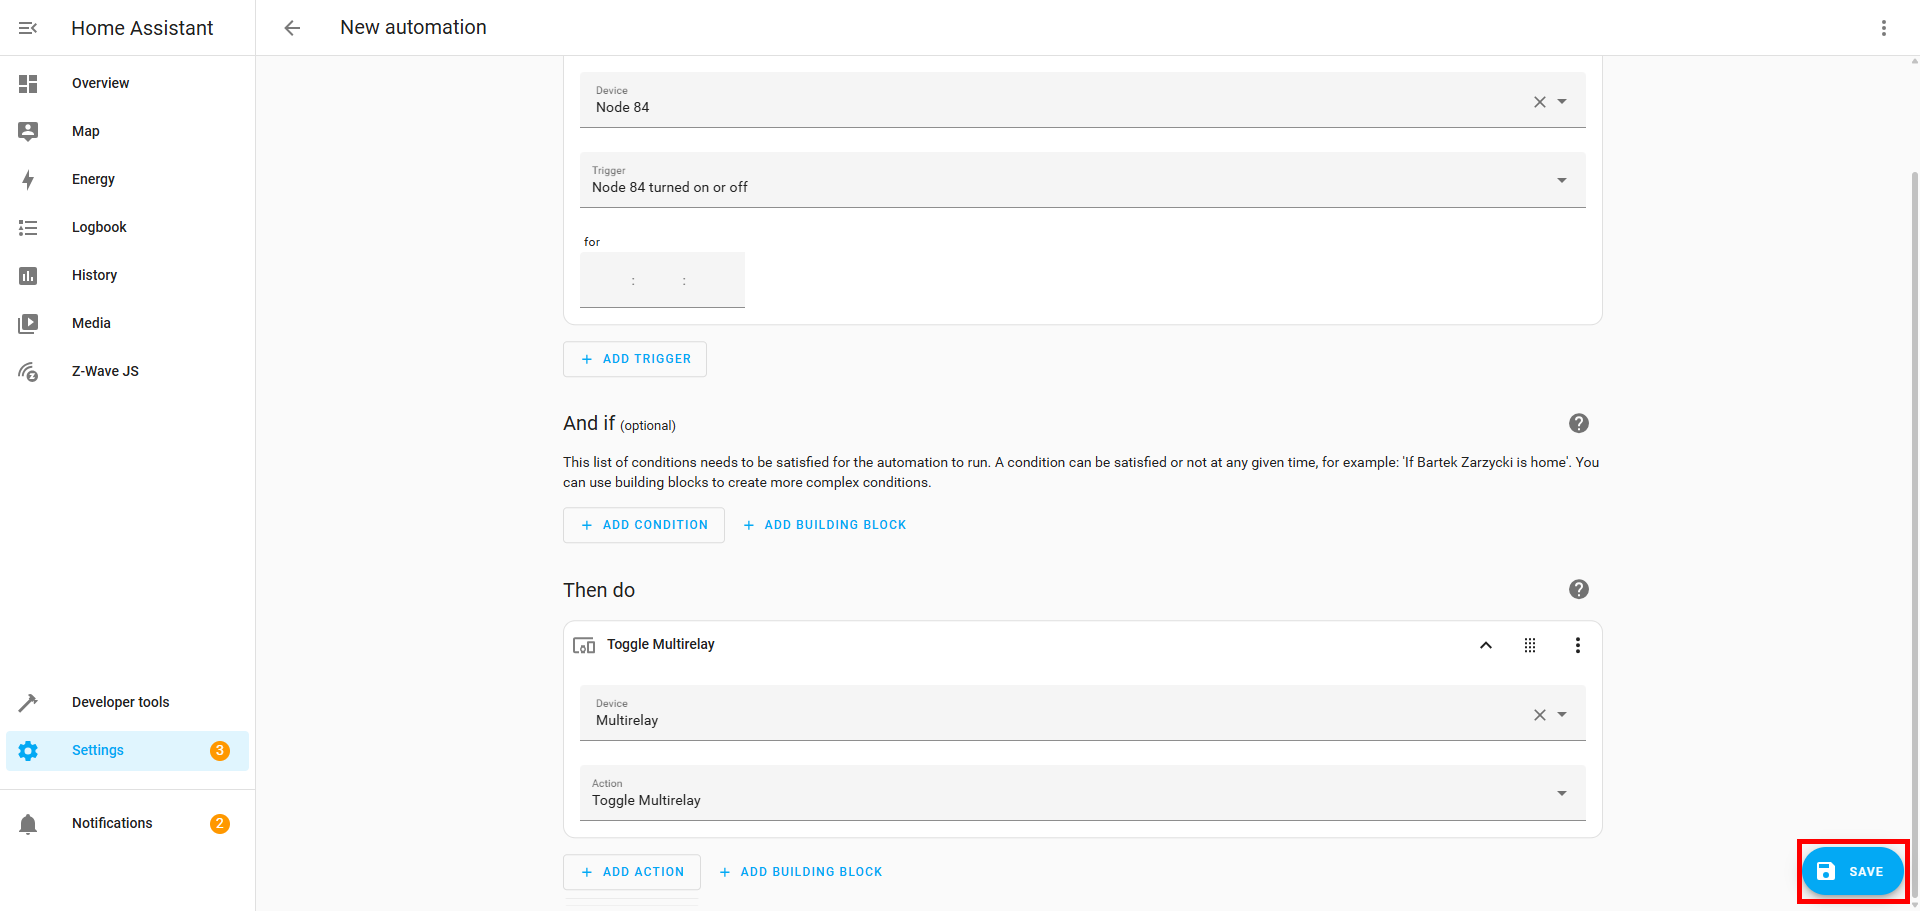
1. From the Device Info screen, select the + in Automations:

2. A box will pop up. Select use device as trigger:

3. Select your trigger option. Use 001 for remote button 1, 002 for remote button 2, 003 for remote button 3, 004 for remote button 4, and 005 for the main switch button:

4. Select any conditions, then select the action part of the scene by clicking + Add Action:

5. A pop up will display; select the action/then portion of the scene whether it's a device, light, etc.:

6. Choose the device for the action part of the scene:

7. Choose what you want the device to do. In this example, the button press on button 1 will toggle the state of the Multirelay:

8. Click Save.
Direct Association
The official Home Assistant Z-Wave add-on does not have association support at the moment; in order to use Direct Association you need to install the Z-Wave JS UI add-on, which supports direct association.
Direct association is a direct link established between two Z-Wave devices where one of them acts as the trigger and the other acts as the receiver of that trigger. For example, if you associate a Z-Wave light switch to a motion sensor, the light switch will turn on anytime motion is triggered, without the hub getting involved or without the need to set up an automation for it. In other words, one Z-Wave device sends a direct message to another Z-Wave device, bypassing the hub. These are usually very simple unconditional commands like "on/off" or "dim/increase brightness". The communication works one way without any feedback to the other device. The controlling device simply sends the command to the controlled device or devices associated in what we call "association group". The controlling device is not affected by the controlled device at all, even though there is a link established between the two, it only ever works in one direction.
Association Groups
The association groups supported by the ZEN32 can be found in the device manual, in the Advanced Settings document, and we've included them below as well:
Group 1: Lifeline to hub
Group 2: Main button (5) basic set (pressed only, doesn’t send anything when switch turned on via hub)
Group 3: Main button (5) multilevel (held)
Group 4: Small button #1 basic set (pressed)
Group 5: Small button #1 multilevel (held) > in sequence > held = increase brightness, release = stop level, held = decrease brightness, release = stop level
Group 6: Small button #2 basic set (pressed)
Group 7: Small button #2 multilevel (held) > in sequence > held = increase brightness, release = stop level, held = decrease brightness, release = stop level
Group 8: Small button #3 basic set (pressed)
Group 9: Small button #3 multilevel (held) > in sequence > held = increase brightness, release = stop level, held = decrease brightness, release = stop level
Group 10: Small button #4 basic set (pressed)
Group 11: Small button #4 multilevel (held) > in sequence > held = increase brightness, release = stop level, held = decrease brightness, release = stop level
Limitations and Considerations
Security Level: Before attempting association, double check that both devices are added with the exact same level of security; if one device is included with S2A and one is included with S0, the association will not be available.
Z-Wave Long Range: Please also note that Direct Association is not an option if the device is included via Z-Wave Long Range. ZWLR is device-to-hub direct communication; there are no repeaters and no mesh and the ZWLR devices do not communicate with each other, so direct association programming is not an option for devices included via ZWLR.
You can read more about the requirements, limitations, and recommendations for programming using Direct Association here.
Programming Direct Association via Z-Wave JS UI
If you have the Z-Wave JS UI add-on, you can manage the associations under each node, in the groups tab, as seen in the screenshot below. Under the ZEN32 node, expand the options, then go to groups and program each group according to the Association Group mapping shown above. We've included a programming example below using the ZEN77 triggering the ZEN04, but associations will be programmed the same for the ZEN32:
1. Click on the controlling device's row/tile. In the example below, the ZEN77 (DA test) will be the controlling device, triggering the ZEN04 (DA test2) on/off. You will click on the triggering/controlling device (ZEN77 in the example below):

2. Click on the Groups tab and then click Add:

3. Program the association according to the desired function via the group association (on/off control, dimmer control, etc) according to the Group Associations provided above.
Then select the device you want to associate with this controller. Below you'll see the Target Node is DA test2, which is the ZEN04 name from step 1 above. Finish by selecting Add again at the bottom of the window

4. The association will appear in the groups list if successful, as shown below:

How to Program the LED Indicators on Your ZEN32 Scene Controller in Home Assistant
Do you want the LED indicators on your ZEN32 to reflect the status of the device associated with each button?
One of the most common questions about the ZEN32—especially when using Direct Association—is why the LED indicators on the buttons don’t reflect the actual status of the devices they control. The key to understanding this lies in how the ZEN32 functions: think of it more like a remote control than a traditional switch. When you press a button on a remote to change the TV channel, you verify the channel by looking at the TV—not the remote. Similarly, the ZEN32 buttons simply send commands like “Button 2 pushed once” or “Button 4 pushed three times” to your hub. The hub then interprets that input and triggers automations or scenes based on your setup.
By default, LED indicators on the ZEN32 toggle on or off each time a button is pressed when using Direct Association, but they don’t inherently track the actual status of the device being controlled—especially if that device can be toggled from multiple sources. To keep the LED indicator in sync with a device’s real-time status, you need to create a separate automation in Home Assistant that adjusts the LED’s brightness and color based on the status of the controlled device. For example, “If the bedroom light is on, set parameter 5 to value 3 and parameter 10 to value 1” will illuminate the LED on Button 4 in blue.
Ultimately, the LED indicators can be fully customized and used independently as visual feedback tools—not just for toggling status, but also for notifications and advanced home logic cues.
We've included instructions below for programming the LED indicators on Home Assistant using Z-Wave JS UI based on the associated device status below.
JS Z-Wave UI added a service called "bulk_set_partial_config_parameters." This tool will allow you to set any parameter for a Z-Wave device in Zwave_JS.

In this case, bypassing the entity ID of the controller, and parameter 2, option 3 – the LED is now Always ON. The example below follows those settings with Parameter 7, option 3, to turn the indicator red.
Parameters that can be changed are anything available in the device configuration in ZwaveJS UI:

The Parameter numbers are the last number in the various settings above:
- For example, the LED Indicator for button 1 is 18-112-0-2, so the Parameter number is 2.
- You can find the available options in the dropdown menu (always on is value 3, for instance).
With these changes, you can specify the status of the LED indicators based on conditions in the home.
Video Tutorial
We're including a very helpful set-up video from the mostlychris YouTube channel. It's full of tips and best practice recommendations. Make sure to subscribe and send thanks in the comments if you enjoy the video!
Do you have more questions about programming the device? Feel free to reach out to us for answers!

