Installing the ZEN56 RGBW Dimmer in a 3 way setup allows you to control the same lighting load from more than one location. Because the ZEN56 is designed differently from a traditional mechanical dimmer, it does not use a standard 3 way switch configuration. Instead, there are two supported wiring methods depending on the type of switches you want to use and whether you can adjust device settings through your hub.
Using a momentary switch such as the ZAC99 is the recommended approach. In addition to allowing simple expansion to multiple control points, it requires no configuration changes on the dimmer and provides a more natural dimming experience at the wall. With a momentary switch, you can turn the lights on or off with a quick press and adjust brightness by holding the switch, giving you full control directly from the wall without relying on hub settings.
Wiring Tips
-
Always take clear, detailed "before" pictures prior to installing the ZEN56. Should you ever need to restore the original set-up, or reach out to us for help, we will need to verify the original wiring to ensure the installation is correct. Always use the correct screwdriver size for the switch terminals. Please verify you have the proper electrical tools for cutting, prepping, and stripping electrical wires. If you lack the necessary tools to correctly perform the installation or are unsure which tools to use or how, please hire an electrician to complete the installation for you. Please follow the National Electrical Code and your local safety regulations when performing the installation, including (but not limited to), choosing the correct gauge of jumper wires.
-
Power off. Please verify you have turned off the circuit power in the breaker panel before you start the installation.
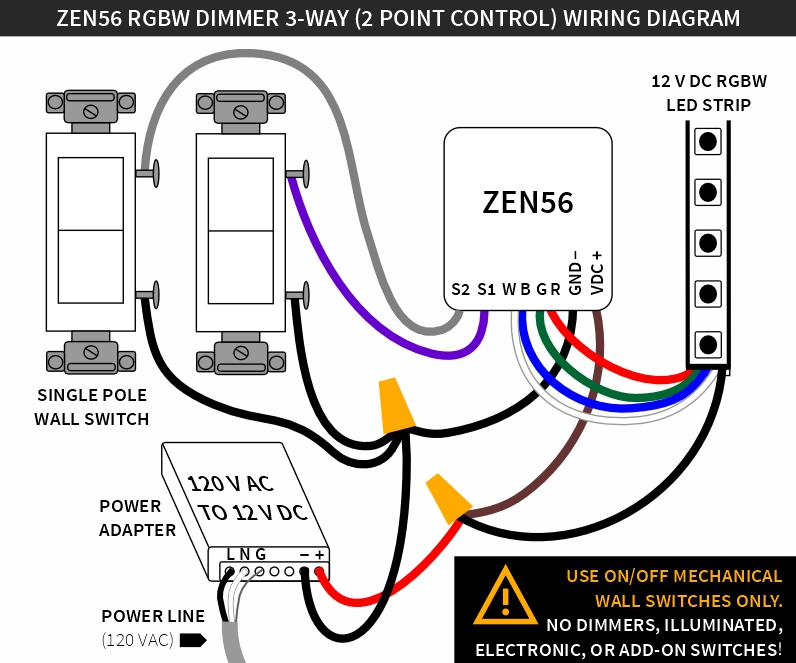
3-Way Diagram with Standard Switches
This option uses two standard single pole switches. In this configuration, the ZEN56 handles the dimming and control logic while the switches act as input triggers. This method requires changing specific parameters on the ZEN56 through your Z Wave hub, so it should only be used with systems that allow access to advanced device settings.
Important: You will need to change out any 3-way switches currently installed for basic single pole switches in each location.
Additionally, the following parameters must be configured:
- Parameter 2 (S1 switch type): set to value 4 (3-way switch)
- Parameter 3 (S2 switch type): set to value 4 (3-way switch)
- Parameter 6 (Enable S2 input): set to value 1 (enable S2 input)
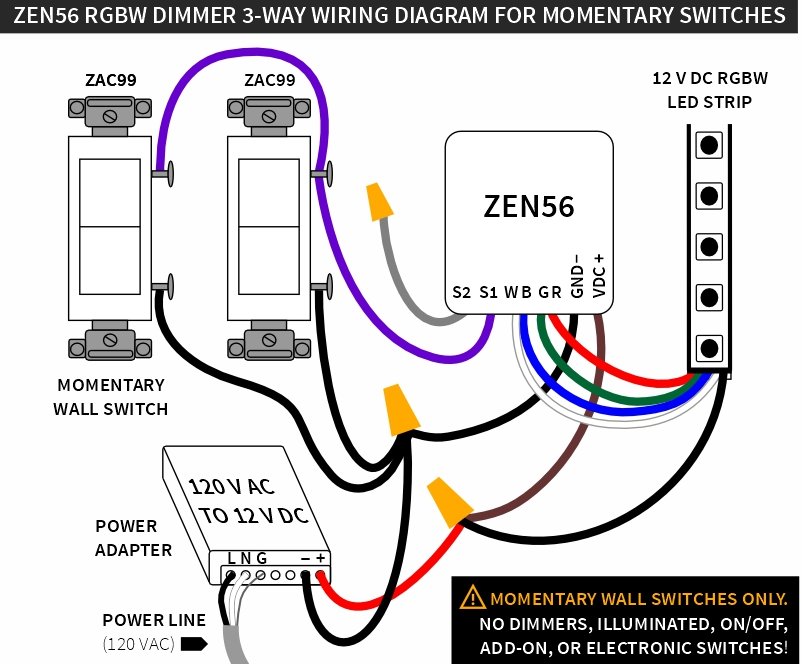
3-Way Diagram with Momentary Switches
This option uses momentary switches, like the ZAC99 Momentary Switch. This method does not require any parameter changes on the ZEN56 and works with hubs that may not expose device settings. Momentary switches are wired in series, which also means you can add more than two switches if needed, allowing control of the same lights from multiple locations.
This is the recommended option, as it provides on or off with a quick press and the ability to adjust brightness by holding the switch, giving you full control directly from the wall without relying on hub settings