
Looking for a Z-Wave doorbell solution? Look no further! The ZEN58 Low Voltage Relay can be connected to your doorbell and let you know when someone is at your door. Receive alerts directly to your smartphone when someone has rung your doorbell. Gain a sense of security knowing that you can monitor when people are approaching your home and even sync your ZEN58 to trigger other smart home devices, such as an outdoor camera or porch lighting.
Once the ZEN58 is wired at the chime, it should work out of the box with no special programming required since the device automatically detects the switch type. If you plan to use the ZEN58 to actively trigger the doorbell and not just monitor it, set the auto off timer to 1 second so the relay only closes briefly, similar to pressing the doorbell button.
INSTALLATION REQUIREMENTS
- The ZEN58 can only be installed at the mechanical chime location. This means the chime box must contain both a wire coming from the transformer and a wire coming from the doorbell button. If your wiring instead has all connections grouped at the transformer, the ZEN58 cannot be installed there and will not be compatible with that setup.
- Please also ensure the doorbell does not have a lighted push button; this type of button will not work with the ZEN58.
WIRE THE ZEN58 LOW VOLTAGE RELAY
WIRING TIPS: Always take clear, detailed "before" pictures prior to installing the ZEN58. Should you ever need to restore the original set-up, or reach out to us for help, we will need to verify the original wiring to ensure the installation is correct. Always use the correct screwdriver size for the ZEN58 terminals. Please verify you have the proper electrical tools for cutting, prepping, and stripping electrical wires. If you lack the necessary tools to correctly perform the installation or are unsure which tools to use or how, please hire an electrician to complete the installation for you. Please follow the National Electrical Code and your local safety regulations when performing the installation, including (but not limited to), choosing the correct gauge of jumper wires.
POWER OFF: Please verify you have turned off the circuit power in the breaker panel before you start the installation. Keep the ZEN58 removed from its power source while performing the installation.
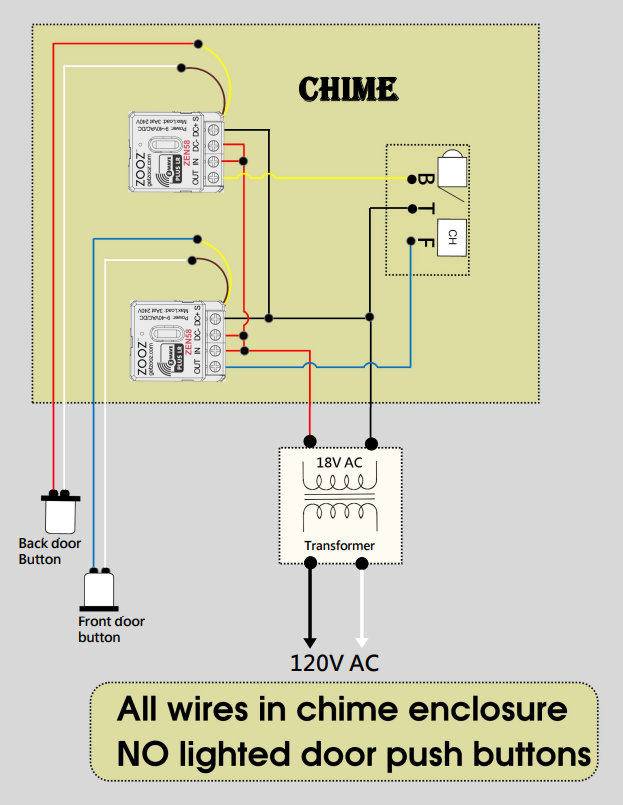
Wiring Configuration
All doorbell wiring is located inside the mechanical chime enclosure. This setup only works with non illuminated door push buttons.
Transformer Connection
-
One leg from the transformer connects to the chime common terminal marked T.
-
That same transformer leg is also connected to DC+ on both ZEN58 units.
-
The second transformer leg connects to DC− on the ZEN58 units.
-
This leg also provides the supply reference for the relay inputs as shown in the diagram.
Door Button Wiring
Each door button is wired to its own ZEN58. Both buttons must be non illuminated.
-
The front door button connects to the S input on the ZEN58 assigned to the FRONT chime terminal.
-
The back door button connects to the S input on the ZEN58 assigned to the REAR chime terminal.
ZEN58 Output Wiring to the Chime
-
Each ZEN58 OUT terminal connects to the matching chime strike terminal.
-
The ZEN58 for the front door connects OUT to the FRONT terminal on the chime.
-
The ZEN58 for the back door connects OUT to the REAR terminal on the chime.
-
The transformer common remains connected directly to the T terminal on the chime.
Behavior
When a door button is pressed, the corresponding ZEN58 detects the signal on its S input and closes its relay.
This briefly connects the transformer power through the ZEN58 OUT terminal to the selected chime terminal FRONT or REAR.
The chime rings normally.
When the press ends, the relay opens again.
Chime Terminal Reference
A standard mechanical chime includes three terminals:
-
T which is the transformer common
-
FRONT for the front door strike
-
REAR for the rear door strike
Each ZEN58 is wired in line with one strike terminal FRONT or REAR so the normal doorbell behavior is preserved while adding smart monitoring and control.
Please don't hesitate to reach out to us with any questions!

