
Integrating a wired leak sensor with the ZEN58 Low Voltage Relay provides a reliable way to monitor potential water leaks while maintaining complete control over your automation setup. The ZEN58 offers the same flexible functionality as the ZEN16 MultiRelay and ZEN17 Universal Relay, giving users the ability to separate the input from the output — ideal for systems that require signal isolation. By using the Notification Command Class, the dry contact input can act as an independent trigger for automations, allowing the relay to operate only when needed.
To prevent damage, always ensure your power source is within the 9-40 AC/DC range and observe polarity when using DC power. Depending on your setup, optional equipment such as 120VAC lights, low voltage sirens, or no additional load at all may be integrated.
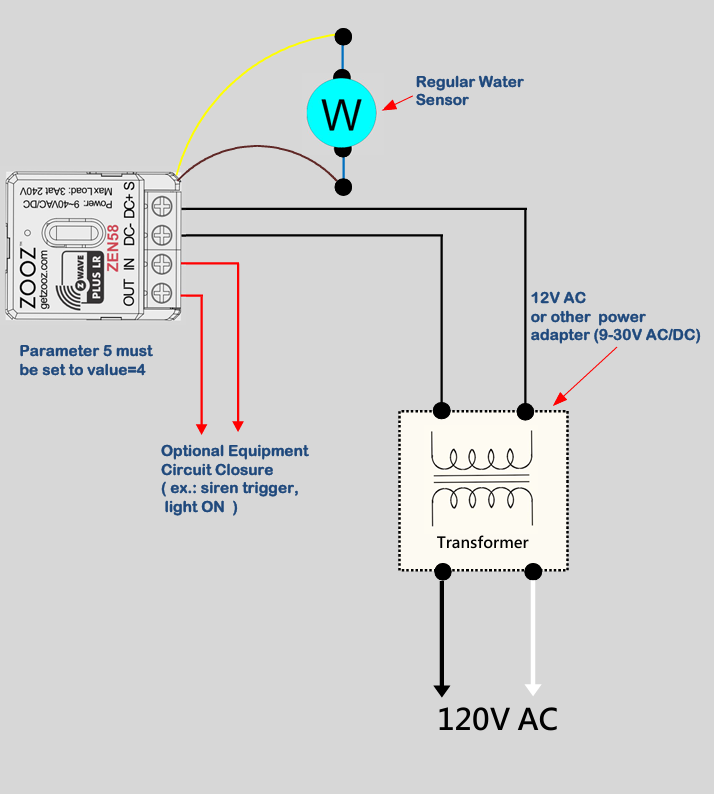
This guide will walk you through the steps to connect a wired leak sensor to the dry contact pigtails on the ZEN58, following the provided wiring diagram to ensure proper function and safety.
WIRE THE ZEN58 LOW VOLTAGE RELAY
WIRING TIPS: Please ensure you take "before" pictures prior to installing the ZEN58. In case you need to restore the original set-up, or reach out to us for input, we will need to verify the original wiring to ensure the installation is correct. Always use the correct screwdriver size for the terminal screws on your relay. Verify you have the correct electrical tools for cutting, prepping, and stripping electrical wires. If you lack the necessary tools to correctly perform the installation or are unsure which tools to use or how, please hire an electrician to complete the installation for you. Please follow the National Electrical Code and your local safety regulations when performing the installation.
- POWER OFF: Always ensure the circuit power is off in the breaker panel before you start. Keep the ZEN58 Relay unplugged from its power source while performing the installation.
- CONNECT THE WATER SENSOR: Connect the wired leak sensor to the dry contact pigtails on ZEN58 as showed in the wiring diagram below.
- CONNECT ANY OPTIONAL EQUIPMENT: Ryou can use the OUT and IN terminals to connect optionsal devices, such as 120VAC lights, low voltage siren, etc.
- POWER THE RELAY: Connect the ZEN58 to the 9–40 V AC or DC power supply. Please note that when using a DC power source, polarity must be observed — connect the positive (+) and negative (–) terminals correctly. When using an AC transformer, polarity does not apply since alternating current has no positive or negative terminalss.
- RESTORE POWER: Turn on the power at the breaker after you have ensured all connections are correct.
PROGRAM THE UNIVERSAL RELAY
You'll need to be able to access the advanced settings for the ZEN58 via your Z-Wave hub in order to program the device.
How to Access the Advanced Settings for the ZEN58 Low Voltage Relay on Home Assistant
How to Access the Advanced Settings for the ZEN58 Low Voltage Relay on HomeSeer
How to Access the Advanced Settings for the ZEN58 Low Voltage Relay on Hubitat
How to Access the Advanced Settings for the ZEN58 Low Voltage Relay on SmartThings
How to Access the Advanced Settings for the ZEN58 Low Voltage Relay on Z-Box
Set the value for Parameter 5 (Input Type) to value 4 (leak alarm / water sensor). Please note: you will need to exclude and reinclude the ZEN58 for the new child device to display in your hub interface.
Input Type
Parameter 5: Choose the wall switch or input type you want to connect to the relay. *Not all values are supported on all hubs. Please check the How to Access the Advanced Settings for My ZEN58 article for your hub for more information.
Values:
0 – automatic detection
1 – toggle switch (state changes whenever the switch is toggled)
2 – momentary push button
3 – toggle switch (light on when the switch is toggled up, light off when the switch is toggled down)
4 – leak alarm (water sensor);
5 – heat alarm
6 – motion alert
7 – open/close alert (door sensor)
8 – CO alarm
9 – CO2 alarm
10 – on/off report (dry contact switch/sensor) *scroll to the When to Use Parameter 5 Value 10 section below for more information on when to use this setting.
11 – garage door mode
12 – garage door mode for the relay (momentary contact) and door sensor type for the input (use with wired analog door/window sensors and garage gate openers)
Default: 0.
IMPORTANT: If you set this parameter to value 4-12, you’ll need to exclude and re-include the device (without changing any settings) so that a child device is created for the input of your choice!
Size: 1 byte dec

