
Ready to make your smart home even smarter? In this guide, we’ll show you how to connect your ZSE42 Leak Sensor to your Telus SmartHome+ system so you can keep an eye on every potential leak. You’ll also find quick tips to solve any connection hiccups along the way.
First, ensure you have an active SmartHome+ Automation subscription and have a SmartHome+ Hub.
Get the TELUS SmartHome+ App
Download the TELUS SmartHome+ app and then log in with your My TELUS credentials. You can download the TELUS SmartHome+ app on Apple App Store or Google Play Store.
Set up your TELUS SmartHome+ Hub
Follow the instructions on the TELUS SmartHome+ Hub set up page. If you have already done this, you can start adding your Z-Wave door and window sensors.
Inclusion Steps
-
Log in to the TELUS SmartHome+ app on your mobile device.
-
In the SmartHome+ app, select the + sign in the top right-hand corner of either your Home tab or Devices tab.
-
Select Device on the bottom sheet that appears.
-
Select Third-party devices from the device category list.
-
Select Z-Wave devices from the connection type list.
-
Select Water leak sensor from the product type list.
-
Scan the ZSE42 Leak Sensor's QR code. You'll find the code on the side or back of the packaging, on the device itself, or on some components inside the box. Ensure the QR code is in focus, well-lit and that there are no objects between your camera and the code.
-
Select the installation location. We recommend including your sensor to the Z-Wave network from the location you want to install it before you actually mount it on the door or window frame to ensure a good connection.
-
Open the sensor’s cover. Use the included round tool to gently twist the battery cover 90° to the left to open it. Insert the CR2450 battery with positive (+) side up, sliding it under the holding block.
Close the cover by twisting it 90° to the right. -
The LED light will start blinking for around 10 seconds once the sensor is powered.
-
Tap Device is ready button at the bottom of the screen. Your device is being added. This process may take up to 60 seconds.
-
After the device has been added, the app will prompt you to name your device. Enter the name you would like to give to your ZSE42 sensor.
-
Select Save in the top right-hand corner to save your changes.
ZSE42 Location & Installation Tips
The ZSE42 Z-Wave Range is up to 130 feet line of sight. The sensor can be installed indoors or outdoors; however, please ensure the sensor is in a protected location, as it should not be exposed to direct sun or rainfall.
Indoor Placement
1. We recommend including your sensor to the Z-Wave network from the location you want to install it.
2. Choose a spot in the area you would like to monitor for water leaks which will not be easily accessible to pets or children to avoid it being misplaced.
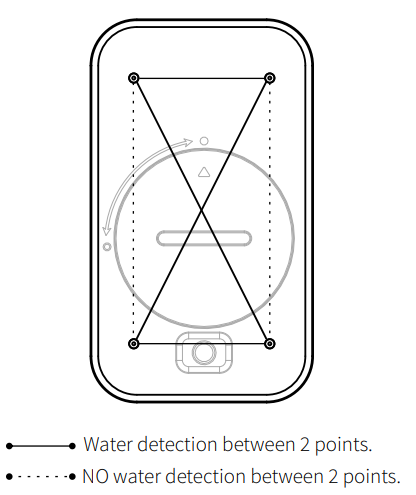
3. Simply place the sensor on a flat surface with the 4 probes touching the ground for best results. The sensor will detect a leak when water reaches any of the 2 probe pairs shown in the
below drawing.
4. Test the sensor by simulating a leak - it should start blinking and send a report to the hub when water is detected.
Outdoor Placement
This sensor is IP66 rated which means it is dust-tight and protected from heavy rainfall. We recommend placing the sensor under an eave or protective cover to prevent long exposure to direct sunlight when using it outdoors. Add the sensor to Z-Wave from the area where it will be installed for best connectivity results.
Manage Device Notifications
The ZSE42 Leak Sensor will send Wet and Dry reports to your Telus SmartHome+ app. These notifications can be managed after setting up the device or in the device settings page. To manage device notifications follow these steps:
-
In the app, navigate to the device page
-
Tap the three dots in the top-right hand corner
-
Select Device settings
-
Toggle device notifications as desired
-
Tap save to confirm your changes
Smart Notifications
Defaults are set to reduce non-critical alerts when Home and increase awareness when Away. Critical alerts always stay on. Home and away modes enable your notifications to respond based on whether someone is home or nobody is. You can switch "Home/Away" modes on your app home screen.
-
Away mode: Most sensors are active. You’ll get alerts if there’s activity or safety concerns while your home is empty.
-
Home mode: Some non-critical alerts are muted, so you get fewer interruptions while someone is home.
Having trouble including the sensor? Check out the troubleshooting steps here.
Questions? Please don't hesitate to reach out to our team for any device-related questions!

